Process states in “top”

This applies to FreeBSD, but is similar on Linux.

Both the top and ps utilities will tell you what a given process is doing, which is generally running on a CPU or waiting for something. However, the documentation doesn’t really tell you what these states mean. The man page for the ps utility suggests reading the system source code. (sys/proc.h).

In this post I’ll deal with the common process states in top, the STATE column in the screenshot below.
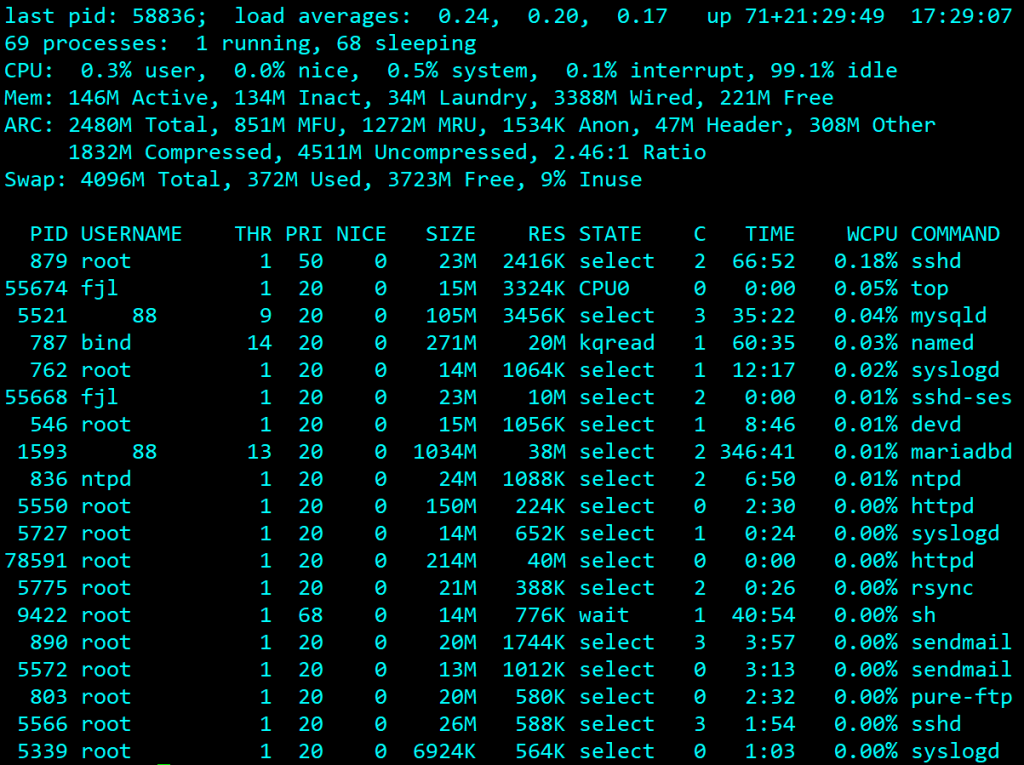
Other columns are:

  • PID is the process-ID
  • USERNAME the user that the process is running under.
  • THR isn’t documented but I’m very sure it’s the thread count – i.e. the number of threads used by a multi-threaded process.
  • PRI is the current process priority, and NICE is the nice value – an often misunderstood weighting used by the scheduler when determining the current priority. It’s outside the scope of this post.
  • SIZE and RES are the total size of the process and the amount of real RAM currently being used, given it may have allocated memory that hasn’t been used yet or may be paged out.
  • C is the CPU number to which the process is currently assigned
  • TIME is the amount of CPU time (in seconds) the process has used since it was started.
  • WCPU is the percentage CPU time currently being used by the process. Note that if you have four CPUs you can have 400% utilisation, as this applies to a single CPU.

And then, of course, there’s STATUS.

Officially, the status is one of one of “START”, “RUN”, “SLEEP”, “STOP”, “ZOMB”, “WAIT”, “LOCK” or the event being waited for. Run means it’s the currently running process, but SMP systems, RUN will be replaced by CPUn, where n is the CPU number doing the running. You’re unlikely to actually see the others as if a process isn’t running it’s going to be waiting for an event. But this is what they mean:

  • START. A very short-lived state when the process is in the process of being created.
  • SLEEP. The process can’t run as it’s waiting for an event (a character to be typed, a disk operation to complete and suchlike). In top you normally see the event being waited for, and these will be listed later.
  • WAIT. A parent process is waiting for a child process to finish, or more accurately, change state. This means the parent process has called wait(), waitpid(), wait4() or similar (see man 2 wait for a full list).
  • LOCK. The process is waiting until the kernel grants it a lock of some kind. You normally see the lock its waiting for prefixed with a ‘*’ rather than just plain “LOCK”.
  • CPUn. The process is currently running on CPU n on an SMP system.
  • RUN. The process is currently running on the single CPU.
  • STOP. The process has been stopped (suspended) by sending it a SIGSTOP (e.g. by typing Ctrl-Z). It may be restarted using SIGSTART (or running fg/bg).
  • ZOMB. A process has stopped but remains in memory as the parent hasn’t collected its exit status yet. This state doesn’t normally last long unless something’s wrong with the parent. You can’t kill a zombie process (the clue is in the name) so if you have one hanging around it will need a reboot to clear it – but don’t worry too much as it won’t be using much memory or other resources.

As I’ve said, you probably won’t see many of these as a process spends most of its time waiting for an event to happen, and in such cases, it shows the event in question. Common events are:

STATEMeaningReason or system call(s) involved
kqreadWaiting for an event to be posted to a kqueue descriptorkevent() extremely common in modern servers (e.g., nginx, OpenZFS-related daemons, libevent-based apps)
sigwaiWaiting for a signalsigwait(), sigwaitinfo(), sigtimedwait(); used by POSIX signal-handling threads
selectWaiting to read/write file.Legacy select() or pselect() calls, still common but being replaced with kqueue/poll.
nanslpSleeping with nanosecond precisionnanosleep() or clock_nanosleep() used for timers, short sleeps, Rate limiting.
lockfBlocked waiting on an advisory file record lock (byte-range lock)Database or similar waiting to lock part of a shared file. fcntl(…, F_SETLKW, …)
acceptWaiting for incoming TCP connectionClassic blocking accept loop; seen in prefork servers, simple daemons calling accept()
pauseSuspended waiting for any signalUsed by older software (including the shell!) calling pause()
waitWaiting for a child process to change state or end.wait(), waitpid() etc. Very common for parent processes (shells, init-like processes, daemons that fork children)
CPUnActively running on CPU number ‘n’It may mean that the process is in a state that it can be given to a CPU, or it may actually be running.
sbwaitWaiting for socket buffer space (send) or data arrival (receive)Socket I/O wait (e.g., TCP send buffer full or recv waiting)
biord
biow
Blocked on block I/O read / write (disk/network filesystem operations)Waiting for disk I/O completion
piperd
pipewr
Blocked reading or writing to a pipePipe I/O wait. Given pipes are now sockets you don’t see this on BSD any more (or at least, I don’t).
uwaitUserland wait Often related to threading / synchronization primitives like pthread_cond_wait() , sem_wait()

Installing K8S on RHEL or Oracle Linux 9

Installing Kubernetes is like nailing jelly to the ceiling. Here’s a script that actually does it, with comments so you know what’s going on.

Realistically, there’s no point in running Kubernetes on a single host – its for clustering. But just to prove it’s possible, this will do it. You can’t normally run a pod on a control node, but with one node you can remove the taint and do it anyway.

I had so many goes at doing this that I wrote this script so I could automate it until I got it right. You can run this script, or do it a command at a time (probably better) as this is only known to work on one particular configuration.

Because its very picky about which versions of various things you have, for the important stuff like containerd and the Kubernetes utilities itself I’ve ended up downloading them from github directly, and installing the various config files for systemd manually. At the start of the script I’m defining these version numbers so they are easy to tweak. One day I might rewrite using dnf based on information gleaned by using the direct approach.

To understand what’s going on, read the comments.

And as a bonus there’s a “hello” pod installed, running Nginx. You can pull its “welcome” page using curl.

#!/bin/bash

# This is a trick that will cause the script to exit immediately if
# any command returns a failure. Do not use this if you are running
# the commands by hand!

set -euo pipefail

# Set up the versions we're using. Trial and error has proved
# that these versions of various things play nice together
# on Oracle or RHEL 9.7

K8S_VERSION="v1.29.15"
CONTAINERD_VERSION="1.7.5"
APISERVER_IP=$(hostname -I | awk '{print $1}')
# Choose a published version (e.g., v1.32.0) as 1.29 isn't.
CRICTL_VERSION="v1.32.0"
CNI_VER="v1.1.1"   # stable version

# Prior to K8S 1.21 alpha, having swapping enabled was
# a disaster. Now it's supposed to work, but having a swap device
# on a VM is a bit crazy, so we'll disable it anyway.

echo "=== Disable swap ==="
swapoff -a
sed -i '/swap/d' /etc/fstab

# These packages are going to be needed and may not be installed
# already.

echo "=== Install dependencies ==="
dnf install -y curl tar wget socat conntrack iptables iproute-tc git

# Assuming firewalld is running it's going to stop us communicating.
# It's probably best to disable it completely with
#
# systemctl disable --now firewalld
#
# Getting K8S running can be tricky enough without a firewall getting
# in the way. However, we can open the ports we know about and hope
# for the best.

echo "=== Open firewall ports ==="
firewall-cmd --permanent --add-port=6443/tcp
firewall-cmd --permanent --add-port=10250/tcp
firewall-cmd --reload

# So now we're set up for installing Kubernetes. We'll start with
# our container managing choice, containerd. Note that it no longer
# requires Docker (or Podman). It handles the contaiers directly.
#
# To avoid problems with repos and "latest versions" I'm just
# downloading the versions I want from the github repos.

echo "=== Install containerd from GitHub ==="
curl -LO https://github.com/containerd/containerd/releases/download/v${CONTAINERD_VERSION}/\
containerd-${CONTAINERD_VERSION}-linux-amd64.tar.gz

tar Cxzvf /usr/local containerd-${CONTAINERD_VERSION}-linux-amd64.tar.gz
rm -f containerd-${CONTAINERD_VERSION}-linux-amd64.tar.gz

# This is the systemd service file, which we need to install manually.

cat <<EOF > /etc/systemd/system/containerd.service
[Unit]
Description=containerd container runtime
After=network.target

[Service]
ExecStart=/usr/local/bin/containerd
Restart=always
RestartSec=5
Delegate=yes
KillMode=process
OOMScoreAdjust=-999

[Install]
WantedBy=multi-user.target
EOF

# We need to create a config file for containerd manually too.
# This is done by getting it to dump its default config.

mkdir -p /etc/containerd
/usr/local/bin/containerd config default > /etc/containerd/config.toml

# We need to enable the systemd cgroup driver in containerd
# as it's disabled by default. Edit /etc/containerd/config.toml
# and find the line SystemdCgroup = false, and change it to true.
# (Scripted here using sed)

sed -i 's/SystemdCgroup = false/SystemdCgroup = true/' /etc/containerd/config.toml

# The next three commands will tell systemd something
# has changed so it will reload our new files. we
# can also kick containerd off now. I think the third
# systemctl is unnecessary as the --now when it is enabled
# should be enough.

systemctl daemon-reload
systemctl enable --now containerd
systemctl restart containerd

# So much for systemd, now wen need to do the same for Kubernetes.
# Installing it manually is very easy - just download the files into
# /usr/local/bin/ and make them executable.

echo "=== Install kubeadm/kubelet/kubectl from dl.k8s.io ==="
mkdir -p /usr/local/bin
cd /usr/local/bin
# Download kubeadm kubelet and kubectl
curl -LO https://dl.k8s.io/release/${K8S_VERSION}/bin/linux/amd64/kubeadm
curl -LO https://dl.k8s.io/release/${K8S_VERSION}/bin/linux/amd64/kubelet
curl -LO https://dl.k8s.io/release/${K8S_VERSION}/bin/linux/amd64/kubectl
chmod +x kubeadm kubelet kubectl

# Now we have to set up kubelet systemd service

cat <<EOF > /etc/systemd/system/kubelet.service

[Unit]
Description=Kubernetes Kubelet
After=network.target containerd.service
Requires=containerd.service

[Service]
ExecStart=/usr/local/bin/kubelet \
  --kubeconfig=/etc/kubernetes/kubelet.conf \
  --config=/var/lib/kubelet/config.yaml \
  --container-runtime-endpoint=unix:///run/containerd/containerd.sock \
  --cgroup-driver=systemd \
  --v=2
Restart=always
RestartSec=5

[Install]
WantedBy=multi-user.target
EOF

# As before, we'll tell systemd something has changed and kick
# off the kubelet service.

systemctl daemon-reload
systemctl enable --now kubelet
systemctl restart kubelet


# crictl is a lightweight command line utility for managing containers
# and suchlike, used by Kubernetes in preference to Docker or Podman.
# Again, we're going to download a specific version direct from github.
# Download and extract crictl as a tarball, unpack it in to /usr/local/bin
# and clean up afterwards.

curl -LO https://github.com/kubernetes-sigs/cri-tools/releases/download/\
${CRICTL_VERSION}/crictl-${CRICTL_VERSION}-linux-amd64.tar.gz

tar zxvf crictl-${CRICTL_VERSION}-linux-amd64.tar.gz -C /usr/local/bin
chmod +x /usr/local/bin/crictl
rm -f crictl-${CRICTL_VERSION}-linux-amd64.tar.gz

# Next we need to attend to the networking.
# We need to bridge two network interfaces
# using the br_netfilter kernel module and then
# enable port forwarding.

# This sets it up now, live.

modprobe br_netfilter
echo 1 > /proc/sys/net/bridge/bridge-nf-call-iptables
echo 1 > /proc/sys/net/ipv4/ip_forward

# This creates a sysctl file so it will be set on boot.
# I've added some support for IPv6. We can make it reload
# to make it live immediately using sysctl.

cat <<EOF > /etc/sysctl.d/99-kubernetes.conf
net.bridge.bridge-nf-call-iptables = 1
net.ipv4.ip_forward = 1
net.bridge.bridge-nf-call-ip6tables = 1
EOF

sysctl --system


# Some installs of RHEL don't have /usr/local/bin in the path all
# of the time, especially if you're switching user. This bit of
# script checks and adds it if necessary.
echo $PATH | grep /usr/local/bin || PATH=$PATH:/usr/local/bin

# Static pods like kube-apiserver don't need CNI, but kubelet
# requires the pause image to start sandbox pods.

echo "=== Get the pause image ==="

ctr images pull k8s.gcr.io/pause:3.10
# Check it's worked using grep. Note this script stops it it doesn't find it.
ctr images ls | grep pause

# kubeadm will pull the required images during init
# but we're going to pull them ahead of time. They can take
# a while and we want to make sure they're available. 

echo "=== Pull the k8s images ==="
kubeadm config images pull

# Finally, we initialise the Kubernetes cluster. Note we
# finessed our main IP address at the start. The pod network 
# is your choice. This step can take a while.

echo "=== Initialize Kubernetes cluster ==="
kubeadm init \
  --pod-network-cidr=10.244.0.0/16 \
  --cri-socket /run/containerd/containerd.sock \
  --apiserver-advertise-address=${APISERVER_IP}

# Assuming it initialised, you're probably good!
#
# If we're running K8S as the root user, which isn't always
# a good idea but for testing it's fine, we need to create about
# .kube directory for root's configuration files.
#
# We could instead export KUBECONFIG the one in /etc with:
#
# export KUBECONFIG=/etc/kubernetes/admin.conf
#

echo "=== Configure kubectl for root user ==="
mkdir -p /root/.kube
cp -f /etc/kubernetes/admin.conf /root/.kube/config
chmod 600 /root/.kube/config
export KUBECONFIG=/root/.kube/config

# Flannel is the last important thing we need configured. It's a CNI
# plugin for Kubernetes that provires the layer 3 (IP) networking.
# Here we're telling kubectl to download it direct from github as it's
# a bit long to embed in this script.

echo "=== Install Flannel CNI ==="
kubectl apply -f https://raw.githubusercontent.com/flannel-io/flannel/master/Documentation/kube-flannel.yml

# You may start off with the CNI plugins in /opt/cni/bin but they're
# probably gone by now. To be sure we'll download them from github.
# However, before you do this you can check /opt/cni/bin and it ought to container
# things like localhost as well as flannel.

mkdir -p /opt/cni/bin
curl -L https://github.com/containernetworking/plugins/releases/\
download/$CNI_VER/cni-plugins-linux-amd64-$CNI_VER.tgz | tar -xz -C /opt/cni/bin

# Right now we're running Kubernetes on a single node, which defeats
# the whole point but we're only testing at present. The snag is that
# Kubernetes needs a control node and worker nodes to run pods on, and you
# can't have a pod on the contoller. It's a bad idea. But we can force
# it to allow us anyway by removing the taint from it. A taint is a node
# property that tells the Kubernetes scheduler to "keep away", and is
# normally used to reserve a node for specific workloads. This include
# the control node, so if we remove the taint it will drop pods on
# itself anyway.

echo "=== Remove control-plane taint for single-node ==="
kubectl taint nodes --all node-role.kubernetes.io/control-plane-

# And to prove it's all working, we'll drop the nginx web server
# on a hello pod and expose http port 80 so we can talk to it.

echo "=== Deploy Hello World NodePort ==="
kubectl create deployment hello --image=nginx --replicas=1
kubectl expose deployment hello --type=NodePort --port=80

# This will verify that everything is running, although it may take a moment or
# three to start.

kubectl get svc

# This bit of shell scriptery extracts the node port visible
# when you run kubectl get svc and prints out the line necessary
# to allow you to access the http server using curl.

NODEPORT=$(kubectl get svc | grep hello | awk '{print $5}' | cut -d: -f2 | cut -d/ -f1)

if test -z "$NODEPORT"
then
    echo "It doesn't look like the hello pod is running."
else
    echo "To get the nginx hello page use curl $APISERVER_IP:$NODEPORT"
    echo "once it's had time to start"
fi


As a bonus, here’s a script to “clean up” after a bad attempt at kubeadm init. kumeadm reset doesn’t do enough!

#!/bin/sh

# Nuclear reset
# This code cleans up after a bad attempt at configuration (kubeadm init)

systemctl stop kubelet
systemctl stop containerd
systemctl disable kubelet
systemctl disable containerd

kubeadm reset -f
rm -rf /etc/kubernetes
rm -rf /var/lib/kubelet/*
rm -rf /var/lib/etcd
systemctl stop containerd
rm -rf /var/lib/containerd/*
echo Checking ports
ss -lntp | grep -E "6443|10250|10251|10252|10257|10258|10259"
# Line to automate kill, but leave it manual "| cut -d = -f 2 | cut -d , -f 1"
echo Anything come up? Please kill -9 the PID

Linux swap files

Last year I wrote a piece about swap file strategies in general (Unix/Linux), but on further investigation I have discovered Linux has a twist in the way it handles swap devices. On Unix there has never been any metadata written to a swap device – it’s just a sequence of blocks, and that’s what I’ve always told people. It turns out that with modern Linux, there is.

Before Linux will use a file or block device for swapping you need to use the mkswap command on it (there’s no Unix equivalent). The man page doesn’t exactly explain what it does as the low level, and I was curious. Unix hasn’t needed metadata on swap (or page) files from 1971 to the present day, so what is Linux doing differently?

Dumping a zeroed swap device before and after running mkswap on it revealed the following had been added:

00000000  00 00 00 00 00 00 00 00  00 00 00 00 00 00 00 00  |................|
*
00000400  01 00 00 00 ff ff 03 00  00 00 00 00 ad 40 e5 4b  |.............@.K|
00000410  87 1a 46 d2 b0 36 ee 60  6d 40 08 d1 00 00 00 00  |..F..6.`m@......|
00000420  00 00 00 00 00 00 00 00  00 00 00 00 00 00 00 00  |................|
*
00000ff0  00 00 00 00 00 00 53 57  41 50 53 50 41 43 45 32  |......SWAPSPACE2|
00001000  00 00 00 00 00 00 00 00  00 00 00 00 00 00 00 00  |................|
*
40000000

So it’s definitely doing something. As you can see the first 1K remains unchanged, which is presumably to avoid messing up partition tables and suchlike. There’s some binary data at 0x400 (1K if you don’t speak hex) and then right on the 4K boundary there’s what appears to be a signature, “SWAPSPACE2”.

Time to go digging into the source code (not so easy with a Linux, as it’s not normally present). It turns out that this is mapped by a union of two structures, and confirmed my suspisions:

union swap_header {
    struct {
        char reserved[PAGE_SIZE - 10];
        char magic[10];
    } magic;
    struct {
        char bootbits[1024];
        __u32 version;
        __u32 last_page;
        __u32 nr_badpages;
        __u32 padding[117];
        __u32 badpages[1];
    } info;
};

If you’re not clear with ‘C’ structures, this is basically saying the header is PAGE_SIZE long, with the last ten bytes being used as a signature (called “magic” – the SWAPSPACE2 in the dump). PAGE_SIZE is, logically, the size of the page the kernel is using for virtual memory, so the header occupies exactly one slot. It’s found in arch/x86/include/asm/page.h, and is the result of a shift calculation based on another tunable, PAGE_SHIFT and results in 4K on most systems but might be adjusted to suit the MMU on non-Intel platforms.

The second structure in the swap_header, which is overlaid on the first because it’s a union, skips the first 1K, calling it “bootbits”, which is fair enough. There might be a bootstrap loader or partition table there. In fact there may well be if the whole drive is being used for swap. It’s not necessary to put a header on a raw block device but I suspect some Linux tools like to see one.

Then comes the version number, which appears to always be ‘1’, and the address of the last page in the device in case the kernel doesn’t know. Finally there’s the size of bad page table. After padding it up to 0x600 there’s a bad page table, four bytes per entry, listing blocks on the page device that can’t be used (the apparent one entry array is a ‘C’ pointer trick). Since the introduction of IDE/SCSI drives around 1990, the disk drives themselves handle bad block mapping so this is only really relevant to ST506 type interfaces, which indicates it must have been in the design of Linux since the very beginning – and even then it would have been there for legacy drives.

There’s another twist I found in the code – the first sixteen bytes of the padding (0x40C to 0x41B) may contain a UUID (in binary, not ASCII) and 0x41C to 0x42B might contain a volume label if you set one using the -L option on mkswap (which is the source I looked at to find out what was going on).

If you try to run swapon on a device or file that doesn’t have this header it will bork. I had a look a the kernel, but I don’t think it cares – however I dare say some userland utilities do (including the aforementioned swapon).

Does this matter? Well it means you’re being short-changed by 4K of swap space on each device, but that’s hardly a big deal. The advantage is that utilities can detect and refuse to swap on a drive or partition you didn’t intend for swapping. The important thing is to remember to put the header on if you’re using Linux instead of Unix.

Linux Network Cheat Sheet

This is an rewrite of a much older post.

Some Linux distributions use a system called iproute2 to configure network interfaces, which is a more limited version of the standard Unix system based around ifconfig. The original Linux rewrite of ifconfig was less capable, so rather than bringing it up to Unix standards it was thrown out and a new one written. This lists common tasks that are possible of both, and their equivalents. NB. “eth0” is any network interface in the format your system uses.

TaskUnix standardLinux iproute2
List all interfacesifconfigip addr
List specific interfaceifconfig eth0ip addr show dev eth0
Bring up/down interfaceifconfig eht0 up (or down)ip link set eth0 up (or down)
Set IP addressifconfig eth0 192.168.1.10/24ip addr add 192.168.1.10/24 dev eth0
Configure using DHCPdhclient eth0dhclient eth0
Set IPv6 address
(syntax works with add/delete/alias etc)
ifconfig eth0 inet6 2001:db8::1 prefixlen 64
or
ifconfig eth0 inet6 2001:db8::1/64
ip -6 addr add 2001:db8::1/64 dev eth0
Add appletalk addressifconfig eth0 atalk 45.156ip --appletalk addr add 45.156 dev eth0
Set IP + netmask + broadcast (where defaults not suitable)ifconfig eth0 192.168.1.10 netmask 255.255.255.0 broadcast 192.168.1.255ip addr add 192.168.1.10/24 broadcast 192.168.1.255 dev eth0
Add alias (not explicit on Linux)ifconfig eth0 alias 192.168.1.2 netmask 255.255.255.0ip addr add 192.168.1.2/24 dev eth0
Delete specific IP (not possible on old Linux)ifconfig eth0 delete 192.168.1.2ip addr del 192.168.1.2/24 dev eth0
Rename interfaceifconfig eht0 name wan1ip link set eth0 down
ip link set eth0 name wan1
ip link set wan1 up
Show routing tablenetstat -rnip route
Add default routeroute add default 192.168.1.1ip route add default via 192.168.1.1
Delete default routeroute delete default 192.168.1.1ip route del default via 192.168.1.1
Show DNS serverscat /etc/resolv.confresolvectl status
Add DNS serverEdit /etc/resolv.conf:
nameserver 8.8.8.8
resolvectl dns eth0 8.8.8.8
Delete all DNS serversEdit /etc/resolv.confresolvectl dns eth0 ""
Set domain search orderEdit /etc/resolv.conf:
search example.com local.example.com
resolvectl domain eth0 example.com local.example.com
Show listening socketsnetstat -anss -tulnp
Show interface statusnetstat -iip -s link
Set mtuifconfig eth0 mtu 9000ip link set dev eth0 mtu 9000
View ARP cachearp -aip neigh show
Delete ARP entryarp -d 192.168.1.65ip neigh del 192.168.1.65 dev eth0
Delete ARP cachearp -d -aip neigh flush all

Notes

Old Linux ifconfig couldn’t remove a specific IP address but could remove them all using ifconfig eth0 0.0.0.0. You can get the same effect on iproute2 using “ip addr flush dev eth0”. Unix doesn’t have a command that’s quite so destructive.

If you add an alias address on the same subnet as an existing IP address, give it a netmask of /32.

Old Linux produced a routing table using route -n (not -rn) and you’d need to use “gw” when adding or deleting one (e.g. route add default gw 192.168.1.1)

On Solaris you need to add a -p between “route” and “add” – e.g. route -p add default 192.168.1.1

Most versions of ifconfig on Unix systems accept CIDR notation as an alternative to specifying “netmask 255.255.255.255” – for example “192.168.1.1/24

The ip command will usually infer which are IPv4 and IPv6 addresses but it can be made explicit using “ip -4” or “ip -6”. Likewise ifconfig normally doesn’t require “inet” or “inet6” to figure out which kind of IP address you’re giving it. -6 and inet6 have been used above to be 100% explicit. Linux supports fewer interface types than Unix.

It is not possible to delete or edit a single DNS server using the linux ip system, but you can delete them all and add back the ones you want.

On Linux, ip can only configure interfaces for IPv4 and IPv6 (i.e. it won’t support AppleTalk, ATM, Token Ring, or IPX etc.).

Making changes persist through boot

To configure an interface on boot on BSD use sysrc ifconfig_eth0="DHCP", for a DHCP address or edit rc.conf similarly. For a static address use ifconfig_bge0="192.168.1.123/24” and defaultrouter=”192.168.1.1” and add the nameservers to /etc/resolv.conf with a line like “nameserver 192.168.1.2” For Linux it’s much more complicated using other files or databases.

Debian/Ubuntu older versions

edit /etc/network/interfaces:

auto eth0
iface eth0 inet dhcp
For static address use:
auto eth0
iface eth0 inet static
address 192.168.1.123/24
gateway 192.168.1.1
dns-nameservers 192.168.1.2 192.168.1.3

Ubuntu with Netplan

edit /etc/netplan/01-netcfg.yaml (or similar):

network:
  version: 2
  renderer: networkd
  ethernets:
    eth0:
      dhcp4: true

For static address use:

network:
  version: 2
  renderer: networkd
  ethernets:
    eth0:
      dhcp4: false
      addresses: [192.168.1.123/24]
      gateway4: 192.168.1.1
      nameservers:
        addresses: [192.168.1.2, 192.168.1.3]

Red Hat/CentOS/Fedora (using network-scripts, older versions):

Edit /etc/sysconfig/network-scripts/ifcfg-eth0:

DEVICE=eth0
BOOTPROTO=dhcp
ONBOOT=yes

For static address use:

DEVICE=eth0
BOOTPROTO=static
ONBOOT=yes
IPADDR=192.168.1.123
PREFIX=24
GATEWAY=192.168.1.1
DNS1=192.168.1.2
DNS2=192.168.1.3

Systems with NetworkManager

(e.g., Fedora, Ubuntu desktop), try ip first but if you have to, use nmcli:

sudo nmcli con mod "Wired connection 1" ipv4.method auto
sudo nmcli con up "Wired connection 1"

For static address use:

sudo nmcli con mod "Wired connection 1" ipv4.method manual ipv4.addresses 192.168.1.123/24 ipv4.gateway 192.168.1.1 ipv4.dns "192.168.1.2 192.168.1.3"
sudo nmcli con up "Wired connection 1"

Replace “Wired connection 1” with your connection name (list with “nmcli con show”, get lots of stuff to tweak with “nmcli con show eth0”. You may also use the name of the ethernet interface when you find it.

Systems with systemd-networkd:

Create or edit /etc/systemd/network/20-wired.network:

[Match]
Name=eth0

[Network]
DHCP=yes

For static address use:

[Match]

Name=eth0

[Network]
Address=192.168.1.123/24
Gateway=192.168.1.1
DNS=192.168.1.2
DNS=192.168.1.3

ssh login fun on Ubuntu VM

Won’t use ed25519

I’ve written about setting up ssh logins many times in the past. It’s something I do all the time. But I came across an interesting situation trying to ssh between two adjacent Ubuntu VMs. Ubuntu 22.04.1 LTS, to be exact. Not exactly the latest release, which makes ssh certificate problems more exciting.

So use ssh-keygen -t ed25519 to create a key pair. The snappily named ed25519 is everyone’s favourite cypher right now, and going between two identical Ubuntu installations compatibility is assured, right? Wrong!

I copied the public key into ~/.ssh/authorized_keys using the PuTTY method (cut/paste between windows) and tried an ssh login. It still asked me for my password.

I set the security on the file, although authorized_keys can just as well be world readable – it contains public keys after all. Still no dice.

Here’s a tip – if ssh isn’t playing nice run it in debug mode. Unlike other software, it’s really simple – just use the -v option. Use it multiple times (-vvv) to get a reasonable level of debug output.

$ ssh -vvv user@otherhost
<snip>
debug3: authmethod_is_enabled publickey
debug1: Next authentication method: publickey
debug1: Offering public key: /home/user1/.ssh/id_rsa RSA SHA256:oOgKcEHVqRgQqZXh5E2++iJUnacbXHDzLsnSHsngNpw
debug3: send packet: type 50
debug2: we sent a publickey packet, wait for reply
debug3: receive packet: type 51
debug1: Authentications that can continue: publickey,password
debug1: Offering public key: /home/user1/.ssh/id_dsa DSA SHA256:7jTWaHnN1cjNAnqD4bOZL9E/3nYMbioPgSimRsgAwuk
debug3: send packet: type 50
debug2: we sent a publickey packet, wait for reply
debug3: receive packet: type 51
debug1: Authentications that can continue: publickey,password
debug1: Trying private key: /home/user1/.ssh/id_ecdsa_sk
debug3: no such identity: /home/user1/.ssh/id_ecdsa_sk: No such file or directory
debug1: Trying private key: /home/user1/.ssh/id_ed25519_sk
debug3: no such identity: /home/user1/.ssh/id_ed25519_sk: No such file or directory
debug1: Trying private key: /home/user1/.ssh/id_xmss
debug3: no such identity: /home/user1/.ssh/id_xmss: No such file or directory
debug2: we did not send a packet, disable method
debug3: authmethod_lookup password
debug3: remaining preferred: ,password
debug3: authmethod_is_enabled password
debug1: Next authentication method: password
user@otherhost's password: ???

What’s going on here then? It’s not even trying the key (id_ed25519) – it’s trying one with the _sk suffix instead. Apparently it’ll use a XMSS certificate, nice! Authentication that works after the quantum apocalypse. Unfortunately ssh-keygen didn’t know about it, so no dice. Okay, if ed25519_sk is preferred to plain old ed25519, let’s make one:

$ ssh-keygen -t ed25519_sk
unknown key type ed25519_sk

Hmm. User-hostile software. With a bit of thought it’d list the ones it does know about when this happens, but you can trick it into telling you by typing “ssh-keygen -t” (or some other command syntax error). This will output a somewhat helpful summary that will include valid options for -t type.

$ ssh-keygen -t
option requires an argument -- t
usage: ssh-keygen [-q] [-a rounds] [-b bits] [-C comment] [-f output_keyfile]
                  [-m format] [-N new_passphrase] [-O option]
                  [-t dsa | ecdsa | ecdsa-sk | ed25519 | ed25519-sk | rsa]
                  [-w provider] [-Z cipher]

It turns out it uses a hyphen instead of an underscore, so try it again.

$ ssh-keygen -t ed25519-sk
Generating public/private ed25519-sk key pair.
You may need to touch your authenticator to authorize key generation.
Key enrollment failed: device not found

Eh? Device not found? What is a -sk key anyway? It sounds like a hardware key of some kind going by the error message, which is clearly not appropriate for a VM. Googling didn’t help, so I asked another member of the OS/2 Drinking club that evening and he thought it was indeed a FIDO-related, or at least some kind of discoverable key requiring a hardware authenticator such as YubiKey.
Meanwhile what to do? Trying to edit /etc/ssh/ssh_config to make it offer a standard ed25519 key defeated me. I have a suspicion that Ubuntu drops them from the list if a FIDO hardware is available, and it clearly thought it was. Adding explicitly for all hosts didn’t work:

Host *
        IdentitiesOnly yes
        IdentityFile ~/.ssh/id_rsa
        IdentityFile ~/.ssh/id_dsa
        IdentityFile ~/.ssh/id_ecdsa
        IdentityFile ~/.ssh/id_ecdsa_sk
        IdentityFile ~/.ssh/id_ed25519
        IdentityFile ~/.ssh/id_ed25519_sk

It may be possible to force it using a user’s config file, but using -i to force an identity failed – it just reverted to the keys it wanted to use.

I gave up fighting with it and switched to old trusty RSA. On some systems (like BSD) you’ll need to add it to /etc/ssh/sshd_config as it’s too 1970’s for some people to abide. But Ubuntu was happy with it out of the box, and it’s still the default keytype for ssh-keygen.

PubkeyAcceptedAlgorithms +ssh-rsa
HostKeyAlgorithms +ssh-rsa

There’s a principle on cryptography that a code is either broken or unbroken, and no one has broken RSA yet in spite of theories that it might be possible (and anyway, it’s too old, grandad!) And in this case, Ubuntu seems to have shot itself in the foot forcing you to use RSA anyway. Or DSA, which is actually broken. Which seems appropriate in the circumstances.

FreeBSD/Linux as Fibre Broadband router Part 3

In parts one and two I covered making the PPP connection, firewall and the DHCP server. This just leaves DNS.

Unbound

FreeBSD has stopped providing a proper DNS server (BIND – the Berkeley Internet Name Daemon) in the base system, replacing it with “unbound”. This might be all you need if you just want to pass DNS queries through to elsewhere and have them cached. It will even allow you to configure your local name server for hosts on the LAN.

To kick off unbound once run “service local_unbound onestart“. This will clobber your /etc/resolv.conf file but it keeps a backup – note well where it’s put it! Probably /var/backups/resolv.conf.20260103.113619 (where the suffix is the date and a random number)

For some strange reason (possibly Linux related) the configuration files for unbound are stored in /var/unbound – notably unbound.conf. By default it will only resolve addresses for localhost, so you’ll need to do a bit of tweaking. Assume your LAN is 192.168.1.0/24 and this host (the gateway/router) is on 192.168.1.2 as per the earlier articles. Add the lines to the server section so it becomes:

server:
        username: unbound
        directory: /var/unbound
        chroot: /var/unbound
        pidfile: /var/run/local_unbound.pid
        auto-trust-anchor-file: /var/unbound/root.key

        interface: 192.168.1.2
        interface: 127.0.0.1
        access-control: 127.0.0.0/8 allow
        access-control: 192.168.1.0/24 allow

        # Paranoid blocking of queries from elsewhere
        access-control: 0.0.0.0/0 refuse
        access-control: ::0/0 refuse

There is a warning at the top of the file that it was auto-generated but it’s safe to edit manually in this case. The interface lines are, as you might expect, the explicit interfaces to listen on. The access-control lines are vital, as listening on an interface doesn’t mean it will respond to queries on that subnet. The paranoid blocking access-control lines are probably redundant unless you make a slip-up in configuring something somewhere else and a query slips in through the back door.

Once configured you can now use 192.168.1.2 as your LAN’s DNS resolver by setting it isc-dhcpd to issue it. A add local_unbound_enable="YES" to your /etc/rc.conf file to have it load on boot.

BIND

Unbound is a lightweight local DNS resolver, but you might want full DNS. I know I do. Therefore you’ll need to install BIND (aka named).

We’re actually looking for BIND9, so search packages for the version you one. This will currently be bind918, bind920 or bind9-devel. Personally I’ll leave someone else to play with the latest version and go for the middle (bind9 version 20).

pkg install bind920

You’ll then need to generate a key to control it using the rndc utility (more on that later)

rndc-confgen -a

Next we’ll need to edit some configuration files:

cd /usr/local/etc/namedb

Here you should find named.conf, which is identical to named.conf.sample in case it’s missing or you break it. The changes are minor.

Around line 20 there’s the listen-on option. Set this to:

listen-on { 127.0.0.1; 192.168.1.2;};

Again, this assumes that 192.168.1.2 is this machine. That’s all you need to do it you want it to provide services to the LAN. While we’re in the options section change the zone file format from modern binary to text. Binary is quicker for massive multi-zone DNS servers, but text is traditional and more convenient otherwise.

masterfile-format text;

If you’re going to do DNS properly you need to configure the local domain. At the the end of the file add the following as appropriate. In this series we’re assuming your domain is example.com and this particular local site is called mysite – i.e. mysite.example.com. All hosts on this site will therefore be named as jim.mysite.example.com, printer.mysite.example.com and so on.

zone "mysite.example.com"
{
        type primary;
        file "/usr/local/etc/namedb/primary/mysite.example.com";
};

zone "1.168.192.in-addr.arpa"
{
        type primary;
        file "/usr/local/etc/namedb/primary/1.168.192.in-addr.arpa";
};

The first file is the zone file, mapping hostnames on to IP addresses. The second is the reverse lookup file. They will look something like this:

; mysite.example.com
;
$TTL 86400      ; 1 day
mysite.example.com        IN SOA  ns0.mysite.example.com. hostmaster.example.com. (
                                2006011238 ; serial
                                18000      ; refresh (5 hours)
                                900        ; retry (15 minutes)
                                604800     ; expire (1 week)
                                36000      ; minimum (10 hours)
                                )
@                       NS      ns0.mysite.example.com.

adderview1              A       192.168.1.204
c5750                   A       192.168.1.201
canoninkjet             A       192.168.1.202
dlinkswitch             A       192.168.1.5
gateway                 A       192.168.1.2
eap245                  A       192.168.1.6
eap265                  A       192.168.1.8
fred-pc                 A       192.168.1.101
ns0                     CNAME       gateway

This is the zone file. I’m not going to explain everything about it here, just that this is a working example and the main points about it.

The first lines, starting with a ‘;’ are comments.

Next comes $TTL, which sets the default time-to-live for everything that doesn’t specify differently, and is basically the number of seconds that systems are supposed to cache the result of a lookup. You might want to reduce this to something like 30 seconds if you’re experimenting. You must specify the default TTL first thing in the file.

Then comes the SOA (Start of Authority) for the domain. It’s specifying the main name server (ns0.mysite.example.com) and the email address of the DNS administrator. However, as ‘@’ has a special meaning in zone files it’s replaced by a dot – so it really reads hostmaster@mysite.example.com. I’ve never figured out how you can have an email address with a dot in the name.

The other values are commented – just use the defaults I’ve given or look them up and tweak them. The only important one is the first number – the serial. This is used to identify which is the newest version of the zone file when it comes to replication, and the important rule is that when you update the master zone file you need to increment it. There’s a convention that you number them YYYYMMDDxx where xx allows for 100 revisions within the day. But it’s only a convention. If you only have one name server, as here, then it’s not important as it’s not replicating.

Next we define the name servers for the domain with NS records. We’ve only got one, so we only have one NS record. The @ is a macro for the current “origin” – i.e. mysite.example.com.

Note well the . on the end of names. This means start at the root – it’s important. Some web browsers allow you to omit it in URLs, and guess you always mean to start at the root – but DNS doesn’t!

Then come the A or Address records. They’re pretty self explanaitory. Because the “origin” is set as mysite.example.com the first line effectively reads:

adderview1.mysite.example.com A 192.168.1.204

This means that if someone looks up adderview1.mysite.example.com they get the IP address 192.168.1.204. Simple! You can have an AAAA record that gives the IPv6 address, but I won’t cover that here.

The last line is line an A record but is a CNAME, which is defining an alias. ns0 is aliased to gateway, which ultimately ends up as being 192.168.1.2 – i.e. the name of our router/DNS server. There is nothing stopping you from having multiple A records pointing to the same IP address – and in some ways it’s better to use an absolute address. It comes down to how you want to manage things, and my desire to get a CNAME example in here somewhere.

The corresponding reverse lookup file goes like this:

; 1.168.192.in-addr.arpa
;
$TTL 86400      ; 1 day
@        IN SOA  ns0.mysite.example.com. hostmaster.example.com. (
                                2006011231 ; serial
                                18000      ; refresh (5 hours)
                                900        ; retry (15 minutes)
                                604800     ; expire (1 week)
                                36000      ; minimum (10 hours)
                                )
@       IN NS      ns0.mysite.example.com.

2       PTR gateway.mysite.example.com.
6       PTR eap245.mysite.example.com.
8       PTR eap265.mysite.example.com.
101     PTR fred-pc.mysite.example.com.
201     PTR c5750m.mysite.example.com.
202     PTR canoninkjet.mysite.example.com.
204     PTR adderview1.mysite.example.com.

As you can see, it’s pretty much the same until you get to the PTR records. These are like A records but go in reverse. In case you’re wondering about the name, it’s important. Note it’s the first three bytes of the subnet but backwards. The last byte is the first part of the PTR line, and the last part is the FQDN to be returned if you do a reverse lookup on the IPv4 address.

Therefore, if you reverse lookup 192.168.1.101 it will look in 1.168.192.in-addr.arpa for a PTR record with 101 as the key and return fred-pc.mysite.example.com.
This all goes back to the history of the Internet, or more precisely, it’s precursor caller ARPAnet. The .arpa TLD was supposed to be temporary during the transition, but it stuck around. Just do it the way I’ve said o or fall flat on your face.

You can have a reverse lookup for IPv6 using a ip6.arpa file, but I’m not going to cover that this time.

Once you’ve made all these changes and set up your zone file, just kick it off with “service named start” (or onestart). To make it start on boot add named_enable=”yes” to /etc/rc.conf

Debugging

You can test it’s working with “host gateway.mysite.example.com 127.0.0.1” and “host gateway.mysite.example.com 192.168.1.2” – both should return 192.168.1.2.

Error messages can be found in /var/log/messages – however they’re not always that revealing! Fortunately BIND comes with some useful checking tools, such a named-checkzone.

named-checkzone mysite.example.com /usr/local/etc/namedb/primary/mysite.example.com

This sanity checks the zone file (second argument) is a proper zone file for the domain name specified in the first argument. We’ve called the file after the domain, which can be confusing but has many advantages in other situations.

You can also check the reverse lookup file in the same way:

named-checkzone 1.168.192.in-addr.arpa /usr/local/etc/namedb/primary/1.168.192.in-addr.arpa

It’ll either come up with warnings or errors, or say it would have been loaded with an OK message.

Next Stage

In Part 2 I explained how to set up the OpenBSD DHCP daemon and here I’ve explained unbound as well as BIND. But for redundancy, the full ISC DHCP Daemon and BIND are necessary as they are able to replicate so one server can carry on if the other fails. That’s the next installment.

Blocking script kiddies with PF

OpenBSD’s PF firewall is brilliant. Not only is it easy to configure with a straightforward syntax, but it’s easy to control on-the-fly.

Supposing we had a script that scanned through log files and picked up the IP address of someone trying random passwords to log in. It’s easy enough to write one. Or we noticed someone trying it while logged in. How can we block them quickly and easily without changing /etc/pf.conf? The answer is a pf table.

You will need to edit pf.conf to declare the table, thus:

# Table to hold abusive IPs
table <abuse> persist

“abuse” is the name of the table, and the <> are important! persist tells pf you want to keep the table even if it’s empty. It DOES NOT persist the table through reboots, or even restarts of the pf service. You can dump and reload the table if you want to, but you probably don’t in this use case.

Next you need to add a line to pf.conf to blacklist anything in this table:

# Block traffic from any IP in the abuse table
block in quick from <abuse> to any

Make sure you add this in the appropriate place in the file (near or at the end).

And that’s it.

To add an IP address (example 1.2.3.4) to the abuse table you need the following:

pfctl -t abuse -T add 1.2.3.4

To list the table use:

pfctl -t abuse -T show

To delete entries or the whole table use one of the following (flush deletes all):

pfctl -t abuse -T delete 1.2.3.4
pfctl -t abuse -T flush

Now I prefer to use a clean interface, and on all systems I implement a “blackhole” command, that takes any number of miscreant IP addresses and blocks them using whatever firewall is available. It’s designed to be used by other scripts as well as on the command line, and allows for a whitelist so you don’t accidentally block yourself! It also logs additions.

#!/bin/sh

/sbin/pfctl -sTables | /usr/bin/grep '^abuse$' >/dev/null || { echo "pf.conf must define an abuse table" >&2 ; exit 1 ; }

whitelistip="44.0 88.12 66.6" # Class B networks that shouldn't be blacklisted

for nasty in "$@"
do
        echo "$nasty" | /usr/bin/grep -E '^[0-9]+\.[0-9]+\.[0-9]+\.[0-9]+$' >/dev/null || { echo "$nasty is not valid IPv4 address" >&2 ; continue ; }

        classb=$(echo "$nasty" | cut -d . -f 1-2)

        case " $whitelistip " in
                *" $classb "*)
                echo "Whitelisted Class B $nasty"
                continue
                ;;
        esac

        if /sbin/pfctl -t abuse -T add "$nasty"
        then
                echo Added new entry $nasty
                echo "$(date "+%b %e %H:%M:%S") Added $nasty" >>/var/log/blackhole
        fi
done

That’s all there is two it. Obviously my made-up whitelist should be set to something relevant to you.

So how do you feed this blackhole script automatically? It’s up to you, but here are a few examples:

/usr/bin/grep "checkpass failed" /var/log/maillog | /usr/bin/cut -d [ -f3 | /usr/bin/cut -f1 -d ] | /usr/bin/sort -u

This goes through mail log and produces a list of IP addresses where people have used the wrong password to sendmail

/usr/bin/grep "auth failed" /var/log/maillog | /usr/bin/cut -d , -f 4 | /usr/bin/cut -c 6- | /usr/bin/sort -u

The above does the same for dovecot. Beware, these are brutal! In reality I have an additional grep in the chain that detects invalid usernames, as most of the script kiddies are guessing at these and are sure to hit on an invalid one quickly.

Both of these examples produce a list of IP addresses, one per line. You can pipe this output using xargs like this.

findbadlogins | xargs -r blackhole

The -r simply deals with the case where there’s no output, and will therefore not run blackhole – a slight efficiency saving.

If you don’t have pf, the following also works (replace the /sbin/pfctl in the script with it):

/sbin/route -q add $nasty 127.0.0.1 -blackhole 2>/dev/null

This adds the nasty IP address to the routing table and directs packets from it to somewhere the sun don’t shine. pf is probably more efficient that the routing table, but only if you’re using it. This is a quick and dirty way of blocking a single address out-of-the-box.

Function Keys with Apache Guacamole and AIX

To use AIX you really need working function keys on your keyboard – programs like SMIT use them a lot. But if you’re using Guacamole you’ll notice that F1..F5 don’t work. You can verify you have the problem by keying them in and they appear to produce the letters A..E. The workaround is to key ESC-1 for F1 ESC-2 for F2 etc but it’s a pain.

If you do a hex dump of the keyboard input you’ll discover F1 is actually sending 1b 5b 5b 41, which are the ASCII codes for the Escape key followed by ‘[[‘ followed by upper-case A. What?

Normal terminals output ^[[[11~ for F1, ^[[[12~ for F2, ^[[[13~ for F3 and so on. (^[ generates 0x1b – i.e. the same as the ASCII Escape key. ^ conventionally means type the next character with the Ctrl key). Guacamole uses the conventional definitions for F6 onwards, but not the first five. Although function keys are programmable on real terminals, if you remember those, no one ever programmed them because if they were used in an application it wouldn’t recognise the macro you’d changed them to, as it’d be expecting the default sequence. The application on the host could reprogram them, of course, but it would have to do this for every terminal type – including new ones it didn’t know about – and the whole thing got silly. So anyone with any sense left them to send the macro as standard, out-of-the-box.

So why on earth does Guacamole send something completely different for the first five? It’s something to do with Linux, where a long time ago someone who didn’t understand what was going on broke the convention. And, it turns out, Guacamole is emulating a Linux keyboard/terminal by default. There is a plan to fix this, but it can’t do it in the current 1.6.0 version. Incidentally, I’m talking about AIX 7.3 (and not expecting a new version for that any time ever).

No problem – you can fix this by setting the terminal-type parameter in user-mapping.xml to something AIX knows about, right? VT220 perhaps. Right? Wrong! It turns out that Guacamole ignores this – it just feeds it to the host when it asks for a terminal ID. It doesn’t change the way it behaves itself at all – the function keys are still wonky.

To fix this issue you’ll need fix the termcap on AIX, creating a Guacamole-specific set of mappings and then (ideally) get Guacamole to ask AIX to select it for you.

There are two ways to fix the termcap, DIY or cut/paste from the one I’ll include below. It’s possibly better to get used to doing it yourself as you might find some other things that need tweaking.

First dump the existing xterm information, which is otherwise “close enough”:

infocmp xterm >xterm-guac.ti

Next open xterm-guac.ti in the editor of your choice (vi or vi with AIX) to find the function key mappings and change them to what Guacamole actually sends. The best way to see what’s actually being sent by any key is to use the standard Unix utility “hd” to hex dump stdin, but it’s not no AIX so you’ll have to use “od -x” instead. Come on IBM! We stopped using octal when we went from 12 to 16-bit (PDP-11 in 1970)

The first (non-comment) line of xterm-guac.ti file defines which terminal this is – it’s not taken from the filename. Having just dumped the xterm definitions, it will say it’s “xterm”. We want to define a new terminal rather than redefining xterm, because although this would work, the next time someone logs on using, say, PUTTY or actual xterm they’ll be swearing at whoever broke the function keys for them. (If, on the other hand, you can’t fix the configuration in Guacamole to use the correct terminal definition, set this to the one it does use – probably leave it as xterm)

So the top line should read something like:

xterm-guac|Guacamole terminal emulator
or
xterm|xterm fixed for Guacamole terminal emulator

Further down you’ll find entries like this (for F1): “kf1=\E[[[11~” Change them to what’s actually sent, i.e. “kf1=\E[[A“. The “\E” is the way the termcap system specifies the Escape key, because you can never have enough conventions. The definitions are comma separated – the ‘,’ is not part of the sequence!

Once you’ve saved the file you need to compile and install it, which is really easy:

tic -v xterm-guac.ti

The -v is optional – it just outputs a couple of lines so you know it’s done something:

Working in /usr/share/lib/terminfo
Created x/xterm-guac

And now you’re good to go – AIX has a new type of terminal that matches Guacamole. All you need to do now is tell Guacamole it’s there by editing the connection data in user-mapping.xml (or the equivalent if you’re using a different authentication module). Something like this works well to get that IBM 3270 feeling.

    <connection name="AIX machine">
            <protocol>ssh</protocol>
            <param name="hostname">your-hostname</param>
            <param name="port">22</param>
            <param name="font-name">monospace</param>
            <param name="font-size">24</param>
            <param name="color-scheme">green-black</param>
            <param name="terminal-type">xterm-guac</param>
    </connection>

You don’t need to restart Tomcat, just log out and back in as a user and Guacamole-client will pick up the new settings.

Happy smittying!

Finally, as promised, here’s the tweaked terminal definition (i.e. xterm-guac.ti):

xterm-guac|X11 terminal emulator,
        am, bce, km, mc5i, mir, msgr, npc, xenl,
        colors#8, cols#80, it#8, lines#24, pairs#64,
        acsc=``aaffggiijjkkllmmnnooppqqrrssttuuvvwwxxyyzz{{||}}~~,
        bel=^G, blink=\E[5m, bold=\E[1m, cbt=\E[Z,
        civis=\E[?25l, clear=\E[H\E[2J, cnorm=\E[?12l\E[?25h,
        cr=\r, csr=\E[%i%p1%d;%p2%dr, cub=\E[%p1%dD, cub1=\b,
        cud=\E[%p1%dB, cud1=\n, cuf=\E[%p1%dC, cuf1=\E[C,
        cup=\E[%i%p1%d;%p2%dH, cuu=\E[%p1%dA, cuu1=\E[A,
        cvvis=\E[?12;25h, dch=\E[%p1%dP, dch1=\E[P,
        dl=\E[%p1%dM, dl1=\E[M, ech=\E[%p1%dX, ed=\E[J,
        el=\E[K, el1=\E[1K, flash=\E[?5h$<100>\E[?5l,
        home=\E[H, hpa=\E[%i%p1%dG, ht=\t, hts=\EH,
        ich=\E[%p1%d@, il=\E[%p1%dL, il1=\E[L, ind=\n,
        indn=\E[%p1%dS, invis=\E[8m,
        is2=\E[!p\E[?3;4l\E[4l\E>, kDC=\E[3;2~, kEND=\E[1;2F,
        kHOM=\E[1;2H, kIC=\E[2;2~, kLFT=\E[1;2D, kNXT=\E[6;2~,
        kPRV=\E[5;2~, kRIT=\E[1;2C, kb2=\EOE, kbs=\b,
        kcbt=\E[Z, kcub1=\EOD, kcud1=\EOB, kcuf1=\EOC,
        kcuu1=\EOA, kdch1=\E[3~, kend=\EOF, kent=\EOM,
        kf1=\E[[A, kf10=\E[21~, kf11=\E[23~, kf12=\E[24~,
        kf13=\E[2P, kf14=\E[2Q, kf15=\E[2R, kf16=\E[2S,
        kf17=\E[15;2~, kf18=\E[17;2~, kf19=\E[18;2~,
        kf2=\E[[B, kf20=\E[19;2~, kf21=\E[20;2~,
        kf22=\E[21;2~, kf23=\E[23;2~, kf24=\E[24;2~,
        kf25=\E[5P, kf26=\E[5Q, kf27=\E[5R, kf28=\E[5S,
        kf29=\E[15;5~, kf3=\E[[C, kf30=\E[17;5~,
        kf31=\E[18;5~, kf32=\E[19;5~, kf33=\E[20;5~,
        kf34=\E[21;5~, kf35=\E[23;5~, kf36=\E[24;5~,
        kf37=\E[6P, kf38=\E[6Q, kf39=\E[6R, kf4=\E[[D,
        kf40=\E[6S, kf41=\E[15;6~, kf42=\E[17;6~,
        kf43=\E[18;6~, kf44=\E[19;6~, kf45=\E[20;6~,
        kf46=\E[21;6~, kf47=\E[23;6~, kf48=\E[24;6~,
        kf49=\E[3P, kf5=\E[[E, kf50=\E[3Q, kf51=\E[3R,
        kf52=\E[3S, kf53=\E[15;3~, kf54=\E[17;3~,
        kf55=\E[18;3~, kf56=\E[19;3~, kf57=\E[20;3~,
        kf58=\E[21;3~, kf59=\E[23;3~, kf6=\E[17~,
        kf60=\E[24;3~, kf61=\E[4P, kf62=\E[4Q, kf63=\E[4R,
        kf7=\E[18~, kf8=\E[19~, kf9=\E[20~, khome=\EOH,
        kich1=\E[2~, kind=\E[1;2B, knl=\r, knp=\E[6~,
        kpp=\E[5~, kri=\E[1;2A, ktab=\t, mc0=\E[i, mc4=\E[4i,
        mc5=\E[5i, op=\E[39;49m, rc=\E8, rev=\E[7m, ri=\EM,
        rin=\E[%p1%dT, rmacs=\E(B, rmam=\E[?7l,
        rmcup=\E[?1049l, rmir=\E[4l, rmkx=\E[?1l\E>,
        rmm=\E[?1034l, rmso=\E[27m, rmul=\E[24m, rs1=\Ec,
        rs2=\E[!p\E[?3;4l\E[4l\E>, sc=\E7,
        setb=\E[4%?%p1%{1}%=%t4%e%p1%{3}%=%t6%e%p1%{4}%=%t1%e%p1%{6}%=%t3%e%p1%d%;m,
        setf=\E[3%?%p1%{1}%=%t4%e%p1%{3}%=%t6%e%p1%{4}%=%t1%e%p1%{6}%=%t3%e%p1%d%;m,
        sgr=%?%p9%t\E(0%e\E(B%;\E[0%?%p6%t;1%;%?%p2%t;4%;%?%p1%p3%|%t;7%;%?%p4%t;5%;%?%p7%t;8%;m,
        sgr0=\E(B\E[m, smacs=\E(0, smam=\E[?7h,
        smcup=\E[?1049h, smir=\E[4h, smkx=\E[?1h\E=,
        smm=\E[?1034h, smso=\E[7m, smul=\E[4m, tbc=\E[3g,
        u6=\E[%i%d;%dR, u7=\E[6n, u8=\E[?1;2c, u9=\E[c,
        vpa=\E[%i%p1%dd,

You’ll notice that the shifted function keys look a bit suspect (e.g. kf13=…) but fixing these is left as an exercise for any reader that actually uses shifted function keys. I can’t find an AIX program that uses them to test it!

Finally, if you’re trying to get the backspace key to work on-screen as well as in the input buffer, try adding “stty echoe” to your .profile.

Incidentally, you may need to fix the standard xterm TI to work with standard XTERM (e.g. PUTTY) as that’s wonked on the AIX side – it depends on how you have PUTTY set up. But that’s another story.

FreeBSD/Linux as Fibre Broadband router Part 2

In part one I described how to set up PPP and the pf firewall to provide NAT with port forwarding and other good things. In Part 2 I’ll add DCHP, and as a bonus I’ll add configuration for an IP address blockfor if you have that kind of ISP. If you want that kind of ISP but can’t find one, I can point at a few that do. In Part 3 I’ll cover DNS and BIND.

DHCP

There’s never been a DHCP server in the FreeBSD base, but it’s installed easily by compiling the port or installing the package. Your best bet for FreeBSD is the DHCP daemon written for OpenBSD, AKA the ISC dhcpd. But beware – the OpenBSD one, although called version 6.6, lags behind the other package isc-dhcp44 as it doesn’t have support peer servers. If you’ve only got one DHCP server on your network, it’s fine. If you want to have primary and secondary servers, or load balance them, look at the latest ISC one instead. I’ll deal with that in another post.

pkg install dhcpd

Before you kick it off you really ought to edit the configuration file, /usr/local/etc/dhcpd.conf. There’s usually a second copy of it postfixed with .sample, and it’s pretty self documenting. I’m posting the basics from a real configuration, which I shall annotated to death. But first, something about the network we’re defining:

I’m going to have a LAN with 192.168.1.0/24 – which means IP addresses in the range 192.168.1.1 to 192.168.1.254. This isn’t a tutorial on routing – just leave the first and last address (0 and 255) alone for now. The network will have a domain. This is optional, but if you’re doing your own DNS you’ll want one. You don’t have to register this domain externally – you can make it up (please end it in .local!) – but let’s assume you have a real one: “example.com”. You’ve created an subdomain for this site called mysite.example.com and it has an A record to prove it, and you’ll probably want to delegate the DNS to it later. But if you’re not worried about domain names, don’t worry about all of this.

The router (i.e. the FreeBSD box) is going to be on 192.168.1.2, which is set up in rc.conf. It can’t be assigned automatically by DHCP because, well, we’re also the DHCP server and that would be silly.

Assuming your LAN-side network interface is bge0 (remember the modem is on bge1 in Part 1) the following line would do it:

sysrc ifconfig_bge0="inet 192.168.1.2 netmask 255.255.255.0"

Obviously change bge0 to the name of your actual Ethernet interface! You might wonder why I’m putting the router on 192.168.1.2 instead of 192.168.1.1, which is a common convention. It’s simple: There are so many home user network appliances that come with 192.168.1.1 as their default IP address, and if you plug one in to your LAN the clash will cause merry hell before you’ve been able to go to their web interface to configure it to something else.

I want some devices to have a fixed IP address supplied by DHCP, and other things to have dynamically allocated ones – friends using the guest WiFi, for example. Having network infrastructure like switches and WAPs on a static addressed, defined by DHCP, is a good way to go. Connecting network printers to Windoze is smoother if they’re on a fixed IP too. But going around and setting it on each device is a pain, so do it by DHCP where it’s defined in one place and can be managed in one place. It works by recognising the MAC address in the request and giving back whatever IP address you have chosen.

As a final tip, keep your network address plan as comments in dhcpd.conf – it’s where you want the information anyway. And with that, here’s the sample file:


# This is the domain name that will be supplied to everything on
# the LAN by default. This is the domain that will be searched if you
# enter a host name. For example, if you want to connect to "fred-pc" it
# will look for it as fred-pc.mysite.example.com, which if you have
# your DNS set up correctly, will find it quickly.
option domain-name "mysite.example.com";

# This specifies the DNS server(s) the machines on the LAN
# will use. We're specifying the same as the router, because
# we'll be running DNS there. If you don't want to, just use the
# IP address of DNS server supplied by your ISP.
option domain-name-servers 192.168.1.2;

# These just specify the time a machine on the LAN gets to hold
# on to a dynamic address before it needs to renew it.
default-lease-time 43200;
max-lease-time 86400;

# This defines our pool of dynamically allocated addresses,
# and I've chosen the range 100..199. Options here override the
# options above (outside the {...}) in the way you might expect.
# I've set the default lease time to 900 seconds (15 minutes)
# for testing purposes only. 2h is normal but it's up to you.
# I normally go for 12h.

subnet 192.168.1.0 netmask 255.255.255.0 {
  range 192.168.1.100 192.168.1.199;
  option broadcast-address 192.168.1.255;
  default-lease-time 900;
}

# The next block is assigning a fixed IP address to 
# a switch, because I don't want it to move. This just needs the 
# MAC address of the device and the fixed-address you want to give it.
# You can have as many of these as you like. The name "switch1" is really
# just for your own reference.

host switch1 {
        hardware ethernet 00:02:FC:CB:1E:7D;
        fixed-address 192.168.1.3;
}

For more information see this post about assigning names, and the dhcpd.conf.sample, which has scenarios far more complex than you’ll need on a simple LAN.

Enable it on reboot with:

sysrc dchpd_enable=yes

You can then start it manually with service dhcpd start.

If you want to make changes to dhcpd.conf you can at any time, but they won’t take effect until you restart dhcpd (with service dhcpd restart). There’s no way of having it just do a reload. Details of the leases it has issued are /var/db/dhcpd.leases, which is just a text file and you can easily read it.

Routing a whole subnet

Supposing you have more than one IP address coming down the PPPoE tunnel at you? This is a service you can get from your ISP, giving you multiple IP addresses for various purposes – such as running servers. Other ISPs give you a single dynamic address, or worse, an IP address generated by CG-NAT. I’d argue this ceases to meet the definition of “Internet Service” at this point.

But assuming you have a block of static addresses, how do you get ppp to use them? I haven’t seen this documented ANYWHERE and figuring it out involved a great deal of trial and error. Shout out to shurik for encouraging me to keep going where ppp.linkup was concerned.

The easy way to add an alias to your tunnel (which you’ll recall we called wan0) is to use ifconfig and simply add it. But the trick with tunnels is to add the alias IP address and the remote tunnel address (i.e. HISADDR). You can find out what HISADDR is using ifconfig:

# ifconfig wan0
wan0: flags=1008051<UP,POINTOPOINT,RUNNING,MULTICAST,LOWER_UP> metric 0 mtu 1492
        options=80000<LINKSTATE>
        inet 1.2.3.4 --> 44.33.22.11 netmask 0xffffffff
        groups: tun
        nd6 options=21<PERFORMNUD,AUTO_LINKLOCAL>
        Opened by PID 658

In the output above, 1.2.3.4 is the IP address supplied by LCP – i.e. your public IP address. 44.33.22.11 is the IP address of the other end of the tunnel. In the parlance of the PPP utility, HISADDR. Earlier we set the default route to HISADDR. There are good reasons why HISADDR is dynamic, not least of which is having a pool of gateways for redundancy, so you have to check what it actually IS today before you assign an alias public address to the tunnel.

Then it’s a simple matter of adding further addresses using ifconfig:

ifconfig wan0 alias 1.2.3.41/32 44.33.22.11

Yes, it’s not quote the same format as adding an alias to an Ethernet interface, as the remote address follows the local one.

You can write a little script to do them automatically:

#!/bin/sh
HISADDR=$(ifconfig wan0 | grep "inet 1.2.3.4" | cut -w -f 5)
ALIASES="1.2.3.41 1.2.3.42 1.2.3.43 1.2.3.44"
for a in $ALIASES
do
    ifconfig wan0 delete $a
    ifconfig wan0 alias $a/32 $HISADDR
done

Note that I’m using grep to find the correct inet address based on the static address I know the interface has. Fiddle this to suit your static address, or if you don’t have one, grep for inet and hope the first it finds is correct. I’m also deleting the old aliases as they might need to be recreated using the new HISADDR.

This is all well and good, but when do you run the script? Automating it is the trick. Fortunately there’s a hook in ppp, where it processes the file /etc/ppp/ppp.linkup when the link comes up. As far as I can tell it’s the same format as ppp.conf, and you have to label the service name in the same way. What’s not documented is how you add alias addresses, but I’ve found a way by getting it to run ipconfig for you. If you start a line with ” !bg “, what follows is run. It’s run without an environment so you have to specify all paths to whatever you want to run in full, but it does work and does expand macros like HISADDR. The space in front of the ! is important! Incidentally, there’s also a ppp.linedown.

Here’s my /etc/ppp/ppp.linkup

cloudscape:
  !bg /sbin/ifconfig wan0 alias 1.2.3.40/32 HISADDR
  !bg /sbin/ifconfig wan0 alias 1.2.3.41/32 HISADDR
  !bg /sbin/ifconfig wan0 alias 1.2.3.42/32 HISADDR
  !bg /sbin/ifconfig wan0 alias 1.2.3.43/32 HISADDR

I would very much like to find the documentation for this, but the author (Brian Somer) has moved on to other things and the documentation that’s out there appears to be all there is. It was written for dial-up connections and wasn’t really designed for fixed lines with multiple public IP addresses.

Meanwhile the other PPP demon, mpd5, which is supposed to be better, was listed in the FreeBSD Handbook as being for PPPoA, pushing user-ppp for PPPoE. This isn’t actually the case, and I may be revisiting this using mpd5 at some point because it’s faster and more efficient, and I don’t need all the extra wonderful NAT and firewall features of user-ppp.

ISC-DHCPd

In this article I’ve used the standard OpenBSD version of the ISC DHCP server. It’s not the same as the full one, which also handle replication. In Part 4 I’ll cover DNS and DHCP replication and redundancy but as I haven’t written it you might want to install the package isc-dhcp44-server instead and use that. For a single server configuration it’s basically the same, but it gets you ahead of the game if you want to replicate servers.

Prepending stuff to a Unix file

(Includes Linux/bash quirks)

Prepending is, of course, adding stuff to the front of a file whereas appending is sticking it on the end. Prepending is an affront to sequential file handling and should never be attempted, but if you really want to do it anyway, it got a few of us thinking.

To append stuff to a file it’s easy.

echo New stuff >> existing-file

The first thing that came into our heads was to reverse the file, append the new stuff and then reverse it again. Except “rev” reverses characters, as well as lines, so the stuff you want to append would have to be reversed to it came out the right way and… it was getting messy.

Someone suggested tac to reverse the file line-by-line, which was better, but tac???? Apparently it’s a Linux reverse “cat” that writes stuff out backwards line by line. On Unix it appears to be the equivalent of “tail -r”, but the -r option doesn’t exist on the GNU version. I see that a lot on Linux – they have a cut-down version of some Unix utility and spawn another utility to fill the shortcomings rather than adding it.

But, even with tail -r (or tac) it gets a bit messy – you really need a temp file as far as I can figure it. Does anyone have devious way to avoid it?

So just go for simple. On GNU systems:

echo New stuff | cat <(cat) existing-file > temp && mv temp existing-file

This is only going to work with bash, which has an extension that captures the output of a process and feeds it into stdin: <(....). You do the same easily Bourne shell using a named pipe, but it’s just making things more complicated when there’s a simpler solution when a utility uses a – to stand for stdin in a list of file arguments:

echo New stuff | cat - existing-file > temp && mv temp existing-file

But this is still using a temporary file.

Then it was suggested that sed -i might do it “in place”. If course it’s not in-place on the disk, but it looks neater and you can pretend it’s okay.

echo New Stuff | sed -i "1i $(cat)" existing-file

This was a team effort – Stefan persevered with sed, I added the stdin capture using cat. Note that this is GNU sed – the original sed would require you to specify a backup file extension – i.e. stick a ” after the -i (that’s two single quotes for an empty string). Actually, specifying “.backup” might be wise.

Now back to some real work.