Following on from Basic UNIX file commands, here’s a bit there wasn’t time for on changing metadata on files.
These two commands change the files permissions and ownership. Permissions is information associated with a file that decides who can do what with it. This was once called the file mode, which is why the command is chmod (Change MODe). Files also have owners, both individuals and group of users, and the command to change this is chown (CHOWNer).
chown is easiest, so I’ll start there. To make a file belong to fred the command is:
chown fred myfile
To change the owning group to accounts:
chown :accounts myfile
And to change both at once:
chown fred:accounts myfile
Changing a files permissions is more tricky, and there are several ways of doing it, but this is probably the easiest to remember. You’ll recall that each file has three sets of permissions: Owner, Group and Other. The permissions themselves are read, write and execute (i.e. it’s an executable program).
chown can set or clear a load of permissions in one go, and the format is basically the type of permission, and ‘+’ or ‘-’ for set or clear, and the permissions themselves. What? It’s probably easier to explain with a load of examples.:
chmod u+w myfile
Allows the user of the file to write to it (u means user/owner)
chmod g+w myfile
Allows any user in the group the file belongs to write to it.
chmod o+r myfile
Allows any user who is not in the files group or the owner to read it. (o means “other”).
You can combine these options
chmod ug+rw

Allows the owner and the group to read and write the file.
chmod go-w

Prevents anyone but the user from being able to modify the file.
If you want to run a program you’ve just written called myprog.
chmod +x myprog
If you don’t specify anything before the +/- chmod assumes you mean yourself.
You might notice an ‘x’ permission on a directory – in this case it means the directory is searchable to whoever has the permission.
I was asked me to explain basic Unix shell file manipulation commands, so here goes.
If you’re familiar with MS-DOS, or Windows CMD.EXE and PowerShell (or even CP/M) you’ll know how to manipulate files and directories on the command line. It’s tempting to think that the Unix command line is the same, but there are a few differences that aren’t immediately apparent.
There are actually two main command lines (or shells) for Unix: sh and csh. Others are mainly compatible with these two, with the most common clones being bash and tcsh respectively. Fortunately they’re all the same when it comes to basic commands.
Directory Concepts
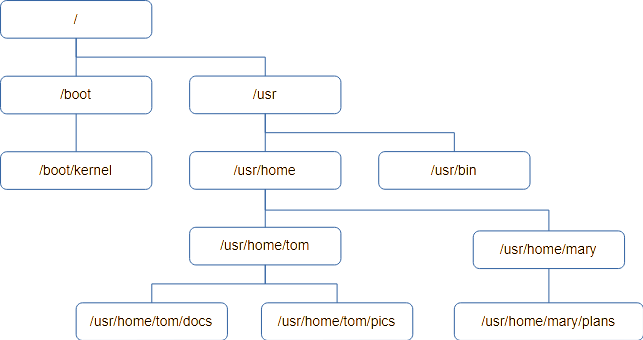
Files are organised into groups called “directories”, which are often called “Folders” on Macintosh and Windows. It’s not a great analogy, but it’s visual on a GUI. Unlike the real world, a directory may contain additional directories as well as files. These directories (or sub-directories) can also contain files and more directories and so on. If you drew a diagram you’d end up with something looking like a tree, with directories being branches coming off branches and the files themselves being leaves. All good trees start with a root from which the rest branches off, and this is no different. The start of a Unix directory tree is known as the root.
Unix has a concept called the Current Working Directory. When a program is looking for a file it is assumed it will be found in the Working Directory if no other location is specified.
Users on a Unix system have an assigned Home Directory, and their Working Directory is initially set to this when the log on.
Users may create whatever files and sub-directories they need within their Home Directory, and the system will allow the do whatever they want with anything they create as it’s owned by them. It’s possible for a normal user to see other directories on the system, in fact it’s necessary, but generally they won’t be able to modify files outside their home directory.
Here’s an example of a directory tree. It starts with the root, /, and each level down adds to the directory “path” to get to the directory.
If you want to know what your current working directory is, the first command we’ll need is “pwd” – or “Print Working Directory”. If you’re ever unsure, use pwd to find out where you are.
Unix commands tend to be short to reduce the amount of typing needed. Many are two letters, and few are longer than four.
The thing you’re most likely to want to do is see a list of files in the current directory. This is achieved using the ls command, which is a shortened form of LiSt.
Typing ls will list the names of the all the files and directories, sorted into ASCII order and arranged into as many columns as will fit on the terminal. You may be surprised to see files that begin with “X” are ahead of files beginning with “a”, but upper case “X” has a lower ASCII value than lower case “a”. Digits 0..9 have a lower value still.
ls has lots of flags to control it’s behaviour, and you should read the documentation if you want to know more of them.
If you want more detail about the files, pass ls the ‘-l’ flag (that’s lower-case L, and means “long form”). You’ll get output like this instead:
drw-r-----  2 fjl  devs        2 Aug 28 13:17 Release
drw-r-----  2 fjl  devs       29 Dec 26  2019 Debug
-rw-r-----  1 fjl  devs     2176 Feb 17  2012 editor.h
-rw-r-----  1 fjl  devs    28190 Feb  7  2012 fbas.c
-rw-r-----  1 fjl  devs    10197 Feb 17  2012 fbas.h
-rw-r-----  1 fjl  devs     5590 Feb 17  2012 fbasexpr.c
-rw-r-----  1 fjl  devs     7556 Feb  3  2012 fbasheap.c
-rw-r-----  1 fjl  devs     7044 Feb  4  2012 fbasio.c
-rw-r-----  1 fjl  devs     4589 Feb  3  2012 fbasline.c
-rw-r-----  1 fjl  devs     4069 Feb  3  2012 fbasstr.c
-rw-r-----  1 fjl  devs     4125 Feb  3  2012 fbassym.c
-rw-r-----  1 fjl  devs    13934 Feb  3  2012 fbastok.c
drw-r-----  3 fjl  devs        3 Dec 26  2019 ipch
-rw-r-----  1 fjl  devs     3012 Feb 17  2012 token.h
:
I’m going to skip the first column for now and look at the third and fourth.
fjl devs
This shows the name of the user who owns the file, followed by the group that owns the file. Unix users can be members of groups, and sometimes it’s useful for a file to be effectively used by a group rather than one user. For example, if you have an “accounts” group and all your accounts staff belong to it, a file can be part of the “accounts” group so everyone can work on it.
Now we’ve covered users and groups we can return to the first column. It shows the file flags, which are various attributes concerning the file. If there’s a ‘-’ then the flag isn’t set. The last nine flags are three sets of three permissions for the file.
The first set are the file owner’s permissions (or rights to use the file).
The second set are the file group’s permissions.
The third are the permissions for any user who isn’t either the owner or in the file’s group
Each group of three represents, in order:
r – Can the file be read, but not changed. w – can the file be written to. If not set it means you can only read it. x – can the file be run (i.e. is it a program)
So:
– rw- — — means only the user can read/write the file.
– rw- r– — means the file can be read by anyone in it’s group but only written to by the owner.
– rwx r-x — means the file is a program, probably written by its owner. Others in the group can run it, but no one else can even read it.
There are other special characters that might appear in the first filed for advanced purposes but I’m covering the basics here, and you could write a book on ls.
I’ve missed off the first ‘-’, which isn’t a permission but indicates the type of the file. If it’s a ‘-’ it’s just a regular file. A ‘d’ means it’s actually a directory. You’ll sometimes see ‘c’ and ‘s’ on modern systems, which are normally disk drives and network connections. Unix treats everything like a file so disk drives and network sockets can be found in the directory tree too. You’ll probably see ‘l’ (lower case L) which means it’s a symbolic link – a bit like a .LNK file in Windows.
This brings us to the second column, which is a number. It is the number of times the file exists in the directory tree thanks to their being links, and most cases this will be one. I’ll deal with links later.
The last three columns should be easy to guess: Length, date and finally the name of the file; at least in the case of a regular file.
There are many useful and not so useful options supported by ls. Here are a few that might be handy.
-d
By default, if you give ls a directory name it will show you the contents of the directory. If you want to see the directory itself, most likely because you want to see its permissions, specify -d.
-t
Sort output by time instead of ASCII
-r
Reverse the order of sort. -rtl is useful as it will sort your files with the newest at the end of the list.
-h
Instead of printing a file size in the bytes, which could be a very long number, display in “human readable” format, which restricts it to three characters followed by a suffix: B=bytes, K=Kb, M=Mb and so on.
-F
This is very handy if you’re not using -l, as with just the name printed you can’t tell regular and special files apart. This causes a single character to be added to the file name: ‘*’ means it’s a program (has the x flag set), ‘/’ means it’s a directory and ‘@’ means it’s a symbolic link. Less often you’ll see ‘=’ for a socket, ‘|’ for a FIFO (obsolete) and ‘%’ for a whiteout file (insanity involving union mounts).
Finally, ls takes arguments. By default it lists everything if you give it a list of files and directories, it will just list them.
Where src is a directory, ls src will list the files in that directory. Remember ls -d if you just want information on the directory?
ls src
List everything in the src and obj directories:
ls src obj
Now you can find the names of the files, how do you look at what’s in them? To display the contents of a text file the simple method is cat.
cat test.c
This prints the contents of test.c. You might just want to see the first few lines, so instead try:
head test.c
Only the first ten lines (by default) are printed.
If you want to see the last ten lines, try:
tail test.c
If you want to go down the file a screen full at a time, use.
more test.c
It stops and waits for you to press the space bar after every screen. If you’ve read enough, hit ‘q’ to quit.
less test.c
This is the latest greatest file viewer and it allows you to scroll up and down a file using the arrow keys. It’s got a lot of options.
So far we’ve stayed in our home directory, where we have kept all our files. But evenrtually you’re going to need to organise your files in a hierarchical structure in directories.
To make a directory called “new” type:
mkdir new
This is an mnemonic for “make directory”.
To change your working directory use the chdir command (Change Directory)
chdir new
Most people use the abbreviated synonym for chdir, “cd”, so this is equivalent:
cd new
Once you’re there, type “pwd” to prove we’ve moved:
pwd
If you type ls now you won’t see any files, because it’s empty.
You can also specify the directory explicitly, such as:
cd /usr/home/fred/new
If you don’t start with the root ‘/’, cd will usually start looking for the name of the new directory in the current working directory.
To move back one level up the directory level use this command:
cd ..
You’ll be back in your home directory.
To get rid of the “new” directory use the rmdir command (ReMove DIRectory)
rmdir new
This only works on empty directories, so if there were any files in it you’d have to delete them first. There are other more dangerous commands that will destroy directories and all their contents but it’s better to stick with the safer ones!
To remove an individual file use the rm (ReMove) command, in this case the file being named “unwanted”:
rm unwanted
Normally files are created by applications, but if you want a file to experiment on the easiest way to create one is “touch filename”, which creates an empty file called “filename”. You can also use the echo command:
echo “This is my new text file, do you like it?” > myfile.txt
Echo prints stuff to the screen, but “> myfile.txt” tells Unix to put the output of the echo command into “myfile.txt” instead of displaying it on the screen. We’ll use “echo” more later.
You can display the contents with:
cat myfile.txt
One thing you’re going to want to do pretty soon is copy a file, which is achieved using the cp (CoPy) command:
cp myfile.txt copy-of-myfile.txt
This makes a copy of the file and calls it copy-of-myfile.txt
You can also copy it into a directory
mkdir new
cp myfile.txt new
To see it there, type:
ls -l new
To see the original and the copy, try:
ls - newfile.txt new
If you wanted to delete the copy in “new” use the command:
rm new/myfile.txt
Perhaps, instead of copying your file into “new” you wanted to move it there, so you ended up with only one copy. This is one use of the mv (MoVe) command:
mv myfile.txt new
The file will disappear from your working directory and end up in “new”.
How do you rename a file? There’s no rename command, but mv does it for you. When all is said and done, all mv is doing is changing the name and location of a file.
cd new
mv myfile.txt myfile.text
That’s better – much less Microsoft, much more Unix.
Wildcards
So far we’ve used commands on single files and directories, but most of these commands work with multiple files in one go. We’ve given them a single parameter but we could have used a list.
For example, if we wanted to remove three files called “test”, “junk” and “foo” we could use the command:
rm test junk foo
If you’re dealing with a lot of files you have have the shell create a list of names instead of typing them all. You do this by specifying a sort of “template”, and all the files matching the template will be added to the list.
This might seem the same as Windows, but it’s not – be careful. With Windows the command does the pattern matching according to its context, but the Unix shell has no context and you may end up matching more than you intended, which is unfortunate if you’re about to delete stuff.
The matching against the template is called globbing, and uses the special characters ‘*’ and ‘?’ in it’s simplest form.
‘?’ matches any single character, whereas ‘*’ matches zero or more characters. All other characters except ‘[‘ match themselves. For example:
“?at” would match cat, bat and rat. It would not match “at” as it must have a first character. Neither will it match “cats” as it’s expecting exactly three characters.
“cat*” would match cat, cats, caterpillar and so on.
“*cat*” would match all of the above, as well as “scatter”, “application” and “hellcat”.
You can also specify a list of allowable letters to match between square brackets [ and ], which means any single character will do. You can specify a range, so [0-9] will match any digit. Putting a ‘!’ in front negates the match, so [!0-9] will match any single character that is NOT a digit. If you want to match a two-digit number use [0-9][0-9].
To test globbing out safely, I recommend the use of the echo command for safety. It works like this:
echo Hello world
This prints out Hello world. Useful, eh? But technically what it’s doing is taking all the arguments (aka parameters) one by one and printing them. The first argument is “Hello” so it prints that. The second is “world” so it prints a space and prints that, until there are no arguments left.
Suppose we type this:
echo a*
The Unix shell globs it using the * special character produces a list of all files that start with the letter ‘a’.
You can use this, for example, to specify all the ‘C’ files ending in .c:
echo *.c
If you want to include .h files in this, use
echo *.c *.h
Practice with echo to see how globbing works as it’s non-destructive!
You can also use ls, although this goes on to expand directories into their contents, which can be confusing.
When you have a command that has a source and destination, such as cp (CoPy), they will interpret the everything in the list as a file to be processed apart from the last, which it will expect to be a directory. For example:
cp test junk foo rubbish
Will copy “test”, “junk” and “foo” into an existing directory rubbish.
Now for a practical example. Suppose you have a ‘C’ project where everything is in one directory. .c files, .h files, .o files as well as the program itself. You want to sort this out so the source is in one directory and the objects in another.
Although some of this is BSD specific, the principles apply to any Unix or Linux.
When you install your Unix like OS across several disks, either with a mirror or RAID system (particularly ZFS RAIDZ) you’ll be asked if you want to set up a swap partition, and if you want it mirrored.
The default (for FreeBSD) is to add a swap partition on every disk and not mirror it. This is actually the most efficient configuration apart from having dedicated swap drives, but is also a spectacularly bad idea. More on this later.
What is a swapfile/drive anyway?
The name is a hangover from early swapping multi tasking systems. Only a few programs could fit in main memory, so when their time allocation ran out they were swapped with others on a disk until it was their turn again.
These days we have “virtual memory”, where a Memory Management Unit (MMU) fixed it so blocks of memory known as pages are stored on disk when not in use and automatically loaded when needed again. This is much more effective than swapping out entire programs but needs MMU hardware, which was once complex, slow and expensive.
What an MMU does is remap the CPU address space so the running process believes it has a certain amount of RAM starting at address zero and going up as high as needed. It “thinks” it has the complete processor and all the RAM. However, the operating system is lying to the process, as not all the RAM the process believes it has is mapped to actual RAM. If the process tries to access an address that’s not mapped to anything the OS kernel takes over with a hardware interrupt called a “page fault”. The kernel than brings that page of RAM in from where it’s stored on the swap disk, gets the MMU to map it to the process address space, and restarts the process where it left off. The process doesn’t even know this has happened. If the kernel notices that some areas of RAM aren’t being used by the process it copies them to the swap disk and uses the physical RAM for some other purpose – until the next page fault.
So the swap partition should really be called the paging partition now, and Microsoft actually got the name right on Windows. But we still call it the swap partition.
What you need to remember is that parts of a running programs memory may be in the swap partition instead of RAM at any time, and that includes parts of the operating system.
Strategies
There are several ideas for swap partitions in the 2020s.
No swap partition
Given RAM is so cheap, you can decide not to bother with one, and this is a reasonable approach. Virtual memory is slow, and if you can, get RAM instead. It can still pay to have one though, as some pages of memory are rarely, if ever, used again once created. Parts of a large program that aren’t actually used, and so on. The OS can recognise this and page them out, using the RAM for something useful.
You may also encounter a situation where the physical RAM runs out, which will mean no further programs can be run and those already running won’t be able to allocate any more. This leads to two problems: Firstly “Developers” don’t often program for running out of memory and their software doesn’t handle the situation gracefully. Secondly, if the program your need to run is you login shell you’ll be locked out of your server.
For these reasons I find it better to have a swap partition, but install enough RAM that it’s barely used. As a rule of thumb, I go for having the same swap space as there is physical RAM.
Dedicated Swap Drive(s)
This is the classic gold standard. Use a small fast drive (and expensive), preferably short stroked, so your virtual memory goes as fast as possible. If you’re really using VM this is probably the way to go, and having multiple dedicated drives spreads the load and increases performance.
Swap partition on single drive
If you’ve got a single drive system, just create a swap partition. It’s what most installers do.
Use a swap file
You don’t need a drive or even a partition. Unix treats devices and files the same, so you can create a normal file and use that.
You can swap on any number of files or drives, and use “swapoff” to stop using a particular one.
Unless you’re going for maximum performance, this has a lot going for it. You can allocate larger or smaller swap files as required and easily reconfigure a running system. Also, if your file system is redundant, your swap system is too.
Multiple swap partitions
This is what the FreeBSD installer will offer by default if you set up a ZFS mirror or RAIDZ. It spreads the load across all drives. The only problem is that the whole point of a redundant drive system is that it will keep going after a hardware failure. With a bit of swap space on every drive, the system will fail if any of the drives fails, even if the filing system carries on. Any process with RAM paged out to swap gets knocked out, including the operating system. It’s like pulling out RAM chips and hoping it’s not going to crash. SO DON’T DO IT.
If you are going to use a partition on a data drive, just use one. On an eight drive system the chances of a failure on one of eight drives is eight times higher than one one specific unit, so you reduce the probability of failure considerably by putting all your eggs in one basket. Counterintuitive? Consider that if one basket falls on a distributed swap, they all do anyway.
Mirrored swap drives/partitions
This is sensible. The FreeBSD installer will do this if you ask it, using geom mirror. I’ve explained gmirror in posts passem, and there is absolutely no problem mixing it with ZFS (although you might want to read earlier posts to avoid complications with GPT). But the installer will do it automatically, so just flip the option. It’s faster than a swap file, although this will only matter if your job mix actually uses virtual memory regularly. If you have enough RAM, it shouldn’t.
You might think that mirroring swap drives is slower – and to an extent it is. Everything has to be written twice, and the page-out operation will only complete when both drives have been updated. However, on a page-in the throughput is doubled, given the mirror can read either drive to satisfy the request. The chances are there will be about the same, or slightly more page-ins so it’s not the huge performance hit it might seem at first glance.
Summary
Method
Pros
Cons
No swap
Simple Fastest
Wastes RAM Can lead to serious problems if you run out of RAM
Dedicated Swap Drive(s)
Simple Optimal performance
Each drive is a single point of failure for the whole system
Multiple Swap Partitions
Improved performance Lower cost than dedicated
Each drive is a single point of failure for the whole system
Single swap partition (multi-drive system)
Simple Lower probability of single point of failure occurring.
Reduced performance Still has single point of failure
Mirrored drives or partitions
No single point of failure for the whole system
Reduced performance
Swap file
Flexible even on live system Redundancy the same as drive array
Reduced performance
Quick summary of different swap/paging device strategies.
Conclusion
Having swap paritions on multiple drives increases your risk of a fault taking down a server that would otherwise keep running. Either use mirrored swap partitions/drives, or use a swap file on redundant storage. The choice depends on the amount of virtual memory you use in normal circumstances.
FreeBSD relies on a separate daemon to be running to detect failing drives in a zfs pool rather than the kernel handling it, but I’m not convinced it even works.
I’ve been investigating what the current ZFS on FreeBSD 14.2 does with failing drives. It’s a bit worrying. I posted on the FreeBSD mailing list on 17th Feb 2025 in the hope that someone would know something, and there as some discussion (“me too”), but we drew a blank.
The problem is that ZFS doesn’t “fault” a drive until it’s taken offline by the OS. So if you’ve got a flaky drive you have to wait for FreeBSD to disconnect it, and only then ZFS will notice. At least that’s how it works out of the box (but read on).
In the past I’ve tested ZFS’s robustness simply by pulling drives, which guaranteed the OS would fail it, but a few troubling events led me to do a proper investigation. I acquired collection of flaky drives (data centre discards) that are unreliable, and set it up to fail so I could watch. ZFS will wait a very long time for a SAS drive to complete an operation, in circumstances when the drive is clearly on its last legs. If the operation fails and retries, FreeBSD logs a CAM error but ZFS doesn’t fail the drive. You can have a SAS drive rattling and groaning away, but FreeBSD patiently waits for it to complete by relocating the block or attempting multiple retries, and ZFS is none the wiser. Or maybe ZFS is relocating the block after the CAM error? Either way, ZFS says the drive is “ONLINE” and carries on using it while your system grinds to a standstill.
The only clue, other than the console log, is that operations can start to take a long time. The tenacity of SAS drives means it can take several minutes to complete an iop, although SATA tends to fail more quickly. You can have a SAS drive taking a minute for each operation and all you know about it is things are going very, very slowly. It does keep error statistics for vdevs, cascading up the chain, but what it does with them and when it logs them isn’t entirely clear.
If you use a stethoscope on the drive (one of my favourite tricks) it’s obvious it’s not happy but FreeBSD won’t offline it until it catches fire. In fact I suspect it would need to explode before it noticed.
zfsd
However, there is an answer! Nine years ago saw the release into base of a handy little daemon called zfsd from Justin Gibbs and Alan Somers. This provides some of the functionality of Solaris’ Service Management Facility (SMF), in particular the fault management daemon, fmd. Quite how closely it follows it I’m not certain, but the general idea is the same. Both look to see if the hardware is failing and act accordingly. In the recent Linux ZFS there’s a daemon called zfs-zed but that works a little differently (more later).
On FreeBSD, zfsd listens to devctl/devd (and possibly CAM) and will collect data on drive errors (it calls this a case file). I say “possibly” because it’s not exactly well documented and appears to have remained pretty much unchanged since it appeared in FreeBSD 11. As a result, I’ve been examining the source code, which is in C++ and has been influenced by “Design Patterns” – not a recipe for clear understanding.
Anyway, zfsd definitely listens to the devctl events (the kind of stuff that ends up in the console log) and takes action if there’s a problem. For example, if a vdev generates more than eight delayed I/O events in a minute it will mark it as faulted and activate a hot spare if there is one. If there are more than 50 I/O errors a minute it will do the same. 50 checksum error a minute will degrade a vdev. All of this can be found in the man page.
What’s not so clear is how or whether the code actually operates as advertised. It certainly calls something in response to events, in zfsd_event.cc: likely looking functions such as zpool_vdev_detach(), which are part of libzfs. Trying to find the man page for these functions is more problematic, and a search of the OpenZFS documentation also draws a blank. I’ve heard it not documented because it’s an “unstable interface”. Great.
What I have been able to follow through is that it does listen to devctl/devd events, it matches those events to pools/vdev and leaves it to CaseFile (C++ Class) logic to invoke likely looking functions starting with “zpool_”, which are found libzfs judging by the headers.
Now in my experience of a failing drive, one delayed operation is one too many – two is a sure sign of an imminent apocalypse. I’m not clear how zfsd handles this, because a slow I/O is not a failure and won’t generate a “device detached” event directly; and zfsd can only see what comes through the kernel event channel (devctl). So I took a look in the kernel ZFS module (vdev_disk.c and zio.c). ZFS detects something slow internally (zio has a timeout based, I think on zfs_deadman_synctim_ms) and it will log this but as long as it doesn’t actually generate an error, no event will be sent to devctl (and therefore zfsd won’t see it). I hope I’ve got this wrong, and I’ve seen several versions of the source code but I’m concentrating on the one in the 14.2-RELEASE base system. In other words, I don’t see it calling sEvent::Process() with this stuff.
However, there is logic for handling long operations and error counts and in case_file.cc. There are even tunable values as zpool properties (there is no “zfsd config file”)
Property
Description
Default
io_n
Number of I/O errors to trigger fault.
50
io_t
Time window (seconds) for io_n count.
60
slow_io_n
Number of delayed/slow I/O events to trigger fault.
8
slow_io_t
Time window (seconds) for slow_io_n count.
60
checksum_n
Number of checksum errors to mark DEGRADED (not full fault).
50
checksum_t
Time window (seconds) for checksum_n count.
60
These defaults are hard wired into a header file (case_file.h – DEFAULT_ZFS_DEGRADE_IO_COUNT etc), and documented in the vdevprops(7) and zfsd man pages – inconsistently.
You can try to read the current values using the command:
zpool get io_n,io_t,slow_io_n,slow_io_t,checksum_n,checksum_t zroot all-vdevs
The command for “zpool get”, which is not the same as “zfs get”, is documented in man zpool-get, and I have to say it can be a bit confusing. The format of the line above includes a list of properties followed by the zpool name followed either by a particular vdev or the special value “all-vdevs”. It’s worth running this to find out what the possible vdevs are, as it may not be what you think!
Chances are they’ll all be set to “default”, and I believe the table above has the correct default values (cribbed from the source code) but I can’t be sure. Your output for a simple mirror system should look like this:
zpool set checksum_n=3 zroot root-0
zpool set slow_io_n=3 zroot mirror-0
zpool set io_n=3 zroot ada0p3
Unfortunately the documentation is a bit hazy on the effects of setting these values in different places. Do values on leaf vdevs (e.g. ada1p3) take precedence over values set further up (e.g. mirror-0)? What I’m not sure of is whether the root-0 error count can take the whole pool offline, but I suspect it should. In other words, each level keeps its own error count and if one drive is acting up it, can it take a whole vdev or pool offline? The other explanation is that the values always cascade down to the leaf vnode (drive) if it doesn’t have a particular value set – not a chance I’d take if the host is in a data centre a long way off!
What’s worse, I can’t find out which of these values is actually used. Properties aren’t inherited but I’d have assumed zfsd would walk back up the tree from the disk to find the first set value (be that immediately or at the root vdev). I can find no such code, so which one do you set?
And you probably do want to tune these parameters, as these values don’t match my real-world experience of drive failures. I believe that Linux has defaults of 10 errors in 10 minutes, which seems a better choice. If a drive is doing that, it’s usually not long for this world, but expecting 50 errors in a minute when operations are taking 30 seconds to return while the drive tries its hardest isn’t going to cut it.
I’m also a tad suspicious that all these values are “default” – i.e. not set. This triggers zfsd to use the hard-wired values – values that can only be changed by recompiling. And I have no idea what might be using the values stored as vdev properties other than zfsd, and what counts as a “default” for them. I would have expected the values to be set on root-0 (i.e. the zpool) when the zpool is created, and inherited by vdevs unless specifically set. In other words, I smell a rat.
Linux?
I mentioned Linux doesn’t have zfsd, but I believe the kernel modules zfs.ko etc send events to it’s own zed (part of OpenZFS that FreeBSD doesn’t use), which in turns runs executables or scrips to do the hot-spare swapping and so on. If the kernel detects a device failure, it mark the vdev as DEGRADED or FAULTED. That’s to say it’s a kernel module, not a daemon doing the job of picking up on failed drives. Ilumonos had a similar system, and I assume Solaris still does.
How do you clear a zpool property?
As an aside, here’s something you won’t find documented anywhere – how do you set a zpool property back to it’s default value? You might be thinking:
zpool inherit io_n zroot ada0p3
Well inherit works with zfs, doesn’t it? No such luck.
zpool io_n=default zroot ada0p3
Nope! Nor does =0 or just =
The way which works is:
zpool io_n=none zroot ada0p3
Update: 19-Nov-25
I’m still suspicious of this so I asked Allan Jude and Michael Lucas for Klara during a webinar. Apparently they don’t have a problem with zfsd. (They had a few days pre-warning of the question). I’ve added some trace stuff to it and I’m watching it closely. I never did figure out how it could detect slow operations – if anyone can enlighten me as to how the kernel communicates this to zfsd other than a “timeout, give up” event, I’d really appreciate it.
Update 01/12/2025
A couple of weeks ago Allan Jude very kindly alerted me to an update to zfsd that does indeed tackle long operations, which it didn’t before (I knew I smelled a rat). Unfortunately circumstances have prevented me from taking a proper look yet, but an updated zfsd is in the works.
There are two
mysteries things on ZFS that cause a lot of confusion: The ZIL and
the SLOG. This article is about what they are and why you should
care, or not care about them. But I’ll come to them later. Instead
I’ll start with POSIX, and what it says about writing stuff to disk
files.
When you write to
disk it can either be synchronous or asynchronous. POSIX (Portable
Operating System Interface) has requirements for writes through
various system calls and specifications.
With an
asynchronous write the OS takes the data you give it and returns
control to the application immediately, promising to write the data
as soon as possible in the background. No delay. With a synchronous
write the application won’t get control back until the data is
actually written to the disk (or non-volatile storage of some kind).
More or less. Actually, POSIX.1-2017 (IEEE Standard 1003.1-2017)
doesn’t guarantee it’s written, but that’s the expectation.
You’d want
synchronous writes for critical complex files, such as a database,
where the internal structure would break if a transaction was only
half written, and a database engine needs to know that one write has
occurred before making another.
Writes to ZFS can be
long and complicated, requiring multiple blocks be updated for a
single change. This is how it maintains its very high integrity.
However, this means it can take a while to write even the simplest
thing, and a synchronous write could take ages (in computer terms).
To get around this,
ZFS maintains a ZIL – ZFS Intent Log.
In ZFS, the ZIL
primarily serves to ensure the consistency and durability of write
operations, particularly for synchronous writes. But it’s not a
physical thing; it’s a concept or list. It contains transaction
groups that need to be completed in order.
The ZIL can be physically stored in three possible places…
In-Memory (Volatile
Storage):
This is the default location. Initially, all write operations are buffered in RAM. This is where they are held before being committed to persistent storage. This kind of ZIL is volatile because it’s not backed by any permanent storage until written to disk.
Volatility doesn’t
matter, because ZFS guarantees consistency with transaction groups
(TXGs). The power goes off and the in-RAM ZIL is lost, the
transactions are never applied; but the file system is in a
consistent state.
In-Pool (Persistent
Storage):
Without a dedicated log device (the default), the ZIL entries are written to the main storage pool in transaction groups . This happens for both synchronous and asynchronous writes but is more critical for synchronous writes to ensure data integrity in case of system crashes or power failures. All transactions must take place in order, so they all need to be committed to non-volatile storage before a synchronous write can return.
SLOG (Separate
Intent Log Device):
For better
performance with synchronous writes, you can add a dedicated device
to serve as the SLOG. This device is typically a low-latency,
high-speed storage like a short-stroked Rapter, enterprise SSD or
NVRAM. ZFS writes the log entries before they’re committed to the
pool’s main storage.
By storing the
pending TXGs on disk, either in the pool or on an SLOG, ZFS can meet
the POSIX requirement that the transaction is stored in non-volatile
storage before the write returns, and if you’re doing a lot of
synchronous writes then storing them on a high-speed SLOG device
helps. But only if the SLOG device is substantially faster than an
array of standard drives. And it only matters if you do a lot of
synchronous writes. Caching asynchronous writes in RAM is always
going to be faster still
I’d contend that the only times synchronous writes feature heavily are databases and virtual machine disks. And then there’s NFS, which absolutely loves them. See ESXi NFS ZFS and vfs-nfsd-async for more information if this is your problem.
If you still think
yo need an SLOG, install a very fast drive. These days an NVMe SLC
NAND device makes sense. Pricy, but it doesn’t need to be very
large. You can add it to a zpool with:
zpool add poolname
log /dev/daX
Where daX is the
drive name, obviously.
As I mentioned, the
SLOG doesn’t need to be large at all. It only has to cope with five
seconds of writes, as that’s the maximum amount of time data is
“allowed” to reside there. If you’re using NFS over 10Gbit
Ethernet the throughput isn’t going to be above 1.25Gb a seconds.
Assuming that’s flat-out synchronous writes, multiplying that by
five seconds is less than 8Gb. Any more would be unused.
If you’ve got a
really critical system you can add mirrored SLOG drives to a pool
thus:
zpool add poolname
log /dev/daX /dev/daY
You can also remove
them with something like:
zpool remove
poolname log /dev/daY
This may be useful
if adding an SLOG doesn’t give you the performance boost you were
hoping for. It’s very niche!
I’ve had a problem with mysql failing to start with error 35 in the log file:
InnoDB: Unable to lock ./ibdata1, error: 35
InnoDB: Check that you do not already have another mysqld process
InnoDB: using the same InnoDB data or log files.
What to do? Google and you get a lot of Linux people saying that the answer is to reboot the box. Hmm. Well you don’t have to.
What causes the error is mysqld crashing, usually when system resources are exhausted. Rebooting will, indeed, unlock ibdata1 but so will killing the process that locks it. Yet the server isn’t running, so how can this be? Well actually part of it is – just not the part the service manager sees.
Run “ps -auxww | grep mysql” and you’ll find a few more. Send them a kill, wait for it to work and then restart. Obviously you can only do this and expect it to work if you’ve sorted out the resource problem.
This is about how to run Docker on Debian Linux, not why you should want to. But it deserves an answer.
Supposing you’re running FreeBSD and someone really, really, really wants to you run something that’s only available as a Docker container? The only practical way is on a Linux VM running under bhyve. RHEL is expensive (and I no longer have an employer willing to stand me a developers’ license), CentoOS is no more. If you want to stay mainstream that leaves Debian and Arch. In my experience, Debian runs easily enough under bhyve, so Debian it is.
So log in to your new Debian installation as root and run the following, which took a while to work out so this is really a cheat sheet…
apt update
apt install curl ca-certificates

# Get docker GPG key
curl -fsSL https://download.docker.com/linux/debian/gpg \
   -o /etc/apt/keyrings/docker.asc

# This adds the latest Docker repo info to your APT sources list
echo "deb [arch=$(dpkg --print-architecture) signed-by=/etc/apt/keyrings/docker.asc]   https://download.docker.com/linux/debian $(. /etc/os-release && echo "$VERSION_CODENAME") stable" \
   | tee /etc/apt/sources.list.d/docker.list > /dev/null
apt update

# Finally install Docker
apt install docker-ce docker-ce-cli containerd.io -y

# You can check it's there by running   docker --version
systemctl enable docker
You can check it’s running with systemctl stop docker, and stop it with systemctl stop docker.
If you’re going to run this as a non-root user (probably a good idea) you’ll probably need to add yourself to the docker group:
usermod -aG docker your-user-id
This is just the Linux way of adding you to the /etc/group file.
If you’re in the data recovery, forensics or just storage maintenance business (including as an amateur) you probably already know about ddrescue. Released about twenty years ago by Antonio Diaz Diaz, it was a big improvement over the original concept dd_rescue from Kurt Garloff in 1999. They copy disk images (which are just files in Unix) trying to get as much data extracted when the drive itself has faults.
If you’re using Windows rather than Unix/Linux then you probably want to get someone else to recover your data. This article assumes FreeBSD.
The advantage of using either of these over dd or cp is that they expect to find bad blocks in a device and can retry or skip over them. File copy utilities like dd ignore errors and continue, and cp will just stop. ddrescue is particularly good at retrying failed blocks, and reducing the block size to recover every last readable scrap – and it treats mechanical drives that are on their last legs as gently as possible.
If you’re new to
it, the manual for ddrescue can be found here.
https://www.gnu.org/software/ddrescue/manual/ddrescue_manual.html
However, for most
use cases the command is simple. Assuming the device you want to copy
is /dev/da1 and you’re calling it thumbdrive the command would be:
ddrescue /dev/da1
thumbdrive.img thumbdrive.map
The device data would be stored in thumbdrive.img, with ongoing state information stored in thumbdrive.map. This state information is important, as it allows ddrescue to pick up where it left off.
However, ddrescue was written before USB flash drives (pen drives, thumb drives or whatever). That’s not to say it doesn’t work, but they have a few foibles of their own. It’s still good enough that I haven’t modified ddrescue base code to cope, but by using a bit of a shell script to do the necessary.
USB flash drives seem to fail in a different way to Winchester disks. If a block of Flash EPROM can’t be read it’s going to produce a read error – fair enough. But they have complex management software running on them that attempts to make Flash EPROM look like a disk drive, and this isn’t always that great in failure mode. In fact I’ve found plenty of examples where they come across a fault and crash rather than returning an error, meaning you have to turn them off and on to get anything going again (i.e. unplug them and put them back in).
So it doesn’t matter how clever ddrescue is – if it hits a bad block and the USB drive controller crashes the it’s going to be waiting forever for a response and you’ll just have come reset everything manually and resume. One of the great features of ddrescue is that it can be stopped and restarted at any time, so continuing after this happens is “built in”.
In reality you’re going to end up unplugging your USB flash drive many times during recovery. But fortunately, it is possible to turn a USB device off and on again without unplugging it using software. Most USB hardware has software control over its power output, and it’s particularly easy on operating systems like FreeBSD to do this from within a shell script. But first you have to figure out what’s where in the device map – specifically which device represents your USB drive in /dev and which USB device it is on the system. Unfortunately I can’t find a way of determining it automatically, even on FreeBSD. Here’s how you do it manually; if you’re using a version of Linux it’ll be similar.
When you plug a USB
storage device into the system it will appear as /dev/da0 for the
first one; /dev/da1 for the second and so on. You can read/write to
this device like a file. Normally you’d mount it so you can read
the files stored on it, but for data recovery this isn’t necessary.
So how do you know which /dev/da## is your media? This easy way to tell is that it’ll appear on the console when you first plug it in. If you don’t have access to the console it’ll be in /var/log/messages. You’ll see something like this.
Jun 10 17:54:24 datarec kernel: umass0 on uhub5
kernel: umass0: <vendor 0x13fe USB DISK 3.0, class 0/0, rev 2.10/1.00, addr 2> on usbus1
kernel:  umass0 on uhub5
kernel:  umass0:  on usbus1
kernel:  umass0:  SCSI over Bulk-Only; quirks = 0x8100
kernel:  umass0:7:0: Attached to scbus7
kernel:  da0 at umass-sim0 bus 0 scbus7 target 0 lun 0
< USB DISK 3.0 PMAP> Removable Direct Access SPC-4 SCSI device
kernel:  da0: Serial Number 070B7126D1170F34
kernel:  da0: 40.000MB/s transfers
kernel:  da0: 59088MB (121012224 512 byte sectors)
kernel: da0: quirks=0x3
kernel: da0: Write Protected
So this is telling
us that it’s da0 (i.e /dev/da0)
The hardware
identification is “<vendor 0x13fe USB DISK 3.0, class 0/0, rev
2.10/1.00, addr 2> on usbus1” which means it’s on USB bus 1,
address 2.
You can confirm this
using the usbconfig utility with no arguments:
ugen5.1:  at usbus5, cfg=0 md=HOST spd=HIGH (480Mbps) pwr=SAVE (0mA)
 ...snip...
ugen1.1:  at usbus1, cfg=0 md=HOST spd=HIGH (480Mbps) pwr=SAVE (0mA)
ugen1.2:  at usbus1, cfg=0 md=HOST spd=HIGH (480Mbps) pwr=ON (300mA)
There it is again,
last line.
usbconfig has lots
of useful commands, but the ones we’re interested are power_off and
power_on. No prizes for guessing what they do. However, unless you
specify a target then it’ll switch off every USB device on the
system – including your keyboard, probably.
There are two ways
of specifying the target, but I’m using the -d method. We’re
after device 1.2 so the target is -d 1.2
Try it and make sure
you can turn your USB device off and on again. You’ll have to wait
for it to come back online, of course.
There are ways of doing this on Linux by installing extra utilities such as hub-ctrl. You may also be able to do it by writing stuff to /sys/bus/usb/devices/usb#/power/level” – see the manual that came with your favourite Linux distro.
The next thing we
need to do is provide an option for ddrescue so that it actually
times out if the memory stick crashes. The default is to wait
forever. The –timeout=25 or -T 25 option (depending on your optional
taste) sees to that, making it exit if it hasn’t been able to read
anything for 25 seconds. This isn’t entirely what we’re after, as
a failed read would also indicate that the drive hadn’t crashed.
Unfortunately there’s no such tweak for ddrescue, but failed reads
tend to be quick so you’d expect a good read within a reasonable
time anyway.
So as an example of putting it all into action, here’s a script for recovering a memory stick called duracell (because it’s made by Duracell) on USB bus 1 address 2.
#!/bin/sh
while ! ddrescue -T 25 -u /dev/da0 duracell.img duracell.map
 do
     echo ddrescue returned $?
     usbconfig -d 1.2 power_off
     sleep 5
     usbconfig -d 1.2 power_on
     sleep 15
     echo Restarting
 done
A few notes on the
above. Firstly, ddrescue’s return code isn’t defined. However, it
appears to do what one might expect so the above loop will drop out
if it ever completes. I’ve set the timeout for time since last good
read to 25 seconds, which seems about right. Turning off the power
for 5 seconds and then waiting for 15 seconds for the system to
recognise it may be a bit long – tune as required. I’m also using
the -u option to tell ddrescue to only go forward through the drive
as it’s easier to read the status when it’s always incrementing.
Going backwards and forwards makes sense with mechanical drives, but
not flash memory.
Aficionados of
ddrescue might want to consider disabling scraping and/or trimming
(probably trimming) but I’ve seen it recover data with both
enabled. Data recovery is an art, so tweak away as you see fit – I
wanted to keep this example simple.
Now this system
isn’t prefect. I’m repurposing ddrescue, which does a fine job on
mechanical drives, to recover data from a very different animal. I
may well write a special version for USB Flash drives but this method
does actually work quite well. Let me know how you get on.
How do you force a string into proper case in a Unix shell script? (That is to say, capitalise the first letter and make the rest lower case). Bash4 has a special feature for doing it, but I’d avoid using it because, well, I want to be Unix/POSIX compatible.
It’s actually very easy once you’ve realised tr won’t do it all for you. The tr utility has no concept on where in the input stream it is, but combining tr with cut works a treat.
I came across this problem when I was writing a few lines to automatically create directory layouts for interpreted languages (in this case the Laminas framework). Languages of this type like capitalisation of class names, but other names have be lower case.
Before I get started, I note about expressing character ranges in tr. Unfortunately different systems have done it in different ways. The following examples assume BSD Unix (and POSIX). Unix System V required ranges to be in square brackets – e.g. A-Z becomes “[A-Z]”. And the quotes are absolutely necessary to stop the shell globing once you’ve introduced the square brackets!
Also, if you’re using a strange character set, consider using \[:lower:\] and \[:upper:\] instead of A-Z if your version of tr supports it (most do). It’s more compatible with foreign character sets although I’d argue it’s not so easy on the eye!
Anyway, these examples use A-Z to specify ASCII characters 0x41 to 0x5A – adjust to suit your tr if your Unix is really old.
To convert a string ($1) into lower case, use this:
lower=$(echo $1 | tr A-Z a-z)
To convert it into upper case, use the reverse:
upper=$(echo $1 | tr a-z A-Z)
To capitalise the first letter and force the rest to lower case, split using cut and force the first character to be upper and the rest lower:
This is tested on FreeBSD in /bin/sh, but should work on all BSD and bash-based Linux systems using international character sets.
You could, if you wanted to, use sed to split up a multi-word string and change each word to proper case, but I’ll leave that as an exercise to the reader.
Unless you’ve been living in a very Linux-free environment for a while, you’ll know about systemd – the collection of daemons intended to replace the System V init system commonly found on Linux, with something more complicated. I’m not a fan of System V startup, but they might have done better by going for the Research Unix or BSD /etc/rc approach for robustness, simplicity and compatibility. But Linux, to many, is a launcher stub for graphical desktops running LibreOffice and games, and these probably work better with systemd syntax when controlled by a simple GUI.
Systemd is more than an init system – in fact it has daemons from everything from the keyboard to DNS resolution – and network interface configuration (networkd)
This nightmare came out of Red Hat, and Linux distributions like Debian, Ubuntu, openSUSE, Arch, and their derivatives have started using it. One result, amongst other things, is that it’s suddenly not possible to configure networks the way you used to using ifconfig and /etc/resolv.conf.
You can install the missing ifconfig and suchlike using a package called net-tools, which is present on most major Linux distributions and is installed in the appropriate way (dnf, apt, yum etc). This may be the best way to keep scripts working.
Otherwise, you might be hoping systemd-networkd has simplified things, with less to type. But I’m afraid not.
So for those who are struggling, here’s a cheat sheet.
Names
The first think you’ll have to remember is that systemd-networkd doesn’t call your Ethernet interfaces eth0:, eth1. It doesn’t even call them by their driver name+enum BSD style. Instead it mungs a name from indices provided by the firmware, PCIe slot number and even the MAC address. Look out for some very strange interface names.
The idea is that the NIC/port has a predictable name, which is great in theory. I can see two problems: Firstly this doesn’t really help you find the RJ45 any better unless you have a schematic. Secondly, if you pull the system from one host and put it in another it all goes to hell in a handcart anyway. On the plus side I guess it means that adding or removing a NIC isn’t going to change the name of the existing ports.
For what it’s worth, eno# is an onboard device, ens# is a PCI slot index, enp#s# is port number on NIC and PCI slot index. enx1122334455667788 is the MAC address but this behaviour seems to be turned off on most systems. If it can’t determine anything it will fall back to eth#.
There are ways of selecting the old behaviour using kernel parameters or knobbling the /etc/systemd/network/… something “default” depending on system but you should check that out in the man page. Oh, hang on, this is Linux there probably no man pages.
Cheat Sheet
Old
New
ifconfig eth0 192.168.1.2/24
ip addr add 192.168.1.2/24 dev eth0
ifconfig eth0 192.168.1.2 delete
ip addr del 192.168.1.2/24 dev eth0
ifconfig eth0 netmask 255.255.255.0
? Set address and netmask together ?
ifconfig eth0 mtu 5000
ip link set eht0 mtu 5000
ifconfig eth0 down (or up)
ip link set eth0 down (or up)
ifconfig
ip a
netstat
ss
netstat -r
ip route show
route
ip r
route add default 192.168.1.254
ip route add default via 192.168.1.254
arp -a
ip n
ifconfig eht0 name wan1
? Not possible from command line ?
The last entry in the table is about renaming an interface, which given the user-hostile names now generated is even more useful. I haven’t figured out how to do this from the command line, but the assumption is that all interface configuration is done in configuration files by default, which brings us neatly on to these.
Configuring at startup
At one time you could just edit /etc/network/interfaces, and it might still work (it does int he latest Debian, for example). In BSD stick simple definitions in rc.conf, but that’s too easy. Anyway, /etc/network/interfaces could look something like this:
After editing the configuration files(s) you could restart:
/etc/init.d/networking [start | stop | restart]
But some systemd Linux distributions are different. Systemd-networkd has a directory tree full of configuration stuff and I can only scratch the surface here.
Basically a load of *.network stored in /etc/systemd/network/ get run in sort order. It’s normal to prefix each file with two digits and a dash to set this order. I don’t think there’s any reason not to use a single file, but in the Linux world people don’t, often choosing to make the rest of the filename the NIC name, such as “04-enp0s5.network“, although the name you choose is only for your reference (or that of some GUI configuration tool).
To force every NIC to configure using dhcp create a file 02-dhcpall.network:
[Match]
Name=en*
[Network]
DHCP=yes
Note the wildcard on the NIC Name=*
On the other hand if you want to make one specific card static, have a file which you might want to call 01-enp5s2.network:
This should be fairly self-explanatory. You can specify multiple Address= lines (aliases) but for some reason DNS servers tend to be listed on one line, although multiple lines do work in my experience. I’ve used IPv4 in the examples but IPv6 works too.
Domains=example.com test.example.com is basically the DNS search domains (as normally found in resolv.conf). As systemd has its own resolver, systemd-resolved, it’s not just a matter of edit one file any longer, and is also less flexible.
You can restart systemd-networkd with:
systemctl restart systemd-networkd
If you haven’t made any mistakes you might still be connected to your server.