Prepending is, of course, adding stuff to the front of a file whereas appending is sticking it on the end. Prepending is an affront to sequential file handling and should never be attempted, but if you really want to do it anyway, it got a few of us thinking.
To append stuff to a file it’s easy.
echo New stuff >> existing-file
The first thing that came into our heads was to reverse the file, append the new stuff and then reverse it again. Except “rev” reverses characters, as well as lines, so the stuff you want to append would have to be reversed to it came out the right way and… it was getting messy.
Someone suggested tac to reverse the file line-by-line, which was better, but tac???? Apparently it’s a Linux reverse “cat” that writes stuff out backwards line by line. On Unix it appears to be the equivalent of “tail -r”, but the -r option doesn’t exist on the GNU version. I see that a lot on Linux – they have a cut-down version of some Unix utility and spawn another utility to fill the shortcomings rather than adding it.
But, even with tail -r (or tac) it gets a bit messy – you really need a temp file as far as I can figure it. Does anyone have devious way to avoid it?
This is only going to work with bash, which has an extension that captures the output of a process and feeds it into stdin: <(....). You do the same easily Bourne shell using a named pipe, but it’s just making things more complicated when there’s a simpler solution when a utility uses a – to stand for stdin in a list of file arguments:
Then it was suggested that sed -i might do it “in place”. If course it’s not in-place on the disk, but it looks neater and you can pretend it’s okay.
echo New Stuff | sed -i "1i $(cat)" existing-file
This was a team effort – Stefan persevered with sed, I added the stdin capture using cat. Note that this is GNU sed – the original sed would require you to specify a backup file extension – i.e. stick a ” after the -i (that’s two single quotes for an empty string). Actually, specifying “.backup” might be wise.
Following on from Basic UNIX file commands, here’s a bit there wasn’t time for on changing metadata on files.
These two commands change the files permissions and ownership. Permissions is information associated with a file that decides who can do what with it. This was once called the file mode, which is why the command is chmod (Change MODe). Files also have owners, both individuals and group of users, and the command to change this is chown (CHOWNer).
chown is easiest, so I’ll start there. To make a file belong to fred the command is:
chown fred myfile
To change the owning group to accounts:
chown :accounts myfile
And to change both at once:
chown fred:accounts myfile
Changing a files permissions is more tricky, and there are several ways of doing it, but this is probably the easiest to remember. You’ll recall that each file has three sets of permissions: Owner, Group and Other. The permissions themselves are read, write and execute (i.e. it’s an executable program).
chown can set or clear a load of permissions in one go, and the format is basically the type of permission, and ‘+’ or ‘-’ for set or clear, and the permissions themselves. What? It’s probably easier to explain with a load of examples.:
chmod u+w myfile
Allows the user of the file to write to it (u means user/owner)
chmod g+w myfile
Allows any user in the group the file belongs to write to it.
chmod o+r myfile
Allows any user who is not in the files group or the owner to read it. (o means “other”).
You can combine these options
chmod ug+rw

Allows the owner and the group to read and write the file.
chmod go-w

Prevents anyone but the user from being able to modify the file.
If you want to run a program you’ve just written called myprog.
chmod +x myprog
If you don’t specify anything before the +/- chmod assumes you mean yourself.
You might notice an ‘x’ permission on a directory – in this case it means the directory is searchable to whoever has the permission.
I was asked me to explain basic Unix shell file manipulation commands, so here goes.
If you’re familiar with MS-DOS, or Windows CMD.EXE and PowerShell (or even CP/M) you’ll know how to manipulate files and directories on the command line. It’s tempting to think that the Unix command line is the same, but there are a few differences that aren’t immediately apparent.
There are actually two main command lines (or shells) for Unix: sh and csh. Others are mainly compatible with these two, with the most common clones being bash and tcsh respectively. Fortunately they’re all the same when it comes to basic commands.
Directory Concepts
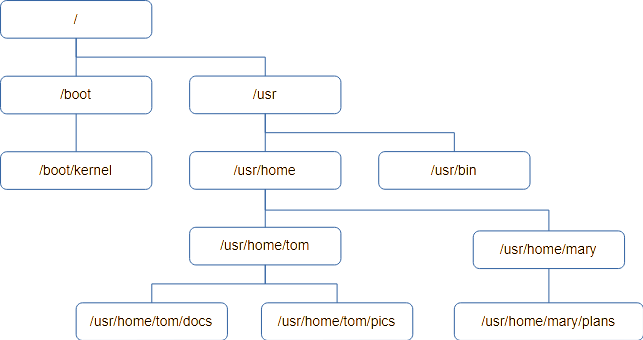
Files are organised into groups called “directories”, which are often called “Folders” on Macintosh and Windows. It’s not a great analogy, but it’s visual on a GUI. Unlike the real world, a directory may contain additional directories as well as files. These directories (or sub-directories) can also contain files and more directories and so on. If you drew a diagram you’d end up with something looking like a tree, with directories being branches coming off branches and the files themselves being leaves. All good trees start with a root from which the rest branches off, and this is no different. The start of a Unix directory tree is known as the root.
Unix has a concept called the Current Working Directory. When a program is looking for a file it is assumed it will be found in the Working Directory if no other location is specified.
Users on a Unix system have an assigned Home Directory, and their Working Directory is initially set to this when the log on.
Users may create whatever files and sub-directories they need within their Home Directory, and the system will allow the do whatever they want with anything they create as it’s owned by them. It’s possible for a normal user to see other directories on the system, in fact it’s necessary, but generally they won’t be able to modify files outside their home directory.
Here’s an example of a directory tree. It starts with the root, /, and each level down adds to the directory “path” to get to the directory.
If you want to know what your current working directory is, the first command we’ll need is “pwd” – or “Print Working Directory”. If you’re ever unsure, use pwd to find out where you are.
Unix commands tend to be short to reduce the amount of typing needed. Many are two letters, and few are longer than four.
The thing you’re most likely to want to do is see a list of files in the current directory. This is achieved using the ls command, which is a shortened form of LiSt.
Typing ls will list the names of the all the files and directories, sorted into ASCII order and arranged into as many columns as will fit on the terminal. You may be surprised to see files that begin with “X” are ahead of files beginning with “a”, but upper case “X” has a lower ASCII value than lower case “a”. Digits 0..9 have a lower value still.
ls has lots of flags to control it’s behaviour, and you should read the documentation if you want to know more of them.
If you want more detail about the files, pass ls the ‘-l’ flag (that’s lower-case L, and means “long form”). You’ll get output like this instead:
drw-r-----  2 fjl  devs        2 Aug 28 13:17 Release
drw-r-----  2 fjl  devs       29 Dec 26  2019 Debug
-rw-r-----  1 fjl  devs     2176 Feb 17  2012 editor.h
-rw-r-----  1 fjl  devs    28190 Feb  7  2012 fbas.c
-rw-r-----  1 fjl  devs    10197 Feb 17  2012 fbas.h
-rw-r-----  1 fjl  devs     5590 Feb 17  2012 fbasexpr.c
-rw-r-----  1 fjl  devs     7556 Feb  3  2012 fbasheap.c
-rw-r-----  1 fjl  devs     7044 Feb  4  2012 fbasio.c
-rw-r-----  1 fjl  devs     4589 Feb  3  2012 fbasline.c
-rw-r-----  1 fjl  devs     4069 Feb  3  2012 fbasstr.c
-rw-r-----  1 fjl  devs     4125 Feb  3  2012 fbassym.c
-rw-r-----  1 fjl  devs    13934 Feb  3  2012 fbastok.c
drw-r-----  3 fjl  devs        3 Dec 26  2019 ipch
-rw-r-----  1 fjl  devs     3012 Feb 17  2012 token.h
:
I’m going to skip the first column for now and look at the third and fourth.
fjl devs
This shows the name of the user who owns the file, followed by the group that owns the file. Unix users can be members of groups, and sometimes it’s useful for a file to be effectively used by a group rather than one user. For example, if you have an “accounts” group and all your accounts staff belong to it, a file can be part of the “accounts” group so everyone can work on it.
Now we’ve covered users and groups we can return to the first column. It shows the file flags, which are various attributes concerning the file. If there’s a ‘-’ then the flag isn’t set. The last nine flags are three sets of three permissions for the file.
The first set are the file owner’s permissions (or rights to use the file).
The second set are the file group’s permissions.
The third are the permissions for any user who isn’t either the owner or in the file’s group
Each group of three represents, in order:
r – Can the file be read, but not changed. w – can the file be written to. If not set it means you can only read it. x – can the file be run (i.e. is it a program)
So:
– rw- — — means only the user can read/write the file.
– rw- r– — means the file can be read by anyone in it’s group but only written to by the owner.
– rwx r-x — means the file is a program, probably written by its owner. Others in the group can run it, but no one else can even read it.
There are other special characters that might appear in the first filed for advanced purposes but I’m covering the basics here, and you could write a book on ls.
I’ve missed off the first ‘-’, which isn’t a permission but indicates the type of the file. If it’s a ‘-’ it’s just a regular file. A ‘d’ means it’s actually a directory. You’ll sometimes see ‘c’ and ‘s’ on modern systems, which are normally disk drives and network connections. Unix treats everything like a file so disk drives and network sockets can be found in the directory tree too. You’ll probably see ‘l’ (lower case L) which means it’s a symbolic link – a bit like a .LNK file in Windows.
This brings us to the second column, which is a number. It is the number of times the file exists in the directory tree thanks to their being links, and most cases this will be one. I’ll deal with links later.
The last three columns should be easy to guess: Length, date and finally the name of the file; at least in the case of a regular file.
There are many useful and not so useful options supported by ls. Here are a few that might be handy.
-d
By default, if you give ls a directory name it will show you the contents of the directory. If you want to see the directory itself, most likely because you want to see its permissions, specify -d.
-t
Sort output by time instead of ASCII
-r
Reverse the order of sort. -rtl is useful as it will sort your files with the newest at the end of the list.
-h
Instead of printing a file size in the bytes, which could be a very long number, display in “human readable” format, which restricts it to three characters followed by a suffix: B=bytes, K=Kb, M=Mb and so on.
-F
This is very handy if you’re not using -l, as with just the name printed you can’t tell regular and special files apart. This causes a single character to be added to the file name: ‘*’ means it’s a program (has the x flag set), ‘/’ means it’s a directory and ‘@’ means it’s a symbolic link. Less often you’ll see ‘=’ for a socket, ‘|’ for a FIFO (obsolete) and ‘%’ for a whiteout file (insanity involving union mounts).
Finally, ls takes arguments. By default it lists everything if you give it a list of files and directories, it will just list them.
Where src is a directory, ls src will list the files in that directory. Remember ls -d if you just want information on the directory?
ls src
List everything in the src and obj directories:
ls src obj
Now you can find the names of the files, how do you look at what’s in them? To display the contents of a text file the simple method is cat.
cat test.c
This prints the contents of test.c. You might just want to see the first few lines, so instead try:
head test.c
Only the first ten lines (by default) are printed.
If you want to see the last ten lines, try:
tail test.c
If you want to go down the file a screen full at a time, use.
more test.c
It stops and waits for you to press the space bar after every screen. If you’ve read enough, hit ‘q’ to quit.
less test.c
This is the latest greatest file viewer and it allows you to scroll up and down a file using the arrow keys. It’s got a lot of options.
So far we’ve stayed in our home directory, where we have kept all our files. But evenrtually you’re going to need to organise your files in a hierarchical structure in directories.
To make a directory called “new” type:
mkdir new
This is an mnemonic for “make directory”.
To change your working directory use the chdir command (Change Directory)
chdir new
Most people use the abbreviated synonym for chdir, “cd”, so this is equivalent:
cd new
Once you’re there, type “pwd” to prove we’ve moved:
pwd
If you type ls now you won’t see any files, because it’s empty.
You can also specify the directory explicitly, such as:
cd /usr/home/fred/new
If you don’t start with the root ‘/’, cd will usually start looking for the name of the new directory in the current working directory.
To move back one level up the directory level use this command:
cd ..
You’ll be back in your home directory.
To get rid of the “new” directory use the rmdir command (ReMove DIRectory)
rmdir new
This only works on empty directories, so if there were any files in it you’d have to delete them first. There are other more dangerous commands that will destroy directories and all their contents but it’s better to stick with the safer ones!
To remove an individual file use the rm (ReMove) command, in this case the file being named “unwanted”:
rm unwanted
Normally files are created by applications, but if you want a file to experiment on the easiest way to create one is “touch filename”, which creates an empty file called “filename”. You can also use the echo command:
echo “This is my new text file, do you like it?” > myfile.txt
Echo prints stuff to the screen, but “> myfile.txt” tells Unix to put the output of the echo command into “myfile.txt” instead of displaying it on the screen. We’ll use “echo” more later.
You can display the contents with:
cat myfile.txt
One thing you’re going to want to do pretty soon is copy a file, which is achieved using the cp (CoPy) command:
cp myfile.txt copy-of-myfile.txt
This makes a copy of the file and calls it copy-of-myfile.txt
You can also copy it into a directory
mkdir new
cp myfile.txt new
To see it there, type:
ls -l new
To see the original and the copy, try:
ls - newfile.txt new
If you wanted to delete the copy in “new” use the command:
rm new/myfile.txt
Perhaps, instead of copying your file into “new” you wanted to move it there, so you ended up with only one copy. This is one use of the mv (MoVe) command:
mv myfile.txt new
The file will disappear from your working directory and end up in “new”.
How do you rename a file? There’s no rename command, but mv does it for you. When all is said and done, all mv is doing is changing the name and location of a file.
cd new
mv myfile.txt myfile.text
That’s better – much less Microsoft, much more Unix.
Wildcards
So far we’ve used commands on single files and directories, but most of these commands work with multiple files in one go. We’ve given them a single parameter but we could have used a list.
For example, if we wanted to remove three files called “test”, “junk” and “foo” we could use the command:
rm test junk foo
If you’re dealing with a lot of files you have have the shell create a list of names instead of typing them all. You do this by specifying a sort of “template”, and all the files matching the template will be added to the list.
This might seem the same as Windows, but it’s not – be careful. With Windows the command does the pattern matching according to its context, but the Unix shell has no context and you may end up matching more than you intended, which is unfortunate if you’re about to delete stuff.
The matching against the template is called globbing, and uses the special characters ‘*’ and ‘?’ in it’s simplest form.
‘?’ matches any single character, whereas ‘*’ matches zero or more characters. All other characters except ‘[‘ match themselves. For example:
“?at” would match cat, bat and rat. It would not match “at” as it must have a first character. Neither will it match “cats” as it’s expecting exactly three characters.
“cat*” would match cat, cats, caterpillar and so on.
“*cat*” would match all of the above, as well as “scatter”, “application” and “hellcat”.
You can also specify a list of allowable letters to match between square brackets [ and ], which means any single character will do. You can specify a range, so [0-9] will match any digit. Putting a ‘!’ in front negates the match, so [!0-9] will match any single character that is NOT a digit. If you want to match a two-digit number use [0-9][0-9].
To test globbing out safely, I recommend the use of the echo command for safety. It works like this:
echo Hello world
This prints out Hello world. Useful, eh? But technically what it’s doing is taking all the arguments (aka parameters) one by one and printing them. The first argument is “Hello” so it prints that. The second is “world” so it prints a space and prints that, until there are no arguments left.
Suppose we type this:
echo a*
The Unix shell globs it using the * special character produces a list of all files that start with the letter ‘a’.
You can use this, for example, to specify all the ‘C’ files ending in .c:
echo *.c
If you want to include .h files in this, use
echo *.c *.h
Practice with echo to see how globbing works as it’s non-destructive!
You can also use ls, although this goes on to expand directories into their contents, which can be confusing.
When you have a command that has a source and destination, such as cp (CoPy), they will interpret the everything in the list as a file to be processed apart from the last, which it will expect to be a directory. For example:
cp test junk foo rubbish
Will copy “test”, “junk” and “foo” into an existing directory rubbish.
Now for a practical example. Suppose you have a ‘C’ project where everything is in one directory. .c files, .h files, .o files as well as the program itself. You want to sort this out so the source is in one directory and the objects in another.
Some people seem to think that disabling network pings (ICMP echo requests to be exact) is a great security enhancement. If attackers can’t ping something they won’t know it’s there. It’s called Security through Obscurity and only a fool would live in this paradise.
But supposing you have something on your network that disables pings and you, as the administrator, want to know if it’s up? My favourite method is to send an ARP packet to the IP address in question, and you’ll get a response.
ARP is how you translate an IP address into a MAC address to get the Ethernet packet to the right host. If you want to send an Ethernet packet to 1.2.3.4 you put out an ARP request “Hi, if you’re 1.2.3.4 please send your MAC address to my MAC address”. If a device doesn’t respond to this then it can’t be on an Ethernet network with an IP address at all.
You can quickly write a program to do this in ‘C’, but you can also do it using a shell script, and here’s a proof of concept.
You run this with a single argument (hostname or IP address) and it will print out whether it is down or up.
The first line is simply the shell needed to run the script.
Line 2 bails out if you forget to add an argument.
Line 3, which is commented out, deletes the host from the ARP cache if it’s already there. This probably isn’t necessary in reality, and you need to be root user to do it. IP address mappings are typically deleted after 20 minutes, but as we’re about to initiate a connection in line 4 it’ll be refreshed anyway.
Line 4 sends a ping to the host. We don’t care if it replies. The timeout is set to the minimum 1 second, which means there’s a one second delay if it doesn’t reply. Other ways of tricking the host into replying exist, but every system has ping, so ping it is here.
Live 5 will print <hostname> is up if there is a valid ARP cache entry, which can be determined by the presence of “expires in” in the output. Adjust as necessary.
The last line, if still running, prints <hostname> is down. Obviously.
This only works across Ethernet – you can’t get an ARP resolution on a different network (i.e. once the traffic has got through a router). But if you’re on your organisation’s LAN and looking to see if an IoT devices is offline, lost or stolen then this is a quick way to poll it and check.
FreeBSD may be the hottest operating system available, but having hot hardware isn’t so good. Modern drives and CPUs can report their temperature, but it’s not easy to see it.
I’ve produced an example script that will report the temperature of whatever it can, with the idea that it can form the basis of whatever you really need to do. I have a multi-server monitoring system using the same methods.
Getting the CPU core temperature is a simple sysctl variable, but it only appears if you have the coretemp.ko module loaded or compiled into the kernel. But coretemp.ko only works for Intel processors; for AMD you need amdtemp.ko instead.
The script tries to determine the CPU type the best way I know how, and loads the appropriate module if necessary. If it loads the module, it unloads the module at the end to leave things as it found them. You can omit the unload so it’s loaded on first, or put the module permanently in loader.conf if you prefer. But this is only an example, and I prefer to keep my scripts independent of host configuration.
Next you need a way to get the temperature from all your drives. This isn’t built in to FreeBSD but you can use the excellent the excellent smartmontools https://www.smartmontools.org by Bruce Allen and Christian Franke.
This was originally intended to access the SMART reporting on ATA drives, but will now extract information for SAS units too. To smartmontools, and the “smartctl” utility in particular, you can build from ports with:
cd /usr/ports/sysutils/smartmontools
make install clean
You can also install it as a binary package with: “pkg install smartmontools”
The script tries to enumerate the drives and CPUs on the system. ATA drives are in /dev/ and begin “ada”, SCSI and USB drives begin “da”. The trick is to figure out which devices are drives and which are partitions or slices within a drive – I don’t have a perfect method.
SCSI drives that aren’t disks (i.e. tape) start “sa”, and return some really weird stuff when smartctl queries them. I’ve tested the script with standard LTO tape drives, but you’ll probably need to tweak it for other things. (Do let me know).
Figuring out the CPUs is tricky, as discrete CPUs and cores within a single chip appear the same. The script simply goes on the cores, which results in the same temperature being reported for each.
You can override any of the enumeration by simply assigning the appropriate devices to a list, but where’s the fun? Seriously, this example shows how you can enumerate devices and it’s useful when you’re monitoring disparate hosts using the same script.
Finally, there are three loops that read the temperature for each device type into into “temp” and then print it. Do whatever you want – call “shutdown -p now” if you think something’s too hot; autodial the fire brigade or, as I do, send yourself an email.
The Script
#!/bin/sh # FreeBSD Temperature monitoring example script # (c) FJL 2024 frank@fjl.co.uk # Please feel free to use this as an example for a few techniques # including enumerating devices on a host and extracting temperature # information.
# Full path to utilities in case run with no PATH set GREP=/usr/bin/grep SMARTCTL=/usr/local/sbin/smartctl CUT=/usr/bin/cut SYSCTL=/sbin/sysctl
# Load the AMD CPU monitoring driver if necessary if [ ! $($SYSCTL -n dev.cpu.0.temperature 2>/dev/null) ] then # Let's try to find out if we have Intel or # AMD processor and select correct kernel module if $SYSCTL -n hw.model | $GREP AMD >/dev/null then tempmodule=amdtemp else tempmodule=coretemp fi # Load the CPU temp kernel module kldload $tempmodule # Set command to unload it when we're done (optional) unload="kldunload $tempmodule" fi # Enumerate SATA, USB and SAS disks - everything # in /dev/ starting da or ada disks=$(find /dev -depth 1 -type c \( -name da[0-9+] -o -name ada[0-9+] \) | cut -c 6- | sort )
# Enumerate other SCSI devices, starting in sa. # Normally tape drives. May need tweaking! scsis=$(find /dev -depth 1 -type c \( -name sa[0-9+] \) | cut -c 6- | sort)
# Print all the disks for disk in $disks do temp=$($SMARTCTL -a /dev/$disk | $GREP Temperature_Celsius | $CUT -w -f 10) echo "$disk: ${temp}C" done
# Print all the SCSI devices (e.g. tapes) # NB. This will probably take a lot of fiddling as SCSI units return all sorts to smartctl # Note the -T verypermissive. see man smartctl for details. for scsi in $scsis do temp=$($SMARTCTL -a -T verypermissive /dev/$scsi | $GREP "Current Drive Temperature" | cut -w -f 4) echo "$scsi: ${temp}C" done
# Print all the CPUs for cpu in $cpus do temp=$($SYSCTL -n dev.cpu.$cpu.temperature | $CUT -f 1 -d .) echo "CPU$cpu: ${temp}C" done
# Unload the CPU temp kernel module if we loaded it (optional) $unload
How do you force a string into proper case in a Unix shell script? (That is to say, capitalise the first letter and make the rest lower case). Bash4 has a special feature for doing it, but I’d avoid using it because, well, I want to be Unix/POSIX compatible.
It’s actually very easy once you’ve realised tr won’t do it all for you. The tr utility has no concept on where in the input stream it is, but combining tr with cut works a treat.
I came across this problem when I was writing a few lines to automatically create directory layouts for interpreted languages (in this case the Laminas framework). Languages of this type like capitalisation of class names, but other names have be lower case.
Before I get started, I note about expressing character ranges in tr. Unfortunately different systems have done it in different ways. The following examples assume BSD Unix (and POSIX). Unix System V required ranges to be in square brackets – e.g. A-Z becomes “[A-Z]”. And the quotes are absolutely necessary to stop the shell globing once you’ve introduced the square brackets!
Also, if you’re using a strange character set, consider using \[:lower:\] and \[:upper:\] instead of A-Z if your version of tr supports it (most do). It’s more compatible with foreign character sets although I’d argue it’s not so easy on the eye!
Anyway, these examples use A-Z to specify ASCII characters 0x41 to 0x5A – adjust to suit your tr if your Unix is really old.
To convert a string ($1) into lower case, use this:
lower=$(echo $1 | tr A-Z a-z)
To convert it into upper case, use the reverse:
upper=$(echo $1 | tr a-z A-Z)
To capitalise the first letter and force the rest to lower case, split using cut and force the first character to be upper and the rest lower:
This is tested on FreeBSD in /bin/sh, but should work on all BSD and bash-based Linux systems using international character sets.
You could, if you wanted to, use sed to split up a multi-word string and change each word to proper case, but I’ll leave that as an exercise to the reader.
Leon Juranic from Croatian security research company Defensecode has written a rather good summary of some of the nasty tricks you can play on UNIX sysadmins by the careful choice of file names and the shell’s glob functionality.
The shell is the UNIX/Linux command line, and globbing is the shell’s wildcard argument expansion. Basically, when you type in a command with a wildcard character in the argument, the shell will expand it into any number of discrete arguments. For example, if you have a directory containing the files test, junk and foo, specifying cp * /somewhere-else will expand to cp test junk foo /somewhere else when it’s run. Go and read a shell tutorial if this is new to you.
Anyway, I’d thought most people knew about this kind of thing but I was probably naïve. Leon Juranic’s straw poll suggests that only 20% of Linux administrators are savvy.
The next alarming thing he points out is as follows: Another interesting attack vector similar to previously described 'chown'
attack is 'chmod'.
Chmod also has --reference option that can be abused to specify arbitrary permissions on files selected with asterisk wildcard.
Chmod manual page (man chmod):
--reference=RFILE
use RFILE's mode instead of MODE values
Oh, er! Imagine what would happen if you created a file named “–reference=myfile”. When the root user ran “chmod 700 *” it’d end up setting the access permissions on everything to match those of “myfile”. chown has the same option, allowing you to take ownership of all the files as well.
It’s funny, but I didn’t remember seeing those options to chmod and chown. So I checked. They don’t actually exist on any UNIX system I’m aware of (including FreeBSD). On closer examination it’s an enhancement of the Linux bash shell, where many a good idea turns out to be a new vulnerability. That said, I know of quite a few people using bash on UNIX.
This doesn’t detract from his main point – people should take care over the consequences of wildcard expansion. The fact that those cool Linux guys didn’t see this one coming proves it.
This kind of stuff is (as he acknowledges) nothing new. One of the UNIX administrators I work with insists on putting a file called “-i” in every directory to stop wild-card file deletes (-i as an argument to rm forces an “Are you sure?” prompt on every file. And then there’s the old chestnut of how to remove a file with a name beginning with a ‘-‘. You can easily create one with: echo test >-example
Come back tomorrow and I’ll tell you how to get rid of it!
I had a directory with thousands of files from a Windoze environment with inconsistent file extension Some ended in .hgt, others in .HGT. They all needed to be in lower case, for some Windows-written cross-compiled software to find them. UNIX is, of course, case-sensitive on such things but Windoze with its CP/M-like file system used upper-case only, and when the shift key was invented, decided to ignore case.
Anyway, rather than renaming thousands of files by hand I thought I’d write a quick script. Here it is. Remember, the old extension was .HGT, but I needed them all to be .hgt:
for oldname in `find . -name "*.HGT"`
do
newname=`echo $oldname | tr .HGT .hgt`
mv $oldname $newname
done
Pretty straightforward but I’d almost forgotten the tr (translate) command existed, so I’m now feeling pretty smug and thought I’d share it with the world. It’ll do more than a simple substitution – you could use “[A-Z] [a-z]” to convert all upper case characters in the file to lower case, but I wanted only the extensions done. I could probably have used -exec on the find command, but I’ll leave this as an exercise for the reader!
It could me more compact if you remove the $newname variable and substitute directly, but I used to have an echo line in there giving me confirmation I was doing the right thing.