Both the top and ps utilities will tell you what a given process is doing, which is generally running on a CPU or waiting for something. However, the documentation doesn’t really tell you what these states mean. The man page for the ps utility suggests reading the system source code. (sys/proc.h).
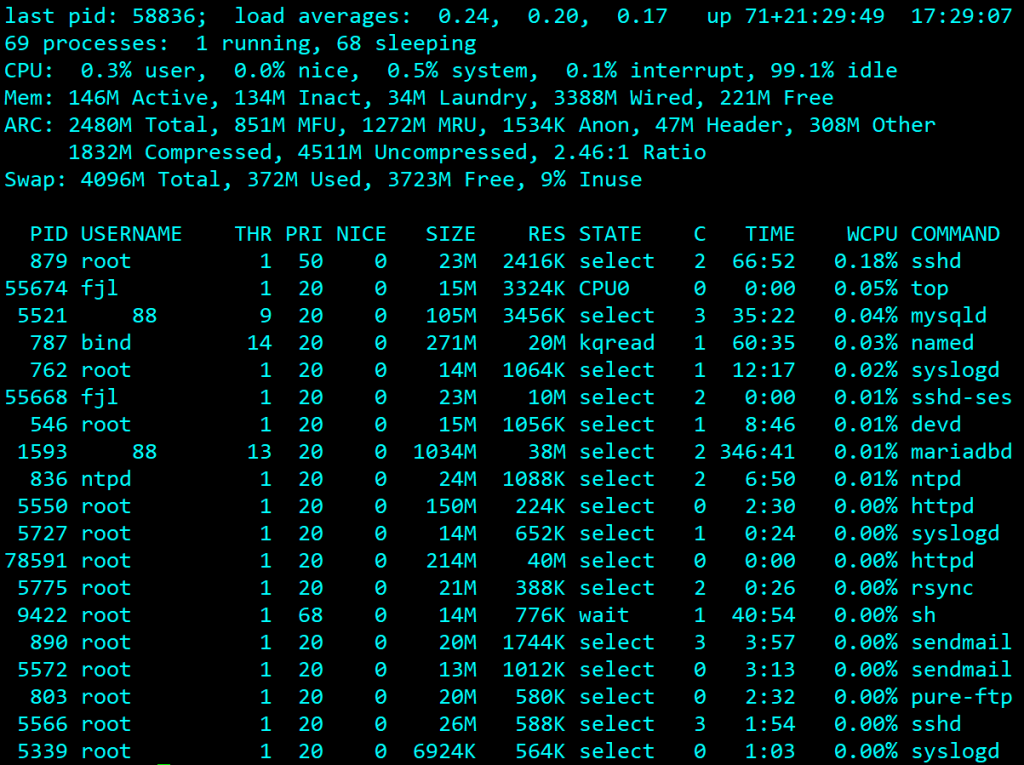
In this post I’ll deal with the common process states in top, the STATE column in the screenshot below.
Other columns are:
PID is the process-ID
USERNAME the user that the process is running under.
THR isn’t documented but I’m very sure it’s the thread count – i.e. the number of threads used by a multi-threaded process.
PRI is the current process priority, and NICE is the nice value – an often misunderstood weighting used by the scheduler when determining the current priority. It’s outside the scope of this post.
SIZE and RES are the total size of the process and the amount of real RAM currently being used, given it may have allocated memory that hasn’t been used yet or may be paged out.
C is the CPU number to which the process is currently assigned
TIME is the amount of CPU time (in seconds) the process has used since it was started.
WCPU is the percentage CPU time currently being used by the process. Note that if you have four CPUs you can have 400% utilisation, as this applies to a single CPU.
And then, of course, there’s STATUS.
Officially, the status is one of one of “START”, “RUN”, “SLEEP”, “STOP”, “ZOMB”, “WAIT”, “LOCK” or the event being waited for. Run means it’s the currently running process, but SMP systems, RUN will be replaced by CPUn, where n is the CPU number doing the running. You’re unlikely to actually see the others as if a process isn’t running it’s going to be waiting for an event. But this is what they mean:
START. A very short-lived state when the process is in the process of being created.
SLEEP. The process can’t run as it’s waiting for an event (a character to be typed, a disk operation to complete and suchlike). In top you normally see the event being waited for, and these will be listed later.
WAIT. A parent process is waiting for a child process to finish, or more accurately, change state. This means the parent process has called wait(), waitpid(), wait4() or similar (see man 2 wait for a full list).
LOCK. The process is waiting until the kernel grants it a lock of some kind. You normally see the lock its waiting for prefixed with a ‘*’ rather than just plain “LOCK”.
CPUn. The process is currently running on CPU n on an SMP system.
RUN. The process is currently running on the single CPU.
STOP. The process has been stopped (suspended) by sending it a SIGSTOP (e.g. by typing Ctrl-Z). It may be restarted using SIGSTART (or running fg/bg).
ZOMB. A process has stopped but remains in memory as the parent hasn’t collected its exit status yet. This state doesn’t normally last long unless something’s wrong with the parent. You can’t kill a zombie process (the clue is in the name) so if you have one hanging around it will need a reboot to clear it – but don’t worry too much as it won’t be using much memory or other resources.
As I’ve said, you probably won’t see many of these as a process spends most of its time waiting for an event to happen, and in such cases, it shows the event in question. Common events are:
STATE
Meaning
Reason or system call(s) involved
kqread
Waiting for an event to be posted to a kqueue descriptor
kevent() extremely common in modern servers (e.g., nginx, OpenZFS-related daemons, libevent-based apps)
sigwai
Waiting for a signal
sigwait(), sigwaitinfo(), sigtimedwait(); used by POSIX signal-handling threads
select
Waiting to read/write file.
Legacy select() or pselect() calls, still common but being replaced with kqueue/poll.
nanslp
Sleeping with nanosecond precision
nanosleep() or clock_nanosleep() used for timers, short sleeps, Rate limiting.
lockf
Blocked waiting on an advisory file record lock (byte-range lock)
Database or similar waiting to lock part of a shared file. fcntl(…, F_SETLKW, …)
accept
Waiting for incoming TCP connection
Classic blocking accept loop; seen in prefork servers, simple daemons calling accept()
pause
Suspended waiting for any signal
Used by older software (including the shell!) calling pause()
wait
Waiting for a child process to change state or end.
wait(), waitpid() etc. Very common for parent processes (shells, init-like processes, daemons that fork children)
CPUn
Actively running on CPU number ‘n’
It may mean that the process is in a state that it can be given to a CPU, or it may actually be running.
sbwait
Waiting for socket buffer space (send) or data arrival (receive)
Socket I/O wait (e.g., TCP send buffer full or recv waiting)
biord biow
Blocked on block I/O read / write (disk/network filesystem operations)
Waiting for disk I/O completion
piperd pipewr
Blocked reading or writing to a pipe
Pipe I/O wait. Given pipes are now sockets you don’t see this on BSD any more (or at least, I don’t).
uwait
Userland wait
Often related to threading / synchronization primitives like pthread_cond_wait() , sem_wait()
In parts one and two I covered making the PPP connection, firewall and the DHCP server. This just leaves DNS.
Unbound
FreeBSD has stopped providing a proper DNS server (BIND – the Berkeley Internet Name Daemon) in the base system, replacing it with “unbound”. This might be all you need if you just want to pass DNS queries through to elsewhere and have them cached. It will even allow you to configure your local name server for hosts on the LAN.
To kick off unbound once run “service local_unbound onestart“. This will clobber your /etc/resolv.conf file but it keeps a backup – note well where it’s put it! Probably /var/backups/resolv.conf.20260103.113619 (where the suffix is the date and a random number)
For some strange reason (possibly Linux related) the configuration files for unbound are stored in /var/unbound – notably unbound.conf. By default it will only resolve addresses for localhost, so you’ll need to do a bit of tweaking. Assume your LAN is 192.168.1.0/24 and this host (the gateway/router) is on 192.168.1.2 as per the earlier articles. Add the lines to the server section so it becomes:
There is a warning at the top of the file that it was auto-generated but it’s safe to edit manually in this case. The interface lines are, as you might expect, the explicit interfaces to listen on. The access-control lines are vital, as listening on an interface doesn’t mean it will respond to queries on that subnet. The paranoid blocking access-control lines are probably redundant unless you make a slip-up in configuring something somewhere else and a query slips in through the back door.
Once configured you can now use 192.168.1.2 as your LAN’s DNS resolver by setting it isc-dhcpd to issue it. A add local_unbound_enable="YES" to your /etc/rc.conf file to have it load on boot.
BIND
Unbound is a lightweight local DNS resolver, but you might want full DNS. I know I do. Therefore you’ll need to install BIND (aka named).
We’re actually looking for BIND9, so search packages for the version you one. This will currently be bind918, bind920 or bind9-devel. Personally I’ll leave someone else to play with the latest version and go for the middle (bind9 version 20).
pkg install bind920
You’ll then need to generate a key to control it using the rndc utility (more on that later)
rndc-confgen -a
Next we’ll need to edit some configuration files:
cd /usr/local/etc/namedb
Here you should find named.conf, which is identical to named.conf.sample in case it’s missing or you break it. The changes are minor.
Around line 20 there’s the listen-on option. Set this to:
listen-on { 127.0.0.1; 192.168.1.2;};
Again, this assumes that 192.168.1.2 is this machine. That’s all you need to do it you want it to provide services to the LAN. While we’re in the options section change the zone file format from modern binary to text. Binary is quicker for massive multi-zone DNS servers, but text is traditional and more convenient otherwise.
masterfile-format text;
If you’re going to do DNS properly you need to configure the local domain. At the the end of the file add the following as appropriate. In this series we’re assuming your domain is example.com and this particular local site is called mysite – i.e. mysite.example.com. All hosts on this site will therefore be named as jim.mysite.example.com, printer.mysite.example.com and so on.
zone "mysite.example.com"
{
        type primary;
        file "/usr/local/etc/namedb/primary/mysite.example.com";
};

zone "1.168.192.in-addr.arpa"
{
        type primary;
        file "/usr/local/etc/namedb/primary/1.168.192.in-addr.arpa";
};
The first file is the zone file, mapping hostnames on to IP addresses. The second is the reverse lookup file. They will look something like this:
; mysite.example.com
;
$TTL 86400      ; 1 day
mysite.example.com        IN SOA  ns0.mysite.example.com. hostmaster.example.com. (
                                2006011238 ; serial
                                18000      ; refresh (5 hours)
                                900        ; retry (15 minutes)
                                604800     ; expire (1 week)
                                36000      ; minimum (10 hours)
                                )
@                       NS      ns0.mysite.example.com.

adderview1              A       192.168.1.204
c5750                   A       192.168.1.201
canoninkjet             A       192.168.1.202
dlinkswitch             A       192.168.1.5
gateway                 A       192.168.1.2
eap245                  A       192.168.1.6
eap265                  A       192.168.1.8
fred-pc                 A       192.168.1.101
ns0                     CNAME       gateway
This is the zone file. I’m not going to explain everything about it here, just that this is a working example and the main points about it.
The first lines, starting with a ‘;’ are comments.
Next comes $TTL, which sets the default time-to-live for everything that doesn’t specify differently, and is basically the number of seconds that systems are supposed to cache the result of a lookup. You might want to reduce this to something like 30 seconds if you’re experimenting. You must specify the default TTL first thing in the file.
Then comes the SOA (Start of Authority) for the domain. It’s specifying the main name server (ns0.mysite.example.com) and the email address of the DNS administrator. However, as ‘@’ has a special meaning in zone files it’s replaced by a dot – so it really reads hostmaster@mysite.example.com. I’ve never figured out how you can have an email address with a dot in the name.
The other values are commented – just use the defaults I’ve given or look them up and tweak them. The only important one is the first number – the serial. This is used to identify which is the newest version of the zone file when it comes to replication, and the important rule is that when you update the master zone file you need to increment it. There’s a convention that you number them YYYYMMDDxx where xx allows for 100 revisions within the day. But it’s only a convention. If you only have one name server, as here, then it’s not important as it’s not replicating.
Next we define the name servers for the domain with NS records. We’ve only got one, so we only have one NS record. The @ is a macro for the current “origin” – i.e. mysite.example.com.
Note well the . on the end of names. This means start at the root – it’s important. Some web browsers allow you to omit it in URLs, and guess you always mean to start at the root – but DNS doesn’t!
Then come the A or Address records. They’re pretty self explanaitory. Because the “origin” is set as mysite.example.com the first line effectively reads:
adderview1.mysite.example.com A 192.168.1.204
This means that if someone looks up adderview1.mysite.example.com they get the IP address 192.168.1.204. Simple! You can have an AAAA record that gives the IPv6 address, but I won’t cover that here.
The last line is line an A record but is a CNAME, which is defining an alias. ns0 is aliased to gateway, which ultimately ends up as being 192.168.1.2 – i.e. the name of our router/DNS server. There is nothing stopping you from having multiple A records pointing to the same IP address – and in some ways it’s better to use an absolute address. It comes down to how you want to manage things, and my desire to get a CNAME example in here somewhere.
The corresponding reverse lookup file goes like this:
As you can see, it’s pretty much the same until you get to the PTR records. These are like A records but go in reverse. In case you’re wondering about the name, it’s important. Note it’s the first three bytes of the subnet but backwards. The last byte is the first part of the PTR line, and the last part is the FQDN to be returned if you do a reverse lookup on the IPv4 address.
Therefore, if you reverse lookup 192.168.1.101 it will look in 1.168.192.in-addr.arpa for a PTR record with 101 as the key and return fred-pc.mysite.example.com. This all goes back to the history of the Internet, or more precisely, it’s precursor caller ARPAnet. The .arpa TLD was supposed to be temporary during the transition, but it stuck around. Just do it the way I’ve said o or fall flat on your face.
You can have a reverse lookup for IPv6 using a ip6.arpa file, but I’m not going to cover that this time.
Once you’ve made all these changes and set up your zone file, just kick it off with “service named start” (or onestart). To make it start on boot add named_enable=”yes” to /etc/rc.conf
Debugging
You can test it’s working with “host gateway.mysite.example.com 127.0.0.1” and “host gateway.mysite.example.com 192.168.1.2” – both should return 192.168.1.2.
Error messages can be found in /var/log/messages – however they’re not always that revealing! Fortunately BIND comes with some useful checking tools, such a named-checkzone.
This sanity checks the zone file (second argument) is a proper zone file for the domain name specified in the first argument. We’ve called the file after the domain, which can be confusing but has many advantages in other situations.
You can also check the reverse lookup file in the same way:
It’ll either come up with warnings or errors, or say it would have been loaded with an OK message.
Next Stage
In Part 2 I explained how to set up the OpenBSD DHCP daemon and here I’ve explained unbound as well as BIND. But for redundancy, the full ISC DHCP Daemon and BIND are necessary as they are able to replicate so one server can carry on if the other fails. That’s the next installment.
OpenBSD’s PF firewall is brilliant. Not only is it easy to configure with a straightforward syntax, but it’s easy to control on-the-fly.
Supposing we had a script that scanned through log files and picked up the IP address of someone trying random passwords to log in. It’s easy enough to write one. Or we noticed someone trying it while logged in. How can we block them quickly and easily without changing /etc/pf.conf? The answer is a pf table.
You will need to edit pf.conf to declare the table, thus:
# Table to hold abusive IPs
table <abuse> persist
“abuse” is the name of the table, and the <> are important! persist tells pf you want to keep the table even if it’s empty. It DOES NOT persist the table through reboots, or even restarts of the pf service. You can dump and reload the table if you want to, but you probably don’t in this use case.
Next you need to add a line to pf.conf to blacklist anything in this table:
# Block traffic from any IP in the abuse table
block in quick from <abuse> to any
Make sure you add this in the appropriate place in the file (near or at the end).
And that’s it.
To add an IP address (example 1.2.3.4) to the abuse table you need the following:
pfctl -t abuse -T add 1.2.3.4
To list the table use:
pfctl -t abuse -T show
To delete entries or the whole table use one of the following (flush deletes all):
Now I prefer to use a clean interface, and on all systems I implement a “blackhole” command, that takes any number of miscreant IP addresses and blocks them using whatever firewall is available. It’s designed to be used by other scripts as well as on the command line, and allows for a whitelist so you don’t accidentally block yourself! It also logs additions.
#!/bin/sh

/sbin/pfctl -sTables | /usr/bin/grep '^abuse$' >/dev/null || { echo "pf.conf must define an abuse table" >&2 ; exit 1 ; }

whitelistip="44.0 88.12 66.6" # Class B networks that shouldn't be blacklisted

for nasty in "$@"
do
        echo "$nasty" | /usr/bin/grep -E '^[0-9]+\.[0-9]+\.[0-9]+\.[0-9]+$' >/dev/null || { echo "$nasty is not valid IPv4 address" >&2 ; continue ; }

        classb=$(echo "$nasty" | cut -d . -f 1-2)

        case " $whitelistip " in
                *" $classb "*)
                echo "Whitelisted Class B $nasty"
                continue
                ;;
        esac

        if /sbin/pfctl -t abuse -T add "$nasty"
        then
                echo Added new entry $nasty
                echo "$(date "+%b %e %H:%M:%S") Added $nasty" >>/var/log/blackhole
        fi
done
That’s all there is two it. Obviously my made-up whitelist should be set to something relevant to you.
So how do you feed this blackhole script automatically? It’s up to you, but here are a few examples:
The above does the same for dovecot. Beware, these are brutal! In reality I have an additional grep in the chain that detects invalid usernames, as most of the script kiddies are guessing at these and are sure to hit on an invalid one quickly.
Both of these examples produce a list of IP addresses, one per line. You can pipe this output using xargs like this.
findbadlogins | xargs -r blackhole
The -r simply deals with the case where there’s no output, and will therefore not run blackhole – a slight efficiency saving.
If you don’t have pf, the following also works (replace the /sbin/pfctl in the script with it):
This adds the nasty IP address to the routing table and directs packets from it to somewhere the sun don’t shine. pf is probably more efficient that the routing table, but only if you’re using it. This is a quick and dirty way of blocking a single address out-of-the-box.
I started writing the last post as a discussion of ZFS and UFS and it ended up an explainer about how UFS was viable with gmirror. You need to read it to understand the issues if you want redundant storage. But in simple terms, as to which is better, ZFS is. Except when UFS has the advantage.
UFS had a big problem. If the music stopped (the kernel crashed or the power was cut) the file system was in a huge mess as the data on disk wasn’t updated in the right order as it went along. This file system was also know as FS or FFS (Fast File System) but they were more or less the same thing, and it is now history. UFS2 came along (and JFS2 on AIX), which had journaling so that if there was an abrupt it could probably catch up with itself when the power came back. As with databases, a journal keeps an ordered records of updates you can can apply them to a potentially messed up system later in case they were missed. Now we’re really talking about UFS2 here, which is pretty solid.
Then along comes ZFS, which combines a next generation volume manager and next generation file system in one. In terms of features and redundancy it’s way ahead. Some key advantages are built and very powerful RAID, Copy-on-Write for referential integrity following a problem, snapshots, compression, scalability – the list is long. If you want any of these good features you probably want ZFS. But there are two instances where you might want to stick with UFS2.
Cost
The first problem with ZFS is that all this good stuff comes at a cost. It’s not a huge cost by modern standards – I’ve always reckoned an extra 2Gb of RAM for the cache and suchlike covers the resource and performance issues . But on a very small system, 2Gb of RAM is significant.
The second problem is more nuanced. Copy-on-Write. Basically, in order to get the referential integrity and snapshots, when you change the contents of a block within a file ZFS it doesn’t overwrite the block with new data. It writes a new block in free space and links to that instead. If the old block isn’t needed as part of a snapshot it will be marked as free space afterwards. This means that if there’s a failure while the block is half written, no problem – the old block is there and the write never happened. Reboot and you’re at the last consistent state, no more than five seconds before some idiot dug up the power cable.
Holy CoW!
So Copy-on-Write makes sense in many ways, but as you can imagine, if you’re changing small bits of a large random access file, that file is going to end seriously fragmented. And there’s no way to defragment it. This is exactly what a database engine does to its files. Database engines enforce their own referential integrity using synchronous writes, so they’re going to be consistent anyway – but if you’re insisting all transactions in a group are written in order, synchronously, and the underlying file system is spattering blocks all over the disk before returning, you’ve got a double whammy – fragmentation and slow write performance. You can put a lot of cache in to try and hide the problem, but you can’t cache a write if the database insists it won’t proceed until it’s actually stored on disk.
In this one use case, UFS2 is a clear winner. It also doesn’t degrade so badly as the disk becomes full. (The ZFS answer is that if the zpool is approaching 80% capacity, add more disks).
Best of Both
There is absolutely nothing stopping you having ZFS and UFS2 on the same system – on the same drives even. Just create a partition for your database, format it using makefs and mount it on the otherwise ZFS tree wherever it’s needed. You probably want it mirrored for redundancy, so use gmirror. You won’t be able to snapshot it, or otherwise back it up while it’s running, but you can dump a database to a ZFS dataset and have that replicated along with all the others.
You can also boot off UFS2 and create a zpool on additional drives or partitions if you prefer, mounting them on the UFS tree. Before FreeBSD 10 had full support for booting direct of ZFS this was the normal way of using it. The advantages of having the OS on ZFS (easy backup, snapshot and restore) mean it’s probably preferable to use it for the root now, and mount any UFS2 file systems in directories off it.
Over eight ago now I wrote a post ZFS is not always the answer. Bring back gmirror!, suggesting that writing off UFS in favour of ZFS wasn’t a clear cut decision and reminding people how gmirror could be used to mirror drives is you needed redundancy. It’s still true, but it probably needs an update as things are done a little differently now.
MBR vs GPT
There have been various disk partition formats over the years. The original PDP-11 Unix contained only a boot block (512b) to kick start the OS, but BSD implemented its own partitioning scheme from 386BSD onwards – 8K long consisting of a tiny boot1 section that was just enough to find boot2 in the same slice, which was then able to read UFS and therefore the kernel. This first appeared 4.2BSD on the VAX.
Then from the early 1990s the “standard” hard disk partition scheme from the MS-DOS Master Boot Record (MBR) seemed like a great idea. Slices got replaced by partitions and you could co-exist with other systems on the same drive; and x86 systems were now really common, especially compared for VAXes.
The so-called MBR scheme had its problems (and workarounds) as Microsoft wasn’t exactly thinking ahead, but these have been fixed thanks to the wonderful GPT scheme, which was actually designed. However, GEOM Mirror and UFS predate GPT adoption and you have to be aware of a few things if you’re going to use them together. And you should be using GPT.
Why should you use GPT just because it’s “new”? Not so new, in fact. It was actually dreamt up more than 25 years by Intel (on the IA-64 I believe). GPT has a backup header so if you lose the first blocks on your drive you’re not dead in the water – a favourite trick with DOS/Windows losing the entire drive for the sake of one sector. GPT allows drives to be more than 2Tb because it has 64-bit logical block addresses. If that’s not enough, it identifies partitions with a UUID so you can move them around physically and the OS can still find them rather than always having to hang them of the same controller port. And if you’re mixing operating systems on the same disk the others are likely to be using GPT too, so they’ll play nice. As long as you have UEFI compatible firmware, you’re good to go. If all your drives are <2TB and you have old firmware, and only want to run FreeBSD, stick to MBR – and keep a backup of the boot block on a floppy just in case.
Gmirror and GPT
As I mentioned, GPT keeps a second copy of the partition information on the disk. In fact it stores a copy at the end of the drive, and if the table at the front is corrupt or unreadable it’ll use that instead. Specifically GPT stores a header in LBA 1 and the partition table in LBA 2-33 (an insanely large partition table but Intel didn’t want to be accused of making the same limiting mistakes as Microsoft).
The backup GPT header is on on the last block of the drive, with the backup partition table going backwards from that (for 33 LBAs).
GMirror, meanwhile, stores its metadata on the last 512-byte sector of the drive. CRUNCH.
So what to do? One method is to use the -h switch when setting up with gmirror:
gmirror label -h m0 da0 da1
This moves the metadata to the front of the disk, which will deconflict it with the GPT header okay but might crunch with other bootloaders, particularly from another OS that’s sharing the same disk, and which we have no control of. I say might. Personally, I wouldn’t be inclined to take the risk unless I’m dedicating the drive to FreeBSD.
The safe method is to NOT mirror the entire disk, only the partitions we’re interested in. Conventionally, and in the 2017 post, you mirrored the entire drive and therefore the drives were functionally identical without any further work. The downside was that if you replaced a drive you needed one exactly the same size (or larger), and not all 500Gb drives are the same number of blocks, although there’s a pretty good chances these days. If you did happen to be a block or two short on the new one you’d be out of luck.
GEOMs and disks?
I’ve explained how to mirror a single partition already, but not gone into the technicalities. If you’re new to FreeBSD you might not have cottoned on what a GEOM is. It’s short for “geometry”, which probably doesn’t help with understanding it one bit.
It gets the name from disk geometry, but don’t worry about the name. It’s an abstraction layer added to FreeBSD between the physical drive (provider) and higher level functions of the OS such as filing systems (consumers). You can add GEOM “classes” between the provider and consumer to provide RAID, mirroring, encryption, journaling, volume management and suchlike. Before ZFS, this was how you got fancy stuff done. Now, not so much. But the GEOM mirror class (aka gmirror) is still very useful indeed.
But the bottom line is that a disk partition can be a “provider” in just the same way as the whole disk, so what works for a disk will also work for a partition. Chances are the installer has partitioned up your drive thus:
This means /dev/ada0p3 is the UFS partition we’re interested in mirroring. Believe it or not, partition numbers start at one, not zero!
How to actually do it
So if you’ve installed your system and now want to add a GEOM mirror, proceed as follows. Let’s assume your second drive is ada1, which would be logical.
You’ll have to partition it so it has at least one partition the same size as the one you want to mirror. Chances are you’ll want all partitions common between drives. The quickest way to achieve this is to simply copy the partition table:
gpart backup ada0 | gpart restore -F ada1
You can sanity check this with gpart show ada1, which should output the same as gpart show ada0.
The second line adds it to loader.conf to make it load on boot, but only do it if it’s not there already. The kldload will complain if it’s already loaded, which is a good clue you don’t need the second line.
Create the mirror
gmirror label ufsroot /dev/ada0p3 /dev/ada1p3
The “label” subcommand simply writes the metadata to the disks or partitions – remember disks or partitions are all the same to GEOM. The name “ufsroot” is chosen by me to be meaningful. Manuals use things like gm0 for GEOM mirrors and people have come to think it’s important they’re named this way, when the opposite is true. You already know it’s a GEOM mirror because the device is in /dev/mirror – it’s more helpful to know what it’s used for, e.g. UFS root, or swap, or var or whatever.
You can check it’s worked with gmirror status, which should output something like this:
  Name         Status   Components
mirror/ufsroot COMPLETE ada0p3 (ACTIVE)
                        ada1p3 (SYNCHRONIZING)
Wait until it’s finished synchronising, which will take a long time on a large disk. Perhaps go to bed.
Mount the mirror
This process will have created a new device called /dev/mirror/ufsroot but you still have to mount it in place of the “old” UFS partition. This is controlled in the normal way by /etc/fstab, so make a backup and fire up your favourite editor.
Look for the entry for /dev/ada0p3 and change it to /dev/mirror/ufsroot:
/dev/mirror/ufsroot / ufs rw 1 1
Reboot and you should be good.
Boot code
Although your UFS partition is mirrored, if ada0 fails, the system won’t boot as it stands as ada1 lacks the boot code. You can add this this easily enough:
Finally, what about swap partitions? For robustness, mirror them too in the same way:
gmirror label swap /dev/ada0p2 /dev/ada1p2
Then edit fstab to swap on /dev/mirror/swap. Remember “swap” is a meaningful name chosen by you!
Alternatively you can edit fstab to swap on ada1p2 as well, which spreads the load (best for performance). Or you can just leave it as it is – if ada0 fails and you reboot you’ll have no swap until you fix it, but you’ll probably be worrying about other things if that happens.
In part one I described how to set up PPP and the pf firewall to provide NAT with port forwarding and other good things. In Part 2 I’ll add DCHP, and as a bonus I’ll add configuration for an IP address blockfor if you have that kind of ISP. If you want that kind of ISP but can’t find one, I can point at a few that do. In Part 3 I’ll cover DNS and BIND.
DHCP
There’s never been a DHCP server in the FreeBSD base, but it’s installed easily by compiling the port or installing the package. Your best bet for FreeBSD is the DHCP daemon written for OpenBSD, AKA the ISC dhcpd. But beware – the OpenBSD one, although called version 6.6, lags behind the other package isc-dhcp44 as it doesn’t have support peer servers. If you’ve only got one DHCP server on your network, it’s fine. If you want to have primary and secondary servers, or load balance them, look at the latest ISC one instead. I’ll deal with that in another post.
pkg install dhcpd
Before you kick it off you really ought to edit the configuration file, /usr/local/etc/dhcpd.conf. There’s usually a second copy of it postfixed with .sample, and it’s pretty self documenting. I’m posting the basics from a real configuration, which I shall annotated to death. But first, something about the network we’re defining:
I’m going to have a LAN with 192.168.1.0/24 – which means IP addresses in the range 192.168.1.1 to 192.168.1.254. This isn’t a tutorial on routing – just leave the first and last address (0 and 255) alone for now. The network will have a domain. This is optional, but if you’re doing your own DNS you’ll want one. You don’t have to register this domain externally – you can make it up (please end it in .local!) – but let’s assume you have a real one: “example.com”. You’ve created an subdomain for this site called mysite.example.com and it has an A record to prove it, and you’ll probably want to delegate the DNS to it later. But if you’re not worried about domain names, don’t worry about all of this.
The router (i.e. the FreeBSD box) is going to be on 192.168.1.2, which is set up in rc.conf. It can’t be assigned automatically by DHCP because, well, we’re also the DHCP server and that would be silly.
Assuming your LAN-side network interface is bge0 (remember the modem is on bge1 in Part 1) the following line would do it:
Obviously change bge0 to the name of your actual Ethernet interface! You might wonder why I’m putting the router on 192.168.1.2 instead of 192.168.1.1, which is a common convention. It’s simple: There are so many home user network appliances that come with 192.168.1.1 as their default IP address, and if you plug one in to your LAN the clash will cause merry hell before you’ve been able to go to their web interface to configure it to something else.
I want some devices to have a fixed IP address supplied by DHCP, and other things to have dynamically allocated ones – friends using the guest WiFi, for example. Having network infrastructure like switches and WAPs on a static addressed, defined by DHCP, is a good way to go. Connecting network printers to Windoze is smoother if they’re on a fixed IP too. But going around and setting it on each device is a pain, so do it by DHCP where it’s defined in one place and can be managed in one place. It works by recognising the MAC address in the request and giving back whatever IP address you have chosen.
As a final tip, keep your network address plan as comments in dhcpd.conf – it’s where you want the information anyway. And with that, here’s the sample file:
# This is the domain name that will be supplied to everything on
# the LAN by default. This is the domain that will be searched if you
# enter a host name. For example, if you want to connect to "fred-pc" it
# will look for it as fred-pc.mysite.example.com, which if you have
# your DNS set up correctly, will find it quickly.
option domain-name "mysite.example.com";

# This specifies the DNS server(s) the machines on the LAN
# will use. We're specifying the same as the router, because
# we'll be running DNS there. If you don't want to, just use the
# IP address of DNS server supplied by your ISP.
option domain-name-servers 192.168.1.2;

# These just specify the time a machine on the LAN gets to hold
# on to a dynamic address before it needs to renew it.
default-lease-time 43200;
max-lease-time 86400;

# This defines our pool of dynamically allocated addresses,
# and I've chosen the range 100..199. Options here override the
# options above (outside the {...}) in the way you might expect.
# I've set the default lease time to 900 seconds (15 minutes)
# for testing purposes only. 2h is normal but it's up to you.
# I normally go for 12h.

subnet 192.168.1.0 netmask 255.255.255.0 {
  range 192.168.1.100 192.168.1.199;
  option broadcast-address 192.168.1.255;
  default-lease-time 900;
}

# The next block is assigning a fixed IP address to
# a switch, because I don't want it to move. This just needs the
# MAC address of the device and the fixed-address you want to give it.
# You can have as many of these as you like. The name "switch1" is really
# just for your own reference.

host switch1 {
        hardware ethernet 00:02:FC:CB:1E:7D;
        fixed-address 192.168.1.3;
}
For more information see this post about assigning names, and the dhcpd.conf.sample, which has scenarios far more complex than you’ll need on a simple LAN.
Enable it on reboot with:
sysrc dchpd_enable=yes
You can then start it manually with service dhcpd start.
If you want to make changes to dhcpd.conf you can at any time, but they won’t take effect until you restart dhcpd (with service dhcpd restart). There’s no way of having it just do a reload. Details of the leases it has issued are /var/db/dhcpd.leases, which is just a text file and you can easily read it.
Routing a whole subnet
Supposing you have more than one IP address coming down the PPPoE tunnel at you? This is a service you can get from your ISP, giving you multiple IP addresses for various purposes – such as running servers. Other ISPs give you a single dynamic address, or worse, an IP address generated by CG-NAT. I’d argue this ceases to meet the definition of “Internet Service” at this point.
But assuming you have a block of static addresses, how do you get ppp to use them? I haven’t seen this documented ANYWHERE and figuring it out involved a great deal of trial and error. Shout out to shurik for encouraging me to keep going where ppp.linkup was concerned.
The easy way to add an alias to your tunnel (which you’ll recall we called wan0) is to use ifconfig and simply add it. But the trick with tunnels is to add the alias IP address and the remote tunnel address (i.e. HISADDR). You can find out what HISADDR is using ifconfig:
# ifconfig wan0
wan0: flags=1008051<UP,POINTOPOINT,RUNNING,MULTICAST,LOWER_UP> metric 0 mtu 1492
        options=80000<LINKSTATE>
        inet 1.2.3.4 --> 44.33.22.11 netmask 0xffffffff
        groups: tun
        nd6 options=21<PERFORMNUD,AUTO_LINKLOCAL>
        Opened by PID 658
In the output above, 1.2.3.4 is the IP address supplied by LCP – i.e. your public IP address. 44.33.22.11 is the IP address of the other end of the tunnel. In the parlance of the PPP utility, HISADDR. Earlier we set the default route to HISADDR. There are good reasons why HISADDR is dynamic, not least of which is having a pool of gateways for redundancy, so you have to check what it actually IS today before you assign an alias public address to the tunnel.
Then it’s a simple matter of adding further addresses using ifconfig:
ifconfig wan0 alias 1.2.3.41/32 44.33.22.11
Yes, it’s not quote the same format as adding an alias to an Ethernet interface, as the remote address follows the local one.
You can write a little script to do them automatically:
#!/bin/sh
HISADDR=$(ifconfig wan0 | grep "inet 1.2.3.4" | cut -w -f 5)
ALIASES="1.2.3.41 1.2.3.42 1.2.3.43 1.2.3.44"
for a in $ALIASES
do
    ifconfig wan0 delete $a
    ifconfig wan0 alias $a/32 $HISADDR
done
Note that I’m using grep to find the correct inet address based on the static address I know the interface has. Fiddle this to suit your static address, or if you don’t have one, grep for inet and hope the first it finds is correct. I’m also deleting the old aliases as they might need to be recreated using the new HISADDR.
This is all well and good, but when do you run the script? Automating it is the trick. Fortunately there’s a hook in ppp, where it processes the file /etc/ppp/ppp.linkup when the link comes up. As far as I can tell it’s the same format as ppp.conf, and you have to label the service name in the same way. What’s not documented is how you add alias addresses, but I’ve found a way by getting it to run ipconfig for you. If you start a line with ” !bg “, what follows is run. It’s run without an environment so you have to specify all paths to whatever you want to run in full, but it does work and does expand macros like HISADDR. The space in front of the ! is important! Incidentally, there’s also a ppp.linedown.
Here’s my /etc/ppp/ppp.linkup
cloudscape:
  !bg /sbin/ifconfig wan0 alias 1.2.3.40/32 HISADDR
  !bg /sbin/ifconfig wan0 alias 1.2.3.41/32 HISADDR
  !bg /sbin/ifconfig wan0 alias 1.2.3.42/32 HISADDR
  !bg /sbin/ifconfig wan0 alias 1.2.3.43/32 HISADDR
I would very much like to find the documentation for this, but the author (Brian Somer) has moved on to other things and the documentation that’s out there appears to be all there is. It was written for dial-up connections and wasn’t really designed for fixed lines with multiple public IP addresses.
Meanwhile the other PPP demon, mpd5, which is supposed to be better, was listed in the FreeBSD Handbook as being for PPPoA, pushing user-ppp for PPPoE. This isn’t actually the case, and I may be revisiting this using mpd5 at some point because it’s faster and more efficient, and I don’t need all the extra wonderful NAT and firewall features of user-ppp.
ISC-DHCPd
In this article I’ve used the standard OpenBSD version of the ISC DHCP server. It’s not the same as the full one, which also handle replication. In Part 4 I’ll cover DNS and DHCP replication and redundancy but as I haven’t written it you might want to install the package isc-dhcp44-server instead and use that. For a single server configuration it’s basically the same, but it gets you ahead of the game if you want to replicate servers.
This morning I woke up to an expired TLS certificate on this blog. This is odd, as it’s automatically renewed from LetsEncrypt using acme.sh, kicked off by a cron job. So what went wrong?
I don’t write about LetsEncrypt or ACME much as I don’t understand everything about it, and it keeps surprising me. But I had discovered a problem with FreeBSD running the latest Apache 2.4 in a jail. As I run my web servers in jails, this applies to me.
I like acme.sh. It’s a shell script. Very clever. No dependencies. Dependencies are against my religion. Why anyone would use a more complex system when there’s something simple that works?
For convenience reasons the certificates are renewed outside of a jail, and the sites are created using a script that sets it all up for me. One source of certificates for multiple jails; it’s easier to manage. It manages sites on other hosts using a simple NFS mount.
When you use acme.sh to renew a certificate for Apache you need to be able to plonk something on the web site. This is easy enough – the certificate host (above the jails) can either get direct access through the filing system, or via NFS. It then gets the new certificate and copies it into the right place. When you first issue yourself a certificate you specify the path you want the certificate to go, and the path to the web site. You also specify the command needed to get your web server to reload. It magically remembers this stuff so the cron job just goes along and does them all. But that’s where the fun starts.
I rehosted the blog on a new instance of Apache, and created a new temporary website to make sure SSL worked – getting acme.sh to issue it a certificate in the process. All good, except I noticed that inside a jail, the new version of Apache stops but doesn’t restart after an “apachectl graceful”. The same with “apachectl reload”. Not great, but I tried using “service -j whatever apache24 restart”. A bit drastic but it worked, and I’ve yet to figure out why other methods like “jexec whatever apachectl graceful” stall.
So what happened this morning at 6am? There were some certificates to renew and acme.sh –cron accidentally KOed Apache. It’s the first time any had expired.
Running acme.sh manually between restarting Apache manually worked, but it’s hardly the dream of automation promised by Unix. Debugging the script I found it was issuing a graceful restart command, and I thought I’d specified something more emphatic. So I started grepping for the line in was using, assuming it must be in a config file somewhere. Nothing.
Long story short, I eventually found where it had hidden the command: in .acme.sh/domain.name/domain.name.conf , in spite of having looked there already. It turns out that it’s the line “Le_ReloadCmd=”, and its unique for each domain (sensible idea), but it’s base64 encoded instead of being plain text! And it’s wrapped between “_ACME_BASE64__START_” and “_ACME_BASE64__END_”. I assume this is done to avoid difficulties with certain characters in shell scripts but it’s a bit of a pain to edit it. You can create a new command by piping it through base64 and editing very carefully, but readable it ain’t.
There is an another way – just recopy the certificate. Unfortunately you need to know, and use, the same options as when you originally created it – you can’t just issue a different –reloadcmd. You can check these by looking at the domain.name.conf file, where fortunately these are stored in plain text. Assuming they’re all the same, this little script will do them all for you at once. Adjust as required.
#!/bin/sh

# Make sure you're in the right directory
cd ~/.acme.sh

# Jail containing web site, assumed all the same.
WJAIL=web

for DOM in $(find . -type d -depth 1 | sed "s|^\./||")
do

echo acme.sh $TEST -d $DOM  --install-cert \
        --cert-file /jail/$WJAIL/data/certs/$DOM/cert.pem \
        --key-file /jail/$WJAIL/data/certs/$DOM/cert.key \
        --fullchain-file /jail/$WJAIL/data/certs/$DOM/Fullchain.pem \
        --reloadcmd "service -j $WJAIL apache24 restart"
done
You will notice that this only echos the command needed, so if anyone’s crazy enough to copy/paste it then it won’t do any damage. Remove the “echo” when you’re satisfied it’s doing the right thing for you.
Or you could just edit all the conf files and replace the Le_ReloadCmd= line – you only have to generate it once, after all.
Following on from Basic UNIX file commands, here’s a bit there wasn’t time for on changing metadata on files.
These two commands change the files permissions and ownership. Permissions is information associated with a file that decides who can do what with it. This was once called the file mode, which is why the command is chmod (Change MODe). Files also have owners, both individuals and group of users, and the command to change this is chown (CHOWNer).
chown is easiest, so I’ll start there. To make a file belong to fred the command is:
chown fred myfile
To change the owning group to accounts:
chown :accounts myfile
And to change both at once:
chown fred:accounts myfile
Changing a files permissions is more tricky, and there are several ways of doing it, but this is probably the easiest to remember. You’ll recall that each file has three sets of permissions: Owner, Group and Other. The permissions themselves are read, write and execute (i.e. it’s an executable program).
chown can set or clear a load of permissions in one go, and the format is basically the type of permission, and ‘+’ or ‘-’ for set or clear, and the permissions themselves. What? It’s probably easier to explain with a load of examples.:
chmod u+w myfile
Allows the user of the file to write to it (u means user/owner)
chmod g+w myfile
Allows any user in the group the file belongs to write to it.
chmod o+r myfile
Allows any user who is not in the files group or the owner to read it. (o means “other”).
You can combine these options
chmod ug+rw

Allows the owner and the group to read and write the file.
chmod go-w

Prevents anyone but the user from being able to modify the file.
If you want to run a program you’ve just written called myprog.
chmod +x myprog
If you don’t specify anything before the +/- chmod assumes you mean yourself.
You might notice an ‘x’ permission on a directory – in this case it means the directory is searchable to whoever has the permission.
I was asked me to explain basic Unix shell file manipulation commands, so here goes.
If you’re familiar with MS-DOS, or Windows CMD.EXE and PowerShell (or even CP/M) you’ll know how to manipulate files and directories on the command line. It’s tempting to think that the Unix command line is the same, but there are a few differences that aren’t immediately apparent.
There are actually two main command lines (or shells) for Unix: sh and csh. Others are mainly compatible with these two, with the most common clones being bash and tcsh respectively. Fortunately they’re all the same when it comes to basic commands.
Directory Concepts
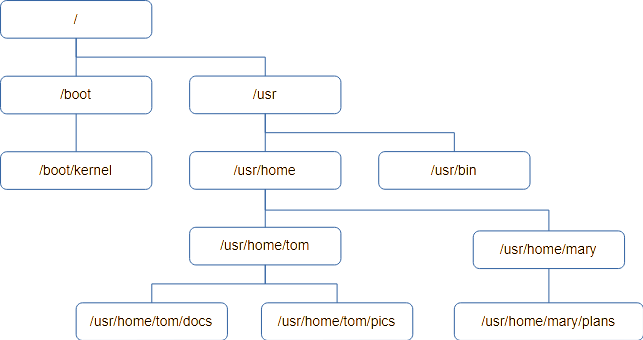
Files are organised into groups called “directories”, which are often called “Folders” on Macintosh and Windows. It’s not a great analogy, but it’s visual on a GUI. Unlike the real world, a directory may contain additional directories as well as files. These directories (or sub-directories) can also contain files and more directories and so on. If you drew a diagram you’d end up with something looking like a tree, with directories being branches coming off branches and the files themselves being leaves. All good trees start with a root from which the rest branches off, and this is no different. The start of a Unix directory tree is known as the root.
Unix has a concept called the Current Working Directory. When a program is looking for a file it is assumed it will be found in the Working Directory if no other location is specified.
Users on a Unix system have an assigned Home Directory, and their Working Directory is initially set to this when the log on.
Users may create whatever files and sub-directories they need within their Home Directory, and the system will allow the do whatever they want with anything they create as it’s owned by them. It’s possible for a normal user to see other directories on the system, in fact it’s necessary, but generally they won’t be able to modify files outside their home directory.
Here’s an example of a directory tree. It starts with the root, /, and each level down adds to the directory “path” to get to the directory.
If you want to know what your current working directory is, the first command we’ll need is “pwd” – or “Print Working Directory”. If you’re ever unsure, use pwd to find out where you are.
Unix commands tend to be short to reduce the amount of typing needed. Many are two letters, and few are longer than four.
The thing you’re most likely to want to do is see a list of files in the current directory. This is achieved using the ls command, which is a shortened form of LiSt.
Typing ls will list the names of the all the files and directories, sorted into ASCII order and arranged into as many columns as will fit on the terminal. You may be surprised to see files that begin with “X” are ahead of files beginning with “a”, but upper case “X” has a lower ASCII value than lower case “a”. Digits 0..9 have a lower value still.
ls has lots of flags to control it’s behaviour, and you should read the documentation if you want to know more of them.
If you want more detail about the files, pass ls the ‘-l’ flag (that’s lower-case L, and means “long form”). You’ll get output like this instead:
drw-r-----  2 fjl  devs        2 Aug 28 13:17 Release
drw-r-----  2 fjl  devs       29 Dec 26  2019 Debug
-rw-r-----  1 fjl  devs     2176 Feb 17  2012 editor.h
-rw-r-----  1 fjl  devs    28190 Feb  7  2012 fbas.c
-rw-r-----  1 fjl  devs    10197 Feb 17  2012 fbas.h
-rw-r-----  1 fjl  devs     5590 Feb 17  2012 fbasexpr.c
-rw-r-----  1 fjl  devs     7556 Feb  3  2012 fbasheap.c
-rw-r-----  1 fjl  devs     7044 Feb  4  2012 fbasio.c
-rw-r-----  1 fjl  devs     4589 Feb  3  2012 fbasline.c
-rw-r-----  1 fjl  devs     4069 Feb  3  2012 fbasstr.c
-rw-r-----  1 fjl  devs     4125 Feb  3  2012 fbassym.c
-rw-r-----  1 fjl  devs    13934 Feb  3  2012 fbastok.c
drw-r-----  3 fjl  devs        3 Dec 26  2019 ipch
-rw-r-----  1 fjl  devs     3012 Feb 17  2012 token.h
:
I’m going to skip the first column for now and look at the third and fourth.
fjl devs
This shows the name of the user who owns the file, followed by the group that owns the file. Unix users can be members of groups, and sometimes it’s useful for a file to be effectively used by a group rather than one user. For example, if you have an “accounts” group and all your accounts staff belong to it, a file can be part of the “accounts” group so everyone can work on it.
Now we’ve covered users and groups we can return to the first column. It shows the file flags, which are various attributes concerning the file. If there’s a ‘-’ then the flag isn’t set. The last nine flags are three sets of three permissions for the file.
The first set are the file owner’s permissions (or rights to use the file).
The second set are the file group’s permissions.
The third are the permissions for any user who isn’t either the owner or in the file’s group
Each group of three represents, in order:
r – Can the file be read, but not changed. w – can the file be written to. If not set it means you can only read it. x – can the file be run (i.e. is it a program)
So:
– rw- — — means only the user can read/write the file.
– rw- r– — means the file can be read by anyone in it’s group but only written to by the owner.
– rwx r-x — means the file is a program, probably written by its owner. Others in the group can run it, but no one else can even read it.
There are other special characters that might appear in the first filed for advanced purposes but I’m covering the basics here, and you could write a book on ls.
I’ve missed off the first ‘-’, which isn’t a permission but indicates the type of the file. If it’s a ‘-’ it’s just a regular file. A ‘d’ means it’s actually a directory. You’ll sometimes see ‘c’ and ‘s’ on modern systems, which are normally disk drives and network connections. Unix treats everything like a file so disk drives and network sockets can be found in the directory tree too. You’ll probably see ‘l’ (lower case L) which means it’s a symbolic link – a bit like a .LNK file in Windows.
This brings us to the second column, which is a number. It is the number of times the file exists in the directory tree thanks to their being links, and most cases this will be one. I’ll deal with links later.
The last three columns should be easy to guess: Length, date and finally the name of the file; at least in the case of a regular file.
There are many useful and not so useful options supported by ls. Here are a few that might be handy.
-d
By default, if you give ls a directory name it will show you the contents of the directory. If you want to see the directory itself, most likely because you want to see its permissions, specify -d.
-t
Sort output by time instead of ASCII
-r
Reverse the order of sort. -rtl is useful as it will sort your files with the newest at the end of the list.
-h
Instead of printing a file size in the bytes, which could be a very long number, display in “human readable” format, which restricts it to three characters followed by a suffix: B=bytes, K=Kb, M=Mb and so on.
-F
This is very handy if you’re not using -l, as with just the name printed you can’t tell regular and special files apart. This causes a single character to be added to the file name: ‘*’ means it’s a program (has the x flag set), ‘/’ means it’s a directory and ‘@’ means it’s a symbolic link. Less often you’ll see ‘=’ for a socket, ‘|’ for a FIFO (obsolete) and ‘%’ for a whiteout file (insanity involving union mounts).
Finally, ls takes arguments. By default it lists everything if you give it a list of files and directories, it will just list them.
Where src is a directory, ls src will list the files in that directory. Remember ls -d if you just want information on the directory?
ls src
List everything in the src and obj directories:
ls src obj
Now you can find the names of the files, how do you look at what’s in them? To display the contents of a text file the simple method is cat.
cat test.c
This prints the contents of test.c. You might just want to see the first few lines, so instead try:
head test.c
Only the first ten lines (by default) are printed.
If you want to see the last ten lines, try:
tail test.c
If you want to go down the file a screen full at a time, use.
more test.c
It stops and waits for you to press the space bar after every screen. If you’ve read enough, hit ‘q’ to quit.
less test.c
This is the latest greatest file viewer and it allows you to scroll up and down a file using the arrow keys. It’s got a lot of options.
So far we’ve stayed in our home directory, where we have kept all our files. But evenrtually you’re going to need to organise your files in a hierarchical structure in directories.
To make a directory called “new” type:
mkdir new
This is an mnemonic for “make directory”.
To change your working directory use the chdir command (Change Directory)
chdir new
Most people use the abbreviated synonym for chdir, “cd”, so this is equivalent:
cd new
Once you’re there, type “pwd” to prove we’ve moved:
pwd
If you type ls now you won’t see any files, because it’s empty.
You can also specify the directory explicitly, such as:
cd /usr/home/fred/new
If you don’t start with the root ‘/’, cd will usually start looking for the name of the new directory in the current working directory.
To move back one level up the directory level use this command:
cd ..
You’ll be back in your home directory.
To get rid of the “new” directory use the rmdir command (ReMove DIRectory)
rmdir new
This only works on empty directories, so if there were any files in it you’d have to delete them first. There are other more dangerous commands that will destroy directories and all their contents but it’s better to stick with the safer ones!
To remove an individual file use the rm (ReMove) command, in this case the file being named “unwanted”:
rm unwanted
Normally files are created by applications, but if you want a file to experiment on the easiest way to create one is “touch filename”, which creates an empty file called “filename”. You can also use the echo command:
echo “This is my new text file, do you like it?” > myfile.txt
Echo prints stuff to the screen, but “> myfile.txt” tells Unix to put the output of the echo command into “myfile.txt” instead of displaying it on the screen. We’ll use “echo” more later.
You can display the contents with:
cat myfile.txt
One thing you’re going to want to do pretty soon is copy a file, which is achieved using the cp (CoPy) command:
cp myfile.txt copy-of-myfile.txt
This makes a copy of the file and calls it copy-of-myfile.txt
You can also copy it into a directory
mkdir new
cp myfile.txt new
To see it there, type:
ls -l new
To see the original and the copy, try:
ls - newfile.txt new
If you wanted to delete the copy in “new” use the command:
rm new/myfile.txt
Perhaps, instead of copying your file into “new” you wanted to move it there, so you ended up with only one copy. This is one use of the mv (MoVe) command:
mv myfile.txt new
The file will disappear from your working directory and end up in “new”.
How do you rename a file? There’s no rename command, but mv does it for you. When all is said and done, all mv is doing is changing the name and location of a file.
cd new
mv myfile.txt myfile.text
That’s better – much less Microsoft, much more Unix.
Wildcards
So far we’ve used commands on single files and directories, but most of these commands work with multiple files in one go. We’ve given them a single parameter but we could have used a list.
For example, if we wanted to remove three files called “test”, “junk” and “foo” we could use the command:
rm test junk foo
If you’re dealing with a lot of files you have have the shell create a list of names instead of typing them all. You do this by specifying a sort of “template”, and all the files matching the template will be added to the list.
This might seem the same as Windows, but it’s not – be careful. With Windows the command does the pattern matching according to its context, but the Unix shell has no context and you may end up matching more than you intended, which is unfortunate if you’re about to delete stuff.
The matching against the template is called globbing, and uses the special characters ‘*’ and ‘?’ in it’s simplest form.
‘?’ matches any single character, whereas ‘*’ matches zero or more characters. All other characters except ‘[‘ match themselves. For example:
“?at” would match cat, bat and rat. It would not match “at” as it must have a first character. Neither will it match “cats” as it’s expecting exactly three characters.
“cat*” would match cat, cats, caterpillar and so on.
“*cat*” would match all of the above, as well as “scatter”, “application” and “hellcat”.
You can also specify a list of allowable letters to match between square brackets [ and ], which means any single character will do. You can specify a range, so [0-9] will match any digit. Putting a ‘!’ in front negates the match, so [!0-9] will match any single character that is NOT a digit. If you want to match a two-digit number use [0-9][0-9].
To test globbing out safely, I recommend the use of the echo command for safety. It works like this:
echo Hello world
This prints out Hello world. Useful, eh? But technically what it’s doing is taking all the arguments (aka parameters) one by one and printing them. The first argument is “Hello” so it prints that. The second is “world” so it prints a space and prints that, until there are no arguments left.
Suppose we type this:
echo a*
The Unix shell globs it using the * special character produces a list of all files that start with the letter ‘a’.
You can use this, for example, to specify all the ‘C’ files ending in .c:
echo *.c
If you want to include .h files in this, use
echo *.c *.h
Practice with echo to see how globbing works as it’s non-destructive!
You can also use ls, although this goes on to expand directories into their contents, which can be confusing.
When you have a command that has a source and destination, such as cp (CoPy), they will interpret the everything in the list as a file to be processed apart from the last, which it will expect to be a directory. For example:
cp test junk foo rubbish
Will copy “test”, “junk” and “foo” into an existing directory rubbish.
Now for a practical example. Suppose you have a ‘C’ project where everything is in one directory. .c files, .h files, .o files as well as the program itself. You want to sort this out so the source is in one directory and the objects in another.
Although some of this is BSD specific, the principles apply to any Unix or Linux.
When you install your Unix like OS across several disks, either with a mirror or RAID system (particularly ZFS RAIDZ) you’ll be asked if you want to set up a swap partition, and if you want it mirrored.
The default (for FreeBSD) is to add a swap partition on every disk and not mirror it. This is actually the most efficient configuration apart from having dedicated swap drives, but is also a spectacularly bad idea. More on this later.
What is a swapfile/drive anyway?
The name is a hangover from early swapping multi tasking systems. Only a few programs could fit in main memory, so when their time allocation ran out they were swapped with others on a disk until it was their turn again.
These days we have “virtual memory”, where a Memory Management Unit (MMU) fixed it so blocks of memory known as pages are stored on disk when not in use and automatically loaded when needed again. This is much more effective than swapping out entire programs but needs MMU hardware, which was once complex, slow and expensive.
What an MMU does is remap the CPU address space so the running process believes it has a certain amount of RAM starting at address zero and going up as high as needed. It “thinks” it has the complete processor and all the RAM. However, the operating system is lying to the process, as not all the RAM the process believes it has is mapped to actual RAM. If the process tries to access an address that’s not mapped to anything the OS kernel takes over with a hardware interrupt called a “page fault”. The kernel than brings that page of RAM in from where it’s stored on the swap disk, gets the MMU to map it to the process address space, and restarts the process where it left off. The process doesn’t even know this has happened. If the kernel notices that some areas of RAM aren’t being used by the process it copies them to the swap disk and uses the physical RAM for some other purpose – until the next page fault.
So the swap partition should really be called the paging partition now, and Microsoft actually got the name right on Windows. But we still call it the swap partition.
What you need to remember is that parts of a running programs memory may be in the swap partition instead of RAM at any time, and that includes parts of the operating system.
Strategies
There are several ideas for swap partitions in the 2020s.
No swap partition
Given RAM is so cheap, you can decide not to bother with one, and this is a reasonable approach. Virtual memory is slow, and if you can, get RAM instead. It can still pay to have one though, as some pages of memory are rarely, if ever, used again once created. Parts of a large program that aren’t actually used, and so on. The OS can recognise this and page them out, using the RAM for something useful.
You may also encounter a situation where the physical RAM runs out, which will mean no further programs can be run and those already running won’t be able to allocate any more. This leads to two problems: Firstly “Developers” don’t often program for running out of memory and their software doesn’t handle the situation gracefully. Secondly, if the program your need to run is you login shell you’ll be locked out of your server.
For these reasons I find it better to have a swap partition, but install enough RAM that it’s barely used. As a rule of thumb, I go for having the same swap space as there is physical RAM.
Dedicated Swap Drive(s)
This is the classic gold standard. Use a small fast drive (and expensive), preferably short stroked, so your virtual memory goes as fast as possible. If you’re really using VM this is probably the way to go, and having multiple dedicated drives spreads the load and increases performance.
Swap partition on single drive
If you’ve got a single drive system, just create a swap partition. It’s what most installers do.
Use a swap file
You don’t need a drive or even a partition. Unix treats devices and files the same, so you can create a normal file and use that.
You can swap on any number of files or drives, and use “swapoff” to stop using a particular one.
Unless you’re going for maximum performance, this has a lot going for it. You can allocate larger or smaller swap files as required and easily reconfigure a running system. Also, if your file system is redundant, your swap system is too.
Multiple swap partitions
This is what the FreeBSD installer will offer by default if you set up a ZFS mirror or RAIDZ. It spreads the load across all drives. The only problem is that the whole point of a redundant drive system is that it will keep going after a hardware failure. With a bit of swap space on every drive, the system will fail if any of the drives fails, even if the filing system carries on. Any process with RAM paged out to swap gets knocked out, including the operating system. It’s like pulling out RAM chips and hoping it’s not going to crash. SO DON’T DO IT.
If you are going to use a partition on a data drive, just use one. On an eight drive system the chances of a failure on one of eight drives is eight times higher than one one specific unit, so you reduce the probability of failure considerably by putting all your eggs in one basket. Counterintuitive? Consider that if one basket falls on a distributed swap, they all do anyway.
Mirrored swap drives/partitions
This is sensible. The FreeBSD installer will do this if you ask it, using geom mirror. I’ve explained gmirror in posts passem, and there is absolutely no problem mixing it with ZFS (although you might want to read earlier posts to avoid complications with GPT). But the installer will do it automatically, so just flip the option. It’s faster than a swap file, although this will only matter if your job mix actually uses virtual memory regularly. If you have enough RAM, it shouldn’t.
You might think that mirroring swap drives is slower – and to an extent it is. Everything has to be written twice, and the page-out operation will only complete when both drives have been updated. However, on a page-in the throughput is doubled, given the mirror can read either drive to satisfy the request. The chances are there will be about the same, or slightly more page-ins so it’s not the huge performance hit it might seem at first glance.
Summary
Method
Pros
Cons
No swap
Simple Fastest
Wastes RAM Can lead to serious problems if you run out of RAM
Dedicated Swap Drive(s)
Simple Optimal performance
Each drive is a single point of failure for the whole system
Multiple Swap Partitions
Improved performance Lower cost than dedicated
Each drive is a single point of failure for the whole system
Single swap partition (multi-drive system)
Simple Lower probability of single point of failure occurring.
Reduced performance Still has single point of failure
Mirrored drives or partitions
No single point of failure for the whole system
Reduced performance
Swap file
Flexible even on live system Redundancy the same as drive array
Reduced performance
Quick summary of different swap/paging device strategies.
Conclusion
Having swap paritions on multiple drives increases your risk of a fault taking down a server that would otherwise keep running. Either use mirrored swap partitions/drives, or use a swap file on redundant storage. The choice depends on the amount of virtual memory you use in normal circumstances.