I’ve already explained how easy FreeBSD jails are to set up and use without resorting to installing heavy management tools, but today I thought I’d add a bit about networking. Specifically, how do you pass traffic arriving on a particular port to a service running inside a jail?
It’s actually very easy. All you need is a very local network inside FreeBSD, natted to the one outside.
Suppose you have your jail.conf set up as per my previous article. Here’s an excerpt:
tom { ip4.addr = 192.168.0.2 ; }
dick { ip4.addr = 192.168.0.3 ;  }
harry { ip4.addr = 192.168.0.4 ;  }
The defaults were set earlier in the file; the only thing that’s unique about each jail is the IP4 address and the name. What I didn’t say at the time was that 192.168.0.0 could have been on an internal network.
To define your local network just define it in rc.conf:
This creates another local loopback interface and assigns a range of IPv4 addresses to it. This can be as large as you wish, but I’ve defined 1..14 (with appropriate subnet mask) because they’ll be listed every time you run ifconfig!
If you’re doing this as a one off or don’t want to reboot just yet, the equivalent commands are:
ifconfig lo1 create
ifconfig lo1 inet 192.168.0.1/28
ifconfig lo1 inet 192.168.0.2/32 alias
ifconfig lo1 inet 192.168.0.3/32 alias
...
Next you’re going to need something to do the natting. pf is your friend here. I struggled for years using ipfw before I discovered pf.
Enable pf in rc.conf too:
pf_enable="yes"
And you’ll need an /etc/pf.conf file to do the magic. I like pf – it’s easier for my brain to understand than most firewalls. Here’s an example file:
PUB_IP="192.168.1.217"
INT="bge0"
JAIL_NET="192.168.0.0/24"
TOM="192.168.0.2"
DICK="192.168.0.3"
HARRY="192.168.0.4"
scrub in all
nat pass on $INT from $JAIL_NET to any -> $PUB_IP
block on $INT proto tcp from any to $PUBIP port 111
rdr pass on $INT proto tcp from any to $PUBIP port 3306  -> $TOM
rdr pass on $INT proto tcp from any to $PUBIP port {21,80,443} -> $DICK
rdr pass on $INT proto tcp from any to $PUBIP port 81 -> $HARRY port 80
So what’s going on?
I’ve used a few macros. PUB_IP is your public IP address, and INT is the interface it’s on. pf may figure some of this out, but I’m being explicit.
TOM, DICK and HARRY are the IPv4 addresses of the jails.
Next I’m scrubbing all interfaces (normally a good idea, but you don’t have to). But the next line is important – it uses nat to allow stuff on your jail network to talk to the outside world. If your host has more than one interface, add extra lines as appropriate (e.g. if it’s a gateway, you might want to NAT to LAN addresses and the WAN).
The following line is where you might want to block more stuff – in this case NFS on port 111. Then we’re back to jail things for the final three lines. They’re pretty self-explanatory, but here’s an explanation anyway.
Let’s say the tom jail is running a MariaDB server on port 3306. The first line takes anything arriving on port 3306 and sends it to tom’s jail IP. Simple. It can reply because of the nat line earlier.
dick is running a web and ftp server, so ports 21,80 and 443 are sent there. The pf syntax lets you do nice stuff like this with the {..}
Finally we come to harry. Here we’re running an http server on port 80, but to make it accessible externally we’re mapping it to port 81 as otherwise it would clash with dick. In other words, if you don’t specify a destination port in the redirect it will assume the same as the source port.
And that’s it! When you jail is started you will see an interface lo1 with the IP address defined in /etc/jail.conf and assuming you have something sensible in /etc/resolv.conf you’ll have a jail that looks like it’s running behind a NAT router with port forwarding.
Of course, if you don’t need to map a jailed service to an external IP address, don’t! Jails can access services on each other using their own virtual network.
To be fair, the Broadcom Ethernet adapter chips aren’t the best supported by FreeBSD. They’re okay, but for FreeBSD Intel rules the roost at 1-Gig and Chelsio at 10-Gig plus.
Unfortunately you may have no choice, as Broadcom chips are built in to the motherboards on some HP servers; notably the Microservers.
The Microserver Gen 7 is a great little box. I love them. I’m not so keen on the Gen 8 or Gen 10, as they’ve dropped a lot of the features that make the Gen 7 so adaptable. So after much investigation, I decided to either forego WoL support, or bung in a cheap Realtek card simply to wake them up, but with only two PCIe slots, it was a pity to waste one on a better supported Ethernet NIC. That was a long time ago, and I’ve had one eye out for a fix for a while.
And then last year someone looked at it, and I found references to this in bug tracker. Unfortunately I don’t know who to credit with the fix, and it hasn’t made it to the kernel yet as it’s not 100%, but if you need it I’ve patched the 12.1 driver based on all the notes I could find.
There’s a question about the new driver’s correct operation on laptops. Why you’d be using WoL on a laptop eludes me; but for the Microservers it just works.
Download the patched driver ‘C’ file above (as edited by yours truly – no guarantees), and copy it to /usr/src/sys/dev/bge/if_bge.c, rebuild the kernel and away you go. As it was a bug with the state the chip was left on shutdown, you have to reboot the NEW kernel to shut down in the correct state for WoL to work. Don’t forget to enable WoL in the Microserver BIOS too.
Although this fixes the WoL issue, I know the Broadcom chips are capable of more than the driver – for example jumbo packets. If you want better network performance with a Microserver, add a dual-port Intel Ethernet card instead. Sorry, HP/Broadcom.
What is going on with FreeBSD in Godden Green in Kent, UK? Jobsite has been spamming me with junior/mid-level programmer roles mentioning FreeBSD for months now, and I’m getting curious!
I have an alert set up so whenever FreeBSD is mentioned I get a ping, as I like to know what’s going on. This isn’t one of the usual suspect AFAIK – they might even be interesting!
I’ve never got the point of ezjail for creating jailed environments (like Solaris Zones) on FreeBSD. It’s easier to do most things manually, and especially since the definitions were removed from rc.conf to their own file, jail.conf. (My biggest problem is remembering whether it’s called “jail” or “jails”!)
jail.conf allows macros, has various macros predefined, and you can set defaults outside of a particular jail definition. If you’re using it as a split-out from rc.conf, you’re missing out.
Here’s an example:
# Set sensible defaults for all jails
path /jail/$name;
exec.start  = "/bin/sh /etc/rc";
exec.stop  = "/bin/sh /etc/rc.shutdown";
exec.clean;
mount.devfs;
mount.procfs;
host.hostname $name.my.domain.uk;
# Define our jails
tom { ip4.addr = 192.168.0.2 ; }
dick { ip4.addr = 192.168.0.3 ;  }
harry { ip4.addr = 192.168.0.4 ;  }
mary { ip4.addr = 192.168.0.5 ;  }
alice { ip4.addr = 192.168.0.6 ;  }
nagios { ip4.addr = 192.168.0.7 ; allow.raw_sockets = 1 ; }
jane { ip4.addr = 192.168.0.8 ; }
test { ip4.addr = 192.168.0.9 ; }
foo { ip4.addr = 192.168.0.10 ; }
bar { ip4.addr = 192.168.0.11 ; }
So what I’ve done here is set sensible default values. Actually, these are probably mostly set what you want anyway, but as I’m only doing it once, re-defining them explicitly is good documentation.
Next I define the jails I want, over-riding any defaults that are unique to the jail. Now here’s one twist – the $name macro inside the {} is the name of the jail being defined. Thus, inside the definition of the jail I’ve called tom, it defines hostname=tom.my.domain.uk. I use this expansion to define the path to the jail too.
If you want to take it further, if you have your name in DNS (which I usually do) you can set ip.addr= using the generated hostname, leaving each individual jail definition as { ;} !
I’ve set the ipv4 address explicitly, as I use a local vlan for jails, mapping ports as required from external IP addresses if an when required.
Note the definition for the nagios jail; it has the extra allow.raw_sockets = 1 setting. Only nagios needs it.
ZFS and FreeBSD Jails.
The other good wheeze that’s become available since the rise of jails is ZFS. Datasets are the best way to do jails.
First off, create your dataset z/jail. (I use z from my default zpool – why use anything longer, as you’ll be typing it a lot?)
Next create your “master” jail dataset: zfs create z/jail/master
Now set it up as a vanilla jail, as per the handbook (make install into it). Then leave it alone (other than creating a snapshot called “fresh” or similar).
When you want a new jail for something, use the following:
zfs clone z/jail/master@fresh z/jail/alice
And you have a new jail, instantly, called alice – just add an entry as above in jail.conf, and edit rc.conf to configure its networ. And what’s even better, alice doesn’t take up any extra space! Not until you start making changes, anyway.
The biggest change you’re likely to make to alice is building ports. So create another dataset for that: z/jail/alice/usr/ports. Then download the ports tree, build and install your stuff, and when you’re done, zfs destroy z/jail/alice/usr/ports. The only space your jail takes up are the changes from the base system used by your application. Obviously, if you use python in almost every jail, create a master version with python and clone that for maximum benefit.
Penguinisters are very keen on their docker, but for the rest of us it may be difficult to see what the fuss is all about – it’s only been around a few years and everyone’s talking about it. And someone asked again today. What are we missing?
Well docker is a solution to a Linux (and Windows) problem that FreeBSD/Solaris doesn’t have. Until recently, the Linux kernel only implemented the original user isolation model involving chroot. More recent kernels have had Control Groups added, which are intended to provide isolation for a group of processes (namespaces). This came out of Google, and they’ve extended to concept to include processor resource allocation as one of the knobs, which could be a good idea for FreeBSD. The scheduler is aware of the JID of the process it’s about to schedule, and I might take a look in the forthcoming winter evenings. But I digress.
So if isolation (containerisation in Linux terms) is in the Linux kernel, what is Docker bringing to the party? The only thing I can think of is standardisation and an easy user interface (at the expense of having Python installed). You might think of it in similar terms to ezjail – a complex system intended to do something that is otherwise very simple.
To make a jail in FreeBSD all you need do is copy the files for your system to a directory. This can even be a whole server’s system disk if you like, and jails can run inside jails. You then create a very simple config file, giving the jail a name, the path to your files and an what IP addresses to pass through (if any) and you’re done. Just type “service jail nameofjal start”, and off it goes.
Is there any advantage in running Docker? Well, in a way, there is. Docker has a repository of system images that you can just install and run, and this is what a lot of people want. They’re a bit like virtual appliances, but not mind-numbingly inefficient.
You can actually run docker on FreeBSD. A port was done a couple of years ago, but it relies on the 64-bit Linux emulation that started to appear in 10.x. The newer the version of FreeBSD the better.
Docker is in ports/sysutils/docker-freebsd. It makes uses of jails instead of Linux cgroups, and requires ZFS rather than UFS for file system isolation. I believe the Linux version uses Union FS but I could be completely wrong on that.
The FreeBSD port works with the Docker hub repository, giving you access to thousands of pre-packaged system images to play with. And that’s about as far as I’ve ever tested it. If you want to run the really tricky stuff (like Windows) you probably want full hardware emulation and something like Xen. If you want to deploy or migrate FreeBSD or Solaris systems, just copy a new tarball in to the directory and go. It’s a non-problem, so why make it more complicated?
Given the increasing frequency Docker turns up in conversations, it’s probably worth taking seriously as Linux applications get packaged up in to images for easy access. Jails/Zones may be more efficient, and Docker images are limited to binary, but convenience tends to win in many environments.
A while back I reviewed the Dell FS12-NV7 – a 2U rack server being sold cheap by all and sundry. It’s a powerful box, even by modern standards, but one of its big drawbacks is the disk system it comes with. But it needn’t be.
There are two viable solutions, depending on what you want to do. You can make use of the SAS backplane, using SAS and/or SATA drives, or you can go for fewer SATA drives and free up one or more PCIe slots as Plan B. You probably have an FS12 because it looks good for building a drive array (or even FreeNAS) so I’ll deal with Plan A first.
Like most Dell servers, this comes with a Dell PERC RAID SAS controller – a PERC6/i to be precise. This ‘I’ means it has internal connectors; the /E is the same but its sockets are external.
The PERC connects to a twelve-slot backplane forming a drive array at the front of the box. More on the backplane later; it’s the PERCs you need to worry about.
The PERC6 is actually an LSI Megaraid 1078 card, which is just the thing you need if you’re running an operating system like Windows that doesn’t support a volume manager, striping and other grown-up stuff. Or if your OS does have these features, but you just don’t trust it. If you are running such an OS you may as well stick to the PERC6, and good luck to you. If you’re using BSD (including FreeNAS), Solaris or a Linux distribution that handles disk arrays, read on. The PERC6 is a solution to a problem you probably don’t have, but in all other respects its a turkey. You really want a straightforward HBA (Host Bus Adapter) that allows your clever operating system to talk directly with the drives.
Any SAS card based on the 1078 (such as the PERC6) is likely to have problems with drives larger than 2Tb. I’m not completely sure why, but I suspect it only applies to SATA. Unfortunately I don’t have any very large SAS drives to test this theory. A 2Tb limit isn’t really such a problem when you’re talking about a high performance array, as lots of small drives are a better option anyway. But it does matter if you’re building a very large datastore and don’t mind slower access and very significant resilvering times when you replace a drive. And for large datastores, very large SATA drives save you a whole lot of cash. The best capacity/cost ratio is for 5Gb SATA drives
Some Dell PERCs can be re-flashed with LSI firmware and used as a normal HBA. Unfortunately the PERC6 isn’t one of them. I believe the PERC6/R can be, but those I’ve seen in a FS12 are just a bit too old. So the first thing you’ll need to do is dump them in the recycling or try and sell them on eBay.
There are actually two PERC6 cards in most machine, and they each support eight SAS channels through two SFF-8484 connectors on each card. Given there are twelve drives slots, one of the PERCs is only half used. Sometimes they have a cable going off to a battery located near the fans. This is used in a desperate attempt to keep the data in the card’s cache safe in order to avoid write holes corrupting NTFS during a power failure, although the data on the on-drive caches won’t be so lucky. If you’re using a file system like that, make sure you have a UPS for the whole lot.
But we’re going to put the PERCs out of our misery and replace them with some nice new LSI HBAs that will do our operating system’s bidding and let it talk to the drives as it knows best. But which to pick? First we need to know what we’re connecting.
Moving to the front of the case there are twelve metal drive slots with a backplane behind. Dell makes machines with either backplanes or expanders. A backplane has a 1:1 SAS channel to drive connection; an expander takes one SAS channel and multiplexes it to (usually) four drives. You could always swap the blackplane with an expander, but I like the 1:1 nature of a backplane. It’s faster, especially if you’re configured as an array. And besides, we don’t want to spend more money than we need to, otherwise we wouldn’t be hot-rodding a cheap 2U server in the first place – expanders are expensive. Bizarrely, HBAs are cheap in comparison. So we need twelve channels of SAS that will connect to the sockets on the backplane.
The HBA you will probably want to go with is an LSI, as these have great OS support. Other cards are available, but check that the drivers are also available. The obvious choice for SAS aficionados is the LSI 9211-8i, which has eight internal channels. This is based on an LSI 2000 series chip, the 2008, which is the de-facto standard. There’s also four-channel -4i version, so you could get your twelve channels using one of each – but the price difference is small these days, so you might as well go for two -8i cards. If you want cheaper there are 1068-based equivalent cards, and these work just fine at about half the price. They probably won’t work with larger disks, only operate at 3Gb and the original SAS standard. However, the 2000 series is only about £25 extra and gives you more options for the future. A good investment. Conversely, the latest 3000 series cards can do some extra stuff (particularly to do with active cables) but I can’t see any great advantage in paying megabucks for one unless you’re going really high-end – in which case the NV12 isn’t the box for you anyway. And you’d need some very fast drives and a faster backplane to see any speed advantage. And probably a new motherboard….
Whether the 6Gb SAS2 of the 9211-8i is any use on the backplane, which was designed for 3Gb, I don’t know. If it matters that much to you you probably need to spend a lot more money. A drive array with a direct 3Gb to each drive is going to shift fast enough for most purposes.
Once you have removed the PERCs and plugged in your modern-ish 9211 HBAs, your next problem is going to be the cable. Both the PERCs and the backplane have SFF-8484 multi-lane connectors, which you might not recognise. SAS is a point-to-point system, the same as SATA, and a multi-lane cable is simply four single cables in a bundle with one plug. (Newer versions of SAS have more). SFF-8484 multi-lane connectors are somewhat rare, (but unfortunately this doesn’t make them valuable if you were hoping to flog them on eBay). The world switched quickly to the SFF-8087 for multi-lane SAS. The signals are electrically the same, but the connector is not.
So there are two snags with this backplane. Firstly it’s designed to work with PERC controllers; secondly it has the old SFF-8484 connectors on the back, and any SAS cables you find are likely to have SFF-8087.
First things first – there is actually a jumper on the backplane to tell it whether it’s talking to a PERC or a standard LSI HBA. All you need to do is find it and change it. Fortunately there are very few jumpers to choose from (i.e. two), and you know the link is already in the wrong place. So try them one at a time until it works. The one you want may be labelled J15, but I wouldn’t like to say this was the same on every variant.
Second problem: the cable. You can get cables with an SFF-8087 on one end and an SFF-8484 on the other. These should work. But they’re usually rather expensive. If you want to make your own, it’s a PITA but at least you have the connectors already (assuming you didn’t bin the ones on the PERC cables).
I don’t know what committee designed SAS cable connectors, but ease of construction wasn’t foremost in their collective minds. You’re basically soldering twisted pair to a tiny PCB. This is mechanically rubbish, of course, as the slightest force on the cable will lift the track. Therefore its usual to cover the whole joint in solidified gunk (technical term) to protect it. Rewiring SAS connectors is definitely not easy.
I’ve tried various ways of soldering to them, none of which were satisfactory or rewarding. One method is to clip the all bare wires you wish to solder using something like a bulldog clip so they’re at lined up horizontally and then press then adjust the clamp so they’re gently pressed to the tracks on the board, making final adjustments with a strong magnifying glass and a fine tweezers. You can then either solder them with a fine temperature-controlled iron, or have pre-coated the pads with solder paste and flash across it with an SMD rework station. I’d love to know how they’re actually manufactured – using a precision jig I assume.
The “easy” way is to avoid soldering the connectors at all; simply cut existing cables in half and join one to the other. I’ve used prototyping matrix board for this. Strip and twist the conductors, push them through a hole and solder. This keeps things compact but manageable. We’re dealing with twisted pair here, so maintain the twists as close as possible to the board – it actually works quite well.
However, I’ve now found a reasonably-priced source of the appropriate cable so I don’t do this any more. Contact me if you need some in the UK.
So all that remains is to plug your HBAs to the backplane, shove in some drives and you’re away. If you’re at this stage, it “just works”. The access lights for all the drives do their thing as they should. The only mystery is how you can get the ident LED to come on; this may be controlled by the PERC when it detects a failure using the so-called sideband channel, or it may be operated by the electronics on the backplane. It’s workings are, I’m afraid, something of a mystery still – it’s got too much electronics on board to be a completely passive backplane.
Plan B: SATA
If you plan to use only SATA drives, especially if you don’t intend using more than six, it makes little sense to bother with SAS at all. The Gigabyte motherboard comes with half a dozen perfectly good 3Gb SATA channels, and if you need more you can always put another controller in a PCIe slot, or even USB. The advantages are lower cost and you get to free up two PCIe slots for more interesting things.
The down-side is that you can’t use the SAS backplane, but you can still use the mounting bays.
Removing the backplane looks tricky, but it really isn’t when you look a bit closer. Take out the fans first (held in place by rubber blocks), undo a couple of screws and it just lifts and slides out. You can then slot and lock in the drives and connect the SATA connectors directly to the back of the drives. You could even slide them out again without opening the case, as long as the cable was long enough and you manually detached the cable it when it was withdrawn. And let’s face it – drives are likely to last for years so even with half a dozen it’s not that great a hardship to open the case occasionally.
Next comes power. The PSU has a special connector for the backplane and two standard SATA power plugs. You could split these three ways using an adapter, but if you have a lot of drives you might want to re-wire the cables going to the backplane plug. It can definitely power twelve drives.
And that’s almost all there is to it. Unfortunately the main fans are connected to the backplane, which you’ve just removed. You can power them from an adapter on the drive power cables, but there are unused fan connectors on the motherboard. I’m doing a bit more research on cooling options, but this approach has promising possibilities for noise reduction.
It seems just about everyone selling refurbished data centre kit has a load of Dell FS12-NV7’s to flog. Dell FS-what? You won’t find them in the Dell catalogue, that’s for sure. They look a bit like C2100s of some vintage, and they have a lot in common. But on closer inspection they’re obviously a “special” for an important customer. Given the number of them knocking around, it’s obviously a customer with big data, centres stuffed full of servers with a lot of processing to do. Here’s a hint: It’s not Google or Amazon.
So, should you be buying a weirdo box with no documentation whatsoever? I’d say yes, definitely. If you’re interests are anything like mine. In a 2U box you can get twin 4-core CPUs and 64Gb of RAM for £150 or less. What’s not to like? Ah yes, the complete lack of documentation.
Over the next few weeks I intend to cover that. And to start off this is my first PC review for nearly twenty years.
So the Dell FS12-NV7:
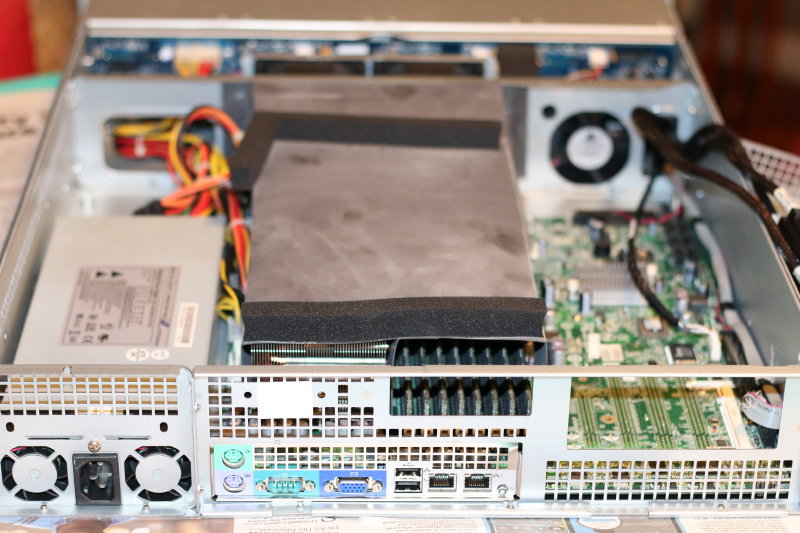
FS-12 looking at the back panel. Note the cowling across the CPUs
As I mentioned, it’s a 2U full length heavy metal box on rails. On the back there are the usual I/O ports: a 9-way RS-232, VGA, two 1Gb Ethernet, two USB2 and a PS/2 keyboard and mouse. The front is taken up by twelve 3.5″ hard drive bays, with the status lights and power button on one of the mounting ears to make room. Unlike other Dell servers, all the connections are on the back, only.
If you want to play with the metalwork, the rear panel is modular and can easily be unscrewed although in practice there’s not much scope for enhancement without changing the motherboard.
The FS12 has a single 1U PSU
Speaking of metalwork, it comes with a single 1U PSU. There’s space above it for a second, but the back panel behind the PSU bay would need swapping – or removing – if you wanted to add a second. The area above the existing unit is just about the only space left in the box, and I have thought of piling up a load of 2.5″ drives there.
Taking the top off is where the fun starts. Inside there’s large Gigabyte EATX motherboard – a Gigabyte GA-3CESL-RH. All the ones I’ve seen are rev 1.7, which is a custom version but its similar to a rev 1.4. It does have, of all things, a floppy disk controller and an IDE (PATA) connector. More generally usefully, there are two more USB headers, a second RS-232 and six SATA sockets (3Gb). At the back there’s either a BMC module, or a socket where it used to be. If you like DRAC, knock yourself out (you’re likely to be barely concious to begin with). Seriously, this is old DRAC and probably only works with IE 2.0 or something. (You can probably tell I haven’t bothered to try it). The BIOS also allows you to redirect the console to the serial port for remote starting.
The Ethernet ports are Marvel 88E1116 1Gb, and haven’t given me any trouble. The firmware supports PXE, and I’m pleased to say that WoL works with the FreeBSD drives.
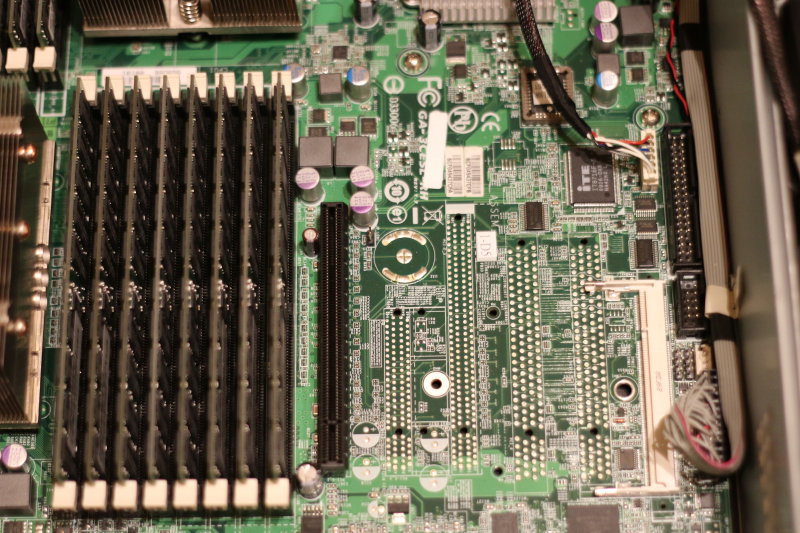
Somebody has pinched the slots!
Unfortunately, while the original Gigabyte model sported twin PCI and three PCIe sockets, the connectors are missing from these examples. It’s hard to find anything with a bit of grunt that can also use with your old but interesting PCI cards. It should be possible to rework it by adding the sockets and smoothing caps and sockets; fortunately the SMD decoupling caps are already still there. On the other had, you could find another motherboard with PCI sockets if that’s what you really want.
But grunt is what this box is all about, and there’s plenty of that.
This is board was designed for Opteron Socket-F processors; specifically the 2000 series (Barcelona and Shanghi). The first digit refers to the number of physical CPUs that work together (either 2 or 8), the second is a code for the number of cores (1=1, 2=2, 3=4, 4=6, 5=8). The last two digits are a speed code. It’s not the frequency, it’s the benchmark speed. I’ve heard rumours that some of FS-12s contain six-core CPUs, but I’ve only seen the 2373EE myself. The EE is the low power consumption version. Sweet.
If I could choose any Opeteron Socket-F CPU, the 2373EE is almost as good as it gets. It’s a tad slower than some of the other models running at 2.1GHz , but has significantly lower power and cooling requirements and was one of the last they produced in the 45nm process. It would be possible to change it for a 2.3GHz version, or one with six cores, but otherwise pretty much every other Opteron would be a downgrade. In other words, don’t think you can hot-rod it with a faster processor – you’re unlikely to find a Socket-F CPU anyway. After these, AMD switched to the Bulldozer line in an AM3+ socket.
This isn’t to say the CPU is modern. It does have the AMD virtualisation instructions, so it’s good news if you want to run nested 64-bit operating systems or hypervisors. The thing it lacks that I’d like most are the AES instructions that appeared in Bulldozer onwards. If you’re doing a lot of crypto, this matters. If you’re not, it doesn’t. Naturally, it implements the AMD64 instruction set, as now used by Intel, and all the media processing bit-twiddle stuff if you can use it. AMD has traditionally been at the forefront of processing smarter, whereas Intel goes for brute force and cranks up the clock speed. This is why AMD has, in my opinion, made assembler programming fun again.
Eight very capable Opteron cores: a good start. This generation supported DDR2 ECC RAM, and these boxes have 16 sockets (eight per CPU). They should be able to support 8Gb DIMMs, although I haven’t been able to verify this. Gigabyte’s documentation on similar motherboards is inconclusive as the earlier boards were from an time when 4Gb was all you could get. Again, I haven’t tried this but they are designed to handle 512Mb DIMMs. 1Gb and 4Gb certainly work and these tend to be available with any FS-12 you buy. At one time DDR2 ECC RAM was rather expensive. Not now. It’s much cheaper than DDR3 because, to be blunt, you can’t use it in very much these days.
And this is what makes the FS12 such a good buy: For about £150 you can get an eight-core processor with 64Gb of RAM. Bargain! And that’s before you look at the disk options.
The FS12, like most Dell Servers, is set up to run Windows and as a result requires a separate volume manager, on hardware designed to pretend Windows is looking at a disk. So-called “hardware” RAID. This takes the form of two PERC6/i cards occupying both PCIe cards on a riser. Fine if you want to run Windows or some other lightweight operating system, but PERC cards are about as naff as you can get for anything Unix-like. They work in RAID mode only, hiding the drives from the OS, and these are just a bit to old to be re-flashed in to anything useful.
The drives fit into a front-loading 12-way array with a SAS/SATA backplane. This is built in to the case; you can’t detach it and use it separately. Not without an angle grinder anyway, although if you really wanted to this would be a practical proposition. Note well that this is a backplane; not an expander, enclosure or anything so complex. Some Dell 2U servers like this do have an expander, which takes four SAS channels of SAS on a single cable and expands them to twelve, but this is the 1:1 version. And it’s an old one at that, using SFF-8484 connectors. If you’ve been using SAS for years you may still never have seen an SFF-8484 (AKA 32-pin Multi-lane). These didn’t last long and were quickly replaced with the far more sensible SFF-8487(AKA 36-pin Mini-SAS). However, if you can sort out the cables (as I will explain in a later post), this backplane has possibilities.
But as it stands you get a the PERCs and a 12-slot drive array that’s only good for Windows or Linux. Unless, that is, you remove the backplane and the PERCs and make use of the six 3Gb SATA sockets on the motherboard. You’ll have to leave the drives in place and connect the cables directly back, but how many drives do you need?
There is one unfortunate feature of these boxes that is hard to ignore: the cooling. It’s effective, but when you turn it on it sounds like a jet engine spooling up. And then it gets even louder. There a lot you can do about this and I’m experimenting with options, which I’ll explain in a later post, but in the mean time you need to give everyone ear defenders, or install it in an outbuilding and use a KVM extender. I’ve been knocking around data centres for over twenty years and I’ve never heard one this bad.
The cooling is actually accomplished by five fans. Two are 1U size in the PSU, and are probably as annoying as any other ~40mm fan. The real screamers are two 80mm and one 60mm fan positioned between the drive cage and the motherboard. A cowling directs the one 80mm fan across each CPU and its DIMMs and the 60mm gives airflow over the Northbridge and PCI slots. They all spin really fast – in excess of 10,000rpm, and although they have sense and control wires nothing seems to be adjusting them downwards to the required rate.
My suspicion is that either the customer didn’t care about noise but wanted to keep everything as cool as possible, or that whatever operating system was installed (ESX I suspect) had a custom daemon to control their speed via the SAS backplane. I shall be going in to cooling options later, but note that the motherboard has five monitored and software adjustable fan connectors that are currently not used.
So, in summary, you’re getting a lot for your money if its the kind of thing you want. It’s ideal as a high-performance Unix box with plenty of drive bays (preferably running BSD and ZFS). In this configuration it really shifts. Major bang-per-buck. Another idea I’ve had is using it for a flight simulator. That’s a lot of RAM and processors for the money. If you forego the SAS controllers in the PCIe slots and dump in a decent graphics card and sound board, it’s hard to see what’s could be better (and you get jet engine sound effects without a speaker).
So who should buy one of these? BSD geeks is the obvious answer. With a bit of tweaking they’re a dream. It can build-absolutely-everything in 20-30 minutes. For storage you can put fast SAS drives in and it goes like the wind, even at 3Gb bandwidth per drive. I don’t know if it works with FreeNAS but I can’t see why not – I’m using mostly FreeBSD 11.1 and the generic kernel is fine. And if you want to run a load of weird operating systems (like Windows XP) in VM format, it seems to work very well with the Xen hypervisor and Dom0 under FreeBSD. Or CentOS if you prefer.
So I shall end this review in true PCW style:
Pros:
Cheap
Lots of CPUs,
Lots of RAM
Lots of HD slots
Great for BSD/ZFS or VMs
Cons:
Noisy
no AES-NI
SAS needs upgrading
Limited PCI slots
As I’ve mentioned, the noise and SAS are easy and relatively cheap to fix, and thanks to BitCoin miners, even the PCI slot problem can be sorted. I’ll talk about this in a later post.
The ZFS bandwaggon has momentum, but ZFS isn’t for everyone. UFS2 has a number of killer advantages in some applications.
ZFS is great if you want to store a very large number of normal files safely. It’s copy-on-write (COW) is a major advantage for backup, archiving and general data safety, and datasets allow you to fine-tune almost any way you can think of. However, in a few circumstances, UFS2 is better. In particular, large random-access files do badly with COW.
Unlike traditional systems, a block in a file isn’t overwritten in place, it always ends up at a different location. If a file started off contiguous it’ll pretty soon be fragmented to hell and performance will go off a cliff. Obvious victims will be databases and VM hard disk images. You can tune for these, but to get acceptable performance you need to throw money and resources to bring ZFS up to the same level. Basically you need huge RAM caches, possibly an SLOG, and never let your pool get more than 50% full. If you’re unlucky enough to end up at 80% full ZFS turns off speed optimisations to devote more RAM to caching as things are going to get very bad fragmentation-wise.
If these costs are a problem, stuck with UFS. And for redundancy, there is still good old GEOM Mirror (gmirror). Unfortunately the documentation of this now-poor relation has lagged a bit, and what once worked as standard, doesn’t. So here are some tips.
The most common use of gmirror (with me anyway) is a twin-drive host. Basically I don’t want things to fail when a hard disk dies, so I add a second redundant drive. Such hosts (often 1U servers) don’t have space for more than two drives anyway – and it pays to keep things simple.
Setting up a gmirror is really simple. You create one using the “gmirror label” command. There is no “gmirror create” command; it really is called “label”, and it writes the necessary metadata label so that mirror will recognise it (“gmirror destroy” is present and does exactly what you might expect).
So something like:
gmirror label gm0 ada1 ada2
will create a device called /dev/mirror/gm0 and it’ll contain ada1’s contents mirrored on to ada2 (once it’s copied it all in the background). Just use /dev/mirror/gm0 as any other GEOM (i.e. disk). Instead of calling it gm0 I could have called it gm1, system, data, flubnutz or anything else that made sense, but gm0 is a handy reminder that it’s the first geom mirror on the system and it’s shorter to type.
The eagle eyed might have noticed I used ada1 and ada2 above. You’ve booted off ada0, right? So what happens if you try mirroring yourself with “gmirror label gm0 ada0 ada1“? Well this used to work, but in my experience it doesn’t any more. And on a twin-drive system, this is exactly what you want to do. But it is still possible, read on…
How to set up a twin-drive host booting from a geom mirror
First off, before you do anything (even installing FreeBSD) you need to set up your disks. Since the IBM XT, hard disks have been partitioned using an MBR (Master Boot Record) at the start. This is really old, naff, clunky and Microsoft. Those in the know have been using the far superior GPT system for ages, and it’s pretty cross-platform now. However, it doesn’t play nice with gmirror, so we’re going to use MBR instead. Trust me on this.
For the curious, know that GPT keeps a copy of the partition table at the beginning and end of the disk, but MBR only has one, stored at the front. gmirror keeps its metadata at the end of the disk, well away from the MBR but unfortunately in exactly the same spot as the spare GPT. You can hack the gmirror code so it doesn’t do this, or frig around with mirroring geoms rather than whole disks and somehow get it to boot, but my advice is to stick to MBR partitioning or BSDlabels, which is an extension. There’s not a lot of point in ever mounting your BSD boot drive on a non-BSD system, so you’re not losing much whatever you choose.
Speaking of metadata, both GPT and gmirror can get confused if they find any old tables or labels on a “new” disk. GPT will find old backup partition tables and try to restore them for you, and gmirror will recognise old drives as containing precious data and dig its heels in when you try to overwrite it. Both gpart and gmirror have commands to erase their metadata, but I prefer to use dd to overwrite the whole disk with zeros anyway before re-use. This checks that the disk is actually good, which is nice to know up-front. You could just erase the start and end if you were in a hurry and wanted to calculate the offsets.
The next thing you’ll need to do is load the geom_mirror kernel module. Either recompile the kernel with it added, or if this fills you with horror, just add ‘load_geom_mirror=”yes”‘ to /boot/loader.conf. This does bring it in early enough in the process to let you boot from it. The loader will boot from one drive or the other and then switch to mirror mode when it’s done.
So, at this point, you’ve set up FreeBSD as you like on one drive (ada0), selecting BSDlabels or MBR as the partition method and UFS as the file system. You’ve set it to load the geom_mirror module in loader.conf. You’re now looking at a root prompt on the console, and I’m assuming your drives are ada0 and ada1, and you want to call your mirror gm0.
Try this:
gmirror label gm0 ada0
Did it work? Well it used to once, but now you’ll probably get an error message saying it could not write metadata to ada0. If (when) this happens I know of one answer, which I found after trying everything else. Don’t be tempted to try everything else yourself (such as seeing if it works with ada1). Anything you do will either fail if you’re lucky, or make things worse. So just reboot, and select single-user mode from the loader menu.
Once you’re at the prompt, type the command again, and this time it should say that gm0 is created. My advice is to now reboot rather than getting clever.
When you do reboot it will fail to mount the root partition and stop, asking for help to find it. Don’t panic. We know where it’s gone. Mount it with “ufs:/dev/mirror/gm0s1a” or whatever slice you had it on if you’ve tried to be clever. Forgot to make a note? Don’t worry, somewhere on the boot long visible on the screen it actually tell you the name of the partition it couldn’t find.
After this you should be “in”. And to avoid this inconvenience next time you boot you’ll need to tweak /etc/fstab using an editor of your choice, although real computer nerds only use vi. What you need to do is replace all references to the actual drive with the gm0 version. Therefore /dev/ada0s1a should be edited to read /dev/mirror/gm0s1a. On a current default install, which no longer partitions the drive, this will only apply the root mount point and the swap file.
Save this, reboot (to test) and you should be looking good. Now all that remains is to add the second drive (ada1 in the example) with the line:
gmirror insert gm0 ada1
You can see the effect by running:
gmirror status
Unless your drive is very small, gm0 will be DEGRADED and it will say something about being rebuilt. The precise wording has changed over time. Rebuilding takes hours, not seconds so leave it. Did I mention it’s a good idea to do this when the system isn’t busy?
So there I was looking at a pile of eight drives and an empty storage array, and wondering how to cofigure it for best performance under ZFS. “Everyone knows” the formula right? The best performance in a raidz array comes if you use 2^D+P drives. That’s to say your data drives should be a power of two (i.e. 2,4,8,16) plus however many redundant (parity) drives for the raidz level you desire. This is mentioned quite often in the Lucas book FreeBSD Mastery:ZFS; although it didn’t originate there I’ll call it the Lucas rule anyway
I have my own rule – redundancy should be two drives or 30%. Why? Well drives in an array have a really nasty habit of failing two at a time. It’s not sods law, it’s a real phenomenon caused by the stress of re-silvering shaking out any other drives that are “on the edge”. This means I go for configurations such as 4+2, 5+2, 6+2. From there on I go to raidz3 with 7+3, 8+3, 9+3. As there’s no raidz4, 12 drives is the limit – for 14 drives I’d have two vdevs (LUNs) of 5+2 each.
However, If you merge my rule with the Lucas rule the only valid sizes are 2+2 and 4+2 and 8+3. And I had just eight drives to play with.
I was curious – how was the Lucas rule derived? I dug out the book, and it doesn’t say. Anywhere. Having a highly developed suspicion of anything described as “best practice” I decided to test it on my rag-bag collection of drives in the Dell backplane, and guess what? No statistically significant difference.
Now the trouble with IT “best practice” guides is they’re written by technicians based on observation, not OS programmers who know how stuff actually works. The first approach has a lot of merit, but unless you know the reason for your observations you won’t know when the reason has become irrelevant. Unfortuantely, as an OS programmer, I now had a duty to figure out what this reason might have been.
After wading through the code and finding nothing much helpful, I did what I should have done first and considered the low-level disk layout. It’s actually quite simple.
Your stuff is written to disk in a series of blocks, right? In a striped array, each drive gets a block in turn to spread the load. No problem there. Well there will be a problem if your ZFS block size doesn’t match the block size on the drives, but that’s a complication I’m going to overlook – lets just assume you got that bit right.
So where does the optimal number of disks come from? I contend that on a striped vdev there never was one. The problem only comes when you add redundant drives.
I’m going to digress here to explain how error correcting data happens – in very simple terms. Suppose you have a sequence of numbers such as:
5 8 2 3
Each number is stored on a separate piece of paper, and to guard against loss you add a fifth number so that when you add them all up you get a total ending in zero. In this example, the total of the first 4 is 18. You can add an extra 2 to make the total 20, which ends in zero, so the fifth number is going to be 2.
5 8 2 3 2
Now, if we lose any one of those five numbers we can work out what it must have been – just work out which digit when added to the remaining four gives you a total ending in zero. For example, supposing ‘3’ when missing. Add up the remainder and you get 17. You need 3 more to get to a zero, so the missing number must be 3.
Digression over. ZFS calculates a block of error correction data for the blocks of data it’s just written and adds this as the last block in the sequence. If If ZFS blocks and sectors were the same size, this would be fine writing another sector is quick. But ZFS blocks no longer match sectors. In fact, they’re tunable over a wide range. We’ve also got 4k sectors instead of the traditional 512b. So, suppose you had 2k ZFS blocks on a 4k sector disk? Your parity data could end up being just half a sector, meaning that ZFS has to read it, overwrite half, and write it back rather than just writing it. This sucks. But if you choose the number of disks carefully, you end up with parity blocks that do fit. So, always make sure you follow Lucas’ rule, and make sure your data drives are a power of two.
Except…
This may have been true once, but now we have variable ZFS blocks sizes, and they tend to be much larger than the sector size anyway. In this situation the “magic” configurations no longer matter. And, now we have lz4 compression, the physical block sizes are variable anyway.
For those not in the know about this, lz4 compression is a no-brainer. It wont’ compress stuff it can’t, and its fast. Most files will compress to at least 2:1, often more – which means when you read a block only half the data needs to travel down the bus to get in memory. Everything suddenly goes twice as fast, at the expense of one core having to do some work. It’s true that the block and sector sizes are nowhere near matching, and this is bound to have a performance hit, but this is more-than eclipsed by the improved transfer rate.
So in summary, forget the 2^D+P “best practice” formula. It was only valid in the early days. Have whatever config you like, but I do commend my rule about the number of redundant drives. This is based on a hardware issue, and no update to the software is going to fix this any time soon.
So there I was, reading the source code to FreeBSD’s nfsd (as you do), trying to figure out why ESXi’s performance was so bad when used with an NFS datastore in a ZFS dataset. Actually, I had some idea. There’s a lot out there on the interweb about whether it’s safe to tweak it to ignore requests to flush the write cache using the sysctl tunable vfs.zfs.cache_flush_disable. (For what it’s worth, I’d say that if your drives are on a UPS it’s fine).
But why does ESXis suck so badly in this respect with NFS connected datastores? What is this excessive cache flushing all about? I decided to install it on an HP Microserver and get to some serious debugging.
Okay, here is how ZFS writes work. When you write something it doesn’t actually write, it puts it in the ZIL. This is an Intent Log – i.e. writes intended to happen. Not exactly a write cache, but it has the same effect, and because of the way ZFS works it’s perfectly safe for avoiding data corruption. If a transaction is waiting in the ZIL when the music stops, the transaction is lots but the disk isn’t trashed. (NB. It’s also possible to put a ZIL on a log drive rather than RAM – I won’t discuss this here).
This should speed things up, right? Normally it does, but not when NFS is being abused. Let me explain. NFS has a transaction commit instruction. The client can tell NFS to flush everything in a transaction to permanent storage and not return until it’s finished. Sometimes you really need this, like if you’re updating the super-block in a database structure. Most of the time you don’t.
Enter ESXi running brain-dead Windows guest machines. How does it know when they’re writing something it isn’t a super-block? It doesn’t. So its solution (as far as I can tell) is to send NFS a commit after every single write and hang around waiting until it’s done it. There’s no point in having the ZIL at all, as it needs to be flushed every time. Putting the ZIL on disk is even worse, as you get an extra write/read for each transaction. I’ve seen people trying to put fast SSDs on the system to try and overcome this – best of luck with that.
As you move further down the chain, FreeBSD, being POSIX compliant whenever possible, will pass on the request for a synchronous write all the way to the disk. Send a block to a SATA or SAS drive and it will initially be cached, right? The write will then complete and the data actually written in the background while the rest of the system zips along. Except that it then issues a SATA or SAS “flush cache” command and waits until everything in its cache has been committed.
In tests this paranoid behaviour lead to running at 20% throughput or less.
Now, if you’re backing an emulated Windows disk you’re always at risk of data corruption, because FAT and NTFS are corruptable. And, dare I say it, crash rather too often. Let’s face it, if you’re worried about stuff like that you wouldn’t be running Windows – never mind as a VM, So lets be sensible about it.
So why was I reading the nfsd code? Well the obvious answer to this performance problem would be to simply ignore NTFS commit commands coming from the client. This is better than killing off all synchronous writes using the tunable vfs.zfs.cache_flush_disable because ZFS itself might be updating its uberblock and have a valid reason for doing it.
My plan was to hack the code – I’ve seen this done elsewhere. But wanting to do things properly I thought I should make it a system tunable. So I took a look at where the synchronous writes were happening – vdev_disk.c and vdev_geom.c (depending on whether you were hitting the raw drive or the GEOM). Lo and behold there was a global called nfs_sync that was compared along with the SYNC flag, and if either were true the sync request was ignored. So where did nfs_async come from? Digging further back it comes from nfs_nfsdserv.c , where it’s set by a system tuneable – vfs.nfsd.async. Now that’s an interesting name! Follow the stable auto variable in nfsrvd_write() and the nfs_async global if you want to see what I’m on about.
A quick Google for vfs.nfsd.async revealed – nothing. I seem to have found another useful tunable that’s yet to be documented. although it’s been in the source since at least 10.0. So I’ll get on to documenting after I’ve done a few more tests.
But if you’re having Windows/NFS problems, especially with ESXi, try setting vfs.nfsd.async instead of crudely disabling cache flushing with vfs.zfs.cache_flush_disable. Let me know how you get on.
Incidentally, you can disable synchronous writes to a dataset using the “sync=disabled” ZFS option. It helps, but not much. I’m still digging to find out why.
Or you could just use Virtualbox instead.